Quantcast
Channel: TechNet Blogs
Viewing all 36188 articles
Browse latest View live

マイクロソフト認定資格を活用して募集中の求人情報にアクセス (更新)【11/10更新】

$
0
0

(この記事は2018年10月15日にMicrosoft Learning blogに掲載された記事Unlock Active Job Postings with Your Microsoft Certification (updated)の翻訳です。最新情報についてはリンク元のページをご参照ください。)


: Acclaim プラットフォームは現在 Credly から提供されています。

マイクロソフト認定資格をお持ちの方で IT 分野の求人をお探しなら、Credly Acclaim プラットフォームで発行されるデジタル バッジをご活用ください。習得したスキルや認定資格に応じてリアルタイムの求人データ (募集中の求人情報、応募条件、給与の目安など) にアクセスできます。以前にも Acclaim プラットフォームの求人データを検索したことがあるという方も、この機会にもう一度ご覧になってみてください。今年に入ってから検索結果が最適化されています。

Credly の Acclaim プラットフォームには、Gartner TalentNeuron™ との提携によりリアルタイムの求人データが掲載されます。データは、25,000 以上の世界中の求人サイトや企業の採用ページ、米国国勢調査局、米国労働統計局から 24 時間年中無休で収集、更新されています。皆様が合格された試験や取得された認定資格の対象となっているスキルに応じて、募集中の求人データと職務内容が表示されます。こちらの動画 (英語) で、求人データがどのように掲載されているのかご覧ください。

それでは、具体的な操作手順をご説明しましょう。ここでは例として、新しい職務別の認定資格である Microsoft Certified: Azure Administrator Associate (英語) で募集されている求人データを取り上げます (ページ下部の 1 番目のスクリーンショット。クリックで拡大)

  • 右側のパネルの [RELATED JOBS] の下に表示されている [VIEW DETAILS] をクリックすると、米国での求人情報 (執筆時点で 193,115 ) が表示されるほか、募集件数の多い勤務地や企業の順にフィルタリングされた結果も確認できます (下部の 2 番目のスクリーンショット)
  • [SKILLS] の下に表示される [Azure] などのスキルをクリックすると、そのスキルに関連した米国での求人情報 (執筆時点で 39,066 ) が表示されます (3 番目のスクリーンショット)

どちら場合でも、いずれかの [JOB TITLE] (23 番目のスクリーンショット) をクリックすると、それぞれの役職で募集中の求人情報へのリンクが表示されるほか、給与の目安も確認できます。求人情報は、勤務地、募集企業、関連スキル別でも募集件数の多い順で表示されます。また、国 (オーストラリア、ブラジル、カナダ、インド、英国、米国) と州によって求人データをフィルタリングすることもできます。今後、ニーズに応じて他の国も追加される予定です。

後でご案内するクイック アクセス リンクからは、特に需要の高い認定資格に関連する求人データにアクセスできます。また、すべてのマイクロソフト バッジに関連する求人データには、こちら (英語) からアクセスできます。

Acclaim プラットフォームのアカウントでバッジを受け取ると、求人データ以外にも、取得した認定資格に基づいて推奨される今後の試験や認定資格を確認することができます。バッジの受け取りは、Credly Acclaim プラットフォームから送られてくる通知を通じていつでも行うことができます。通知メールを削除してしまった場合は、Acclaim プラットフォームのサイト (英語) にアクセスし、右上のプロフィール アイコンをクリックして、以前にマイクロソフトに登録したメール アドレスを使用してアカウントを作成してください。バッジの受け取りに関してお困りの方は、Credly のサポート チーム (英語) にご連絡ください。バッジを受け取り、今すぐ新しい求人データにアクセスしましょう。プラットフォームのご利用に関するご意見もお待ちしております。

*デジタル バッジ プログラムについては、ブログ記事「デジタル バッジの申請方法と活用すべき理由 (更新)」をご覧ください。

Acclaim プラットフォームでバッジを受け取れる新しい職務別の認定資格や、主な MCSE および MCSD 認定資格へのクイック アクセス
https://www.youracclaim.com/org/microsoft-certification/badge/microsoft-certified-azure-administrator-associate (英語)
https://www.youracclaim.com/org/microsoft-certification/badge/mcse-cloud-platform-and-infrastructure-certified-2018 (英語)
https://www.youracclaim.com/org/microsoft-certification/badge/mcse-productivity-certified-2018 (英語)
https://www.youracclaim.com/org/microsoft-certification/badge/mcse-data-management-and-analytics-certified-2018 (英語)
https://www.youracclaim.com/org/microsoft-certification/badge/mcse-business-applications-certified-2018 (英語)
https://www.youracclaim.com/org/microsoft-certification/badge/mcsd-app-builder-certified-2018 (英語)


Microsoft Certified: Azure Administrator Associate に関連するすべての求人情報

Microsoft Certified: Azure Administrator Associate の対象スキルである Azure に関連する求人情報


Top Contributors Awards! RDS Remote Desktop Client Disconnect Codes and Reasons and many more!

$
0
0

Welcome back for another analysis of contributions to TechNet Wiki over the last week.

First up, the weekly leader board snapshot...


As always, here are the results of another weekly crawl over the updated articles feed.


Ninja Award Most Revisions Award
Who has made the most individual revisions


#1 George Chrysovaladis Grammatikos with 55 revisions.


#2 Dave Rendón with 45 revisions.


#3 Peter Geelen with 43 revisions.


Just behind the winners but also worth a mention are:


#4 RajeeshMenoth with 15 revisions.


#5 Richard Mueller with 13 revisions.


#6 Jayendran arumugam with 12 revisions.


#7 Stephan Bren with 10 revisions.


#8 DBS14 with 10 revisions.


#9 Nonki Takahashi with 6 revisions.


#10 Ramakrishnan Raman with 5 revisions.


Ninja Award Most Articles Updated Award
Who has updated the most articles


#1 Dave Rendón with 16 articles.


#2 RajeeshMenoth with 14 articles.


#3 Peter Geelen with 13 articles.


Just behind the winners but also worth a mention are:


#4 George Chrysovaladis Grammatikos with 9 articles.


#5 Jayendran arumugam with 7 articles.


#6 Richard Mueller with 6 articles.


#7 Nonki Takahashi with 3 articles.


#8 serg_23 with 1 articles.


#9 Sameer Mhaisekar with 1 articles.


#10 Tasita Ebacher [MSFT] with 1 articles.


Ninja Award Most Updated Article Award
Largest amount of updated content in a single article


The article to have the most change this week was Outlook and Outlook for Mac: Update File Versions, by Tasita Ebacher [MSFT]

This week's reviser was Tasita Ebacher [MSFT]


Ninja Award Longest Article Award
Biggest article updated this week


This week's largest document to get some attention is RDS Remote Desktop Client Disconnect Codes and Reasons, by jagilber

This week's revisers were Dave Rendón & George Chrysovaladis Grammatikos


Ninja Award Most Revised Article Award
Article with the most revisions in a week


This week's most fiddled with article is Azure Logic Apps: Implementing Message Content Enricher Patterns with Cloud Databases in Integration Account Maps (part 3), by DBS14. It was revised 10 times last week.

This week's revisers were DBS14 & George Chrysovaladis Grammatikos


Ninja Award Most Popular Article Award
Collaboration is the name of the game!


The article to be updated by the most people this week is Microsoft Exchange Troubleshooting: Problemas de Autenticação, by FÁBIOFOL

This week's revisers were RajeeshMenoth, Dave Rendón, Peter Geelen & Jayendran arumugam


Ninja Award Ninja Edit Award
A ninja needs lightning fast reactions!


Below is a list of this week's fastest ninja edits. That's an edit to an article after another person


Ninja Award Winner Summary
Let's celebrate our winners!


Below are a few statistics on this week's award winners.

Most Revisions Award Winner
The reviser is the winner of this category.

George Chrysovaladis Grammatikos

George Chrysovaladis Grammatikos has won 28 previous Top Contributor Awards. Most recent five shown below:

George Chrysovaladis Grammatikos has not yet had any interviews, featured articles or TechNet Guru medals (see below)

George Chrysovaladis Grammatikos's profile page

Most Articles Award Winner
The reviser is the winner of this category.

Dave Rendón

Dave Rendón has been interviewed on TechNet Wiki!

Dave Rendón has won 70 previous Top Contributor Awards. Most recent five shown below:

Dave Rendón has TechNet Guru medals, for the following articles:

Dave Rendón has not yet had any featured articles (see below)

Dave Rendón's profile page

Most Updated Article Award Winner
The author is the winner, as it is their article that has had the changes.

Tasita Ebacher [MSFT]

Tasita Ebacher [MSFT] has won 4 previous Top Contributor Awards:

Tasita Ebacher [MSFT] has not yet had any interviews, featured articles or TechNet Guru medals (see below)

Tasita Ebacher [MSFT]'s profile page

Longest Article Award Winner
The author is the winner, as it is their article that is so long!

jagilber

jagilber has won 3 previous Top Contributor Awards:

jagilber has not yet had any interviews, featured articles or TechNet Guru medals (see below)

jagilber's profile page

Most Revised Article Winner
The author is the winner, as it is their article that has ben changed the most

DBS14

DBS14 has won 8 previous Top Contributor Awards. Most recent five shown below:

DBS14 has TechNet Guru medals, for the following articles:

DBS14 has not yet had any interviews or featured articles (see below)

DBS14's profile page

Most Popular Article Winner
The author is the winner, as it is their article that has had the most attention.

FÁBIOFOL

FABIOFOL has won 5 previous Top Contributor Awards:

FABIOFOL has not yet had any interviews, featured articles or TechNet Guru medals (see below)

FABIOFOL's profile page

Ninja Edit Award Winner
The author is the reviser, for it is their hand that is quickest!

Richard Mueller

Richard Mueller has been interviewed on TechNet Wiki!

Richard Mueller has featured articles on TechNet Wiki!

Richard Mueller has won 239 previous Top Contributor Awards. Most recent five shown below:

Richard Mueller has TechNet Guru medals, for the following articles:

Richard Mueller's profile page


 Says: Another great week from all in our community! Thank you all for so much great literature for us to read this week!

Please keep reading and contributing, because Sharing is caring..!!


Best regards,


Azure Marketplace と AppSource へのリスティング登録に必要な手順の解説【11/11 更新】

$
0
0

FY19 最新のマイクロソフト販売エコシステムとは」でも触れました通り、マーケットプレースは、貴社がマイクロソフトの力を使って世界中にいる購買者に対して広く認知を広げる仕組みとして活用することができます。貴社が知的財産 (IP) となるようなアプリを持っている場合から、コンサルティングサービスや展開サービスなどのサービスを行っている場合など、いずれの場合でもマーケットプレースにご登録いただくことができます。

また今後、OCP Catalog もAppSource に統合されるなど、マイクロソフトとの共同販売 (Co-Sell) を実施するにあたっても重要な位置を占めます。Azure Marketplace または AppSource への登録は、FY19 より共同販売を行う上での要件 (Co-Sell Ready 要件) の1つにもなっていますので、この機会に貴社のアプリケーション/サービスをぜひ Azure Marketplace や AppSource にご登録ください。掲載方法の詳細は「クラウド マーケットプレース パブリッシャーになる」の記事、および関連資料をご覧ください。

マーケットプレースリスティングを最適化すべき 10 の理由

  1. リードを新規獲得する
  2. 購入サイクル中に無料試用版を提供する
  3. 見込み客から購買者へのコンバートを加速化させる
  4. 販売コストを下げる
  5. グローバル市場で戦える
  6. Microsoft のマーケティングやブランド認知のための投資を利用できる
  7. Microsoft チームメンバーが簡単に貴社ソリューションを他社と共有できるようにする
  8. 主な競争力や該当分野の専門知識を証明できる
  9. 信用を高める
  10. 新製品やサービスの市場機会をテストおよび検証する


Azure Marketplace と AppSource の位置づけ

Azure Marketplace と AppSource は、掲載するアプリケーションやサービスが対象としているエンドユーザーが異なっています。Azure Marketplace はクラウド開発者および IT 管理者向けです。Azure Marketplace は Web ポータルや Azure 管理ポータルにも表示されるため、主に Azure を直接触っている人に向けたサービスです。一方、AppSource はビジネスユーザーをターゲットとしています。これらのポータルに掲載するには、クラウドパートナーポータル (CPP) という単一のポータルに申請をすることで両方とも掲載することが可能です。クラウド開発者、IT 管理者、ビジネスユーザーの全てに対応したアプリケーションおよびサービスであれば、ひとつの申請で両方のポータルに掲載することも可能です。


リスティングだけでもOK。3つの公開オプション

これらのポータルに掲載するには、アプリケーションやサービスを対応させる必要があるのではないかと思っている方もいらっしゃると思います。実は、「リスティング」というオプションがあり、特別な対応を行わなくても気軽に掲載することが可能です。

  • リスティング
  • 体験版
  • 販売


関連資料


Resource Center in Project Online doesn’t show any data related to resource availability

$
0
0

Lately, I have started receiving requests from many of my customers related to the Resource/Project Managers not being able to see the data of resources in Resource Center page of Project Online.

When the data doesn't appear in the Resource Center, the Resource Center screen does not provide any error code nor a reason related to why the data is not being made available.

Let's dive deep into this scenario, cause and learn more about the solution of the reported issue.

Scenario

  • In the screen capture below, please note that the Test Resource has a lot of assignments made against it.


  • While looking at the Resource Center Page, a resource in question does not show any assignments.


  • Similar thing can also be noticed in the Remaining Availability/Capacity Planning page.


Cause

This behavior is noticed when the Timephased Data option is selected as 'Never' under Server Settings (PWA Settings) -> Enterprise Data -> Reporting section.


Resolution

Under Server Settings (PWA Settings) -> Enterprise Data -> Reporting, change this option to 'Daily', 'Weekly', 'Monthly' or 'By fiscal period' and click on Save.


Once it is Saved, ensure that you Publish a Project in question (or all the Projects) and check the behavior.

To know more about this feature you can go through a very informative blog of Brian Smith here.

I hope this post helps to see the Resource Availability data in Resource Center/Capacity Planning page of Project Online. 

SQL Server 2014 Service Pack 3 をリリース

$
0
0


執筆者: SQL Server Engineering Team

このポストは、2018 年 10 月 30 日に投稿された SQL Server 2014 Service Pack 3 is now Available!!! の翻訳です。


このたび、SQL Server 2014 Service Pack 3 (SP3) がリリースされました。SQL Server 2014 SP3 には、お客様や SQL コミュニティからのフィードバックに基づくパフォーマンス、スケーラビリティ、診断関連の 25 以上の機能強化が追加されています。今回の機能強化により、SQL Server 2014 を最新のハードウェア設計で実行した場合にパフォーマンスが高速化し、事前設定不要でスケーリングできます。今回のリリースは、SQL 製品チームによる継続的な価値提供の取り組みの成果でもあります。今回のリリースに関する詳細については、KB4022619 をご覧ください。

以下に、SQL 2014 SP3 で導入された機能強化の詳細をご紹介します。

SQL 2014 SP3 の機能強化

  • ディストリビューション データベースのクリーンアップ手順の改善: ディストリビューション データベース テーブルのサイズが過度に大きい場合に、ブロックやデッドロックが発生していました。今回のクリーンアップ手順の改善は、このようなブロックやデッドロック シナリオの一部を解消することを目的としています。
  • Change Tracking のクリーンアップ: Change Tracking のサイド テーブルのクリーンアップのパフォーマンスと効率が向上しました。
  • Resource Governor で CPU タイムアウトを設定して要求をキャンセル: クエリ要求の処理を改善するために、CPU のしきい値に達した場合に要求がキャンセルされるようになりました。
  • SELECT INTO を使用して目的のファイル グループにターゲット テーブルを作成: SQL Server 2014 SP3 より、T-SQL 構文の SELECT INTO では、ON <ファイル グループ名> キーワードを使用して、ユーザーの既定のファイル グループ以外のファイル グループにテーブルを読み込むことができます。
  • 大容量メモリ マシンでのデータベースのバックアップ パフォーマンスの向上: SQL Server 2014 SP3 では、バックアップ時の進行中の I/O をドレインする方法が最適化され、中小規模のデータベースのバックアップ パフォーマンスが大幅に向上しました。たとえば、2 TB のマシンでシステム データベースのバックアップを実行した場合には、パフォーマンスが 100 倍以上に向上しています。データベースのサイズが大きくなるにつれて、このパフォーマンス向上率は低くなります。これは、バッファー プールの反復処理に比べて、バックアップ対象のページが増え、バックアップ I/O に時間がかかるためです。今回の機能強化により、大容量メモリを備えたハイエンド サーバーで複数の小規模なデータベースをホストしているお客様のバックアップ パフォーマンスが向上します。
  • 圧縮バックアップのデータベース復元パフォーマンスの向上: SQL Server 2014 SP3 では、バックアップが圧縮されている場合に 4K セクター ボリュームでの復元パフォーマンスが向上しました。
  • 統計の作成/更新における MAXDOP オプションのサポート: 今回の機能強化により、統計の CREATE/UPDATE ステートメントに MAXDOP オプションを指定できるようになりました。また、すべての種類のインデックスについて、作成または再構築の一部として統計が更新される場合に適切な MAXDOP 設定が使用されていることを確認できます (MAXDOP オプションが存在する場合)。
  • 増分統計の自動更新の改善: 特定のシナリオにおいて、テーブル内の複数のパーティションで多数のデータ変更が行われ、増分統計の変更カウンターの合計値が自動更新のしきい値を超えたものの、個々のパーティションでは自動更新のしきい値を超えていない場合に、テーブルに対してさらに多数の変更が加えられるまで統計の更新が遅延する可能性があります。この現象は、トレース フラグ 11024 で修正されました。


サポート性と診断の機能強化

  • sys.databases is_encrypted 列の更新により TempDB の暗号化状態を正確に反映: すべてのユーザー データベースの暗号化をオフにしてから SQL Server を再起動しても、sys.databases の is_encrypted 列の TempDB の値は 1 になります。この場合、TempDB の暗号化が解除されたため、本来であればこの値は 0 になるはずです。SQL Server 2014 SP3 より、sys.databases.is_encrypted に TempDB の暗号化状態が正確に反映されるようになりました。
  • 新しい DBCC CLONEDATABASE オプションを使用して検証済みクローンとバックアップを生成: SQL Server 2014 SP3 では、DBCC CLONEDATABASE の 2 つの新しいオプションを使用して、a) 検証済みクローンと b) バックアップ クローンを作成できます。WITH VERIFY_CLONEDB オプションを使用してクローン データベースを作成すると、一貫性のあるデータベース クローンが作成、検証されます。このクローンはマイクロソフトによってサポートされ、運用環境で使用できます。今回、クローンが検証済みであるかどうかを確認する新しいプロパティ、SELECT DATABASEPROPERTYEX(‘clone_database_name’, ‘IsVerifiedClone’) が導入されました。BACKUP_CLONEDB オプションを使用してクローンを作成すると、データ ファイルと同じフォルダーにバックアップが作成されます。これにより、クローンを別のサーバーに移動したり、Microsoft CSS に送信してトラブルシューティングを行ったりすることが容易になります。
  • TempDB のバージョン ストアの領域の使用率を監視する新しい DMV: この新しい DMV は、DBA が TempDB のバージョン ストアの使用率を監視する場合に便利です。パフォーマンスを犠牲にしたり、運用環境サーバーで実行する負担を発生させたりすることなく、データベースごとのバージョン ストアの使用率の要件に基づいて TempDB のサイジングをプロアクティブに計画することができます。
  • レプリケーション エージェントの完全なダンプのサポート: レプリケーション エージェントで処理不能な例外が発生した場合、既定では例外の症状のミニ ダンプが作成されます。これにより、処理不能な例外のトラブルシューティングが非常に困難になります。今回の変更により、レプリケーション エージェントの完全なダンプを作成できる新しいレジストリ キーが導入されます。
  • DBCC CLONEDATABASE での Service Broker のサポート: DBCC CLONEDATABASE コマンドの強化により、SSB オブジェクトのスクリプト作成が可能になりました。
  • XEvent の強化による可用性グループの読み取りルーティング エラーのサポート: XEvent の read_only_route_fail は現在、ルーティング リストが存在するものの、ルーティング リストに含まれるすべてのサーバーが接続できない場合にのみ発生します。今回の機能強化では、トラブルシューティングに役立つ詳細情報が追加されたほか、この XEvent が発生するコード ポイントが拡張されました。
  • トランザクション ログ情報を監視する新しい DMV: SQL Server 2014 SP3 では、sys.dm_db_log_stats と sys.dm_db_log_info という 2 つの新しいトランザクション ログ用の DMV が導入されました。これらの DMV を使用すると、トランザクション ログに関する潜在的な問題を監視、警告、回避することができます。
  • dm_db_log_stats: ログに関する概要レベルの情報を返します。
  • dm_db_log_info: DBCC LOGINFO と類似した VLF 情報を表示します。
  • sys.dm_os_sys_info DMV のプロセッサ情報: sys.dm_os_sys_info DMV に 3 つの新しい列が追加され、socket_count、cores_per_numa などのプロセッサ関連情報が表示されるようになりました。
  • sys.dm_db_file_space_usage のエクステントの変更情報: sys.dm_db_file_space_usage に新しい列が追加され、前回の完全バックアップ以降に変更されたエクステントの数を追跡できるようになりました。
  • ディストリビューション データベースへの適切な互換性レベルの設定: Service Pack のインストール後に、ディストリビューション データベースの互換性レベルが 90 に変更されます。これは、sp_vupgrade_replication ストアド プロシージャのコード パスが原因でした。今回、Service Pack が変更され、ディストリビューション データベースに適切な互換性レベルが設定されるようになりました。
  • 前回の正常な DBCC CHECKDB 情報を表示: プログラミングによって前回の正常な DBCC CHECKDB が実行された日付を返すことができる新しいデータベース オプションが追加されました。これにより、DATABASEPROPERTYEX([database], ‘lastgoodcheckdbtime’) というクエリを実行して、指定したデータベースで前回の正常な DBCC CHECKDB が実行された日付/時刻を表す単一の値を取得できるようになりました。
  • SQL Server 2014 SP3 の Deadlock Graph でデータベース名を表示
  • Showplan XML に新しい属性 EstimateRowsWithoutRowgoal を追加: クエリ オプティマイザーで “row goal” ロジックを使用している場合に使用できます。
  • 実際の Showplan XML の拡張により UdfCpuTime と UdfElapsedTime を追加: スカラー ユーザー定義関数の実行に要した時間を追跡できるようになりました。
  • 補助文字の照合順序を使用するデータベースでのレプリケーションのサポート: 補助文字の照合順序を使用するデータベースでレプリケーションがサポートされました。
  • 可用性グループのフェールオーバーにおける Service Broker の適切な処理: 現在の実装では、可用性グループ データベースに対して Service Broker が有効になっている場合、プライマリ レプリカで開始されたすべての Service Broker 接続が可用性グループのフェールオーバー中に開かれたままになります。今回の機能強化は、そのような可用性グループのフェールオーバー中に開かれている接続をすべて切断することを目的としています。
  • レプリケーション エージェントの一部のプロファイル パラメーターの動的な再読み込み: レプリケーション エージェントの現在の実装では、エージェントのプロファイル パラメーターを変更する場合にエージェントを停止してから再起動する必要があります。今回の機能強化により、レプリケーション エージェントを再起動することなく、パラメーターを動的に再読み込みできるようになりました。
  • メモリ許可/使用量の診断の改善: 新しい XEvent の query_memory_grant_usage を使用できます。
  • Showplan XML の診断の拡張: Showplan XML の拡張により、メモリ部分に関する情報が表示されるようになりました。これにより、入れ子になったループ結合、CPU 時間、経過時間を最適化できます。
  • sys.dm_sql_referenced_entities DMV に新しい列を追加: SQL Server 2008 と下位互換性のある try-catch シナリオを実行できるようになりました。

SQL Server 2014 SP3 には、SQL Server 2014 SP2 累積更新プログラム 13 (CU13) までの SQL Server 2014 の累積更新プログラムで提供されるソリューションが含まれています。

このサービス パックは、Microsoft ダウンロード センターから入手できるほか、Microsoft Update カタログ、MSDN、Evaluation Center、MBS/PartnerSource、VLSC からもダウンロードできます。お客様に優れたソフトウェアを提供するための継続的な取り組みの一環として、今回のアップグレードは SQL Server 2014 を既にデプロイしているすべてのお客様にご利用いただけます。


SQL Server 2014 SP3 を入手するには、以下のリンクをご利用ください。

最後までお読みいただきありがとうございました。
Microsoft SQL Server エンジニアリング チーム


Office 365 Weekly Digest | November 4 – 10, 2018

$
0
0

Welcome to the November 4 -10, 2018 edition of the Office 365 Weekly Digest.

Last week, ten features were added to the Office 365 Roadmap, most for SharePoint Online with others for Teams, Microsoft Bookings and Outlook. Also of note is Google G Suite to Office 365 migration that will allow for direct migration of email, contacts and calendar from Google G Suite to Office 365.

The Teams trend continues with more events over the next few weeks. New this week is a Power BI webinar on improving your data modeling skills. The Windows 10, Version 1809 webinar and Ask Microsoft Anything events have been rescheduled to November 28th and December 13th, respectively. Details are provided in the "Upcoming Events" section below.

Blog posts in last week's roundup include a round up of what's new in Teams, migrating content to Microsof Teams using the SharePoint Migration Tool, a recap of OneDrive Message Center updates for the second half of October, updates for Microsoft Flow, PowerApps and AI features in Microsoft Word.

Noteworthy item highlights include a new Outlook Mobile Customer Adoption Pack, the October 2018 release details for Office 365 on Windows Desktop, and the latest Microsoft Mechanics episode detailing the steps of Modern Desktop Deployment. In addition, information on the end of extended support for SharePoint Server 2010 is provided, along with several options for migrating to the cloud or to the latest on-premises version of SharePoint.


OFFICE 365 ROADMAP


Below are the items added to the Office 365 Roadmap last week…


Feature ID

App / Service

Title Description

Status

Added

Estimated Release

More Info
43717

Outlook Web

Outlook on the web - option to sign in through outlook.com We want to simplify how Office 365 users sign in to Outlook on the web. People with an Office 365 account that use Outlook on the web can now sign-in to their work/school accounts using https://www.outlook.com. Outlook will redirect to the org's sign in page and populate the email address and follow the org's current sign in process.

In development

11/06/2018

November CY2018

n / a
43758

Teams

Support for Oracle SBCs in Direct Routing Direct Routing allows customers to connect their voice trunks to Office 365. This feature requires certified Session Border controllers. Oracle SBCs are in the process of being certified and we expect the first SBC to be certified this quarter, Q4-CY19.

In development

11/07/2018

December CY2018

Session Border Controllers certified for Skype for Business
43751

Bookings

Microsoft Bookings - new service hours experience New and more options to customize your business service hours in Microsoft Bookings, including seasonal availability. You can create multiple rules to better customize your bookable hours.

In development

11/07/2018

November CY2018

n / a
43774

SharePoint

SharePoint pages: custom thumbnails and descriptions You will now be able to choose both a new thumbnail and page description within page details: Previously, modern pages would automatically select the first image and generate a description for a page to use in search, highlighted content, and SharePoint News. Now you can customize these components to further manage how they appear in various places to your viewers.

In development

11/08/2018

November CY2018

Build your modern intranet with SharePoint in Office 365
43777

SharePoint

SharePoint web part: personalized web parts Give a personalized experience to your site and page visitors – so they see the content that is theirs, and meant for them to experience. When using personalized web parts, people will see their recent sites, their recent documents and news tailored for them. You can personalize any page or news article. When you add a personalized web part to the page, it is aware of who is signed in and gives them a unique, relevant experience to the content and information you are promoting to them.

In development

11/08/2018

November CY2018

Build your modern intranet with SharePoint in Office 365
43778

SharePoint

SharePoint web part: YouTube embeds A picture is worth a thousand words. A YouTube video can be worth a million. And it's best if it's not just a link out to the Web, but rather a playable video that sits right beside the additional context you want to surround it. You can add a video from YouTube by pasting the share link provided by YouTube. We've added a YouTube icon to make this more apparent in the toolbox.

In development

11/08/2018

November CY2018

Build your modern intranet with SharePoint in Office 365
43779

SharePoint

SharePoint web part: use lists with quick Charts web part The Quick Charts web part now allows you to select a list on the current site to use for your data to be visualized, instead of manually entering the data.

In development

11/08/2018

November CY2018

Build your modern intranet with SharePoint in Office 365
43780

SharePoint

SharePoint web part: code snippet The Code Snippet web part allows authors to share code snippets, with correct syntax, for many commonly supported development languages, on their modern pages.

In development

11/08/2018

November CY2018

Build your modern intranet with SharePoint in Office 365
43781

SharePoint

SharePoint sites: updated "Change the look" panel This "Change the look" panel update includes a new tab interface for the various site settings: theme, header, navigation and footer - all accessible inline as a site owner in a right fly-out edit pane.

In development

11/08/2018

November CY2018

Build your modern intranet with SharePoint in Office 365
43782

Office 365

Exchange

Google G Suite to Office 365 migration We've heard the feedback and we're excited to announce the new G Suite migration experience which will allow you to directly migrate email, calendar and contacts from Google G Suite to Office 365! Our highly secure solution ensures your data is directly migrated to Office 365, with no resting points along the way. We're also adding support for migrating mailbox in batches.

In development

11/08/2018

Q2 CY2019

n / a


UPCOMING EVENTS


Teams Tuesdays

When: Tuesday, November 13, 2018 from 10am – 11am PT | Whether you're managing a new project or starting your own business, it helps to have a team behind you to brainstorm ideas, tackle the work together, and have some fun along the way. Now you can use Microsoft Teams to do just that. Join our team LIVE every Tuesday from 10-11am PDT to learn how you can get started with the free version of Teams. In this hour, we'll walk you through the product and key features, share best practices for getting started, and answer any questions you may have. We look forward to meeting you!


Getting Started with Microsoft Teams

When: Tuesday, November 13, 2018 at 10am PT | This 60-minute session introduces you to the key activities needed to get started with Microsoft Teams today. From setting your profile, to running a meeting, users will leave this session with the foundation needed to use Teams with confidence. Check here for sessions in different time zones and other dates.


Upgrade 101: Understanding your upgrade from Skype for Business to Microsoft Teams

When: Tuesday, November 20, 2018 at 10am PT | Looking to better understand the upgrade journey from Skype for Business to Microsoft Teams? Join us for this 60-minute session to get familiar with our upgrade paths (Upgrade Basic and Upgrade Pro), our resources, and a walkthrough of our upgrade success framework to help you navigate through your journey. Check here for sessions in different time zones and other dates.


Strengthen Your Data Modeling Skills with Power BI

When: Tuesday, November 20, 2018 at 11am PT | Register for this webinar to take your Power BI modeling skills to the next level. Learn about the Power BI in-memory analytics engine, strategies for creating and managing data relationships, and how to use Data Analysis Expressions (DAX) filter context. Find out how to master any modeling challenge with Power BI or Azure Analysis Services. You'll also learn how to: (1) Load, store, and analyze data in Power BI, (2) Define business rules and calculations using DAX, and (3) Use DirectQuery to connect directly to data sources.


Make the switch from Skype for Business to Microsoft Teams: End User Guidance

When: Wednesday, November 21, 2018 at 1pm PT | Designed specifically for Skype for Business end users, this course offers everything you need to help make the transition to Microsoft Teams. We'll focus on the core communication capabilities you use today, chat and meetings, as well as provide an orientation to additional collaboration functionality Teams has to offer. Check here for sessions in different time zones and other dates.


[Rescheduled] Webinar: What's new in Windows 10, version 1809 for IT pros

When: Wednesday, November 28, 2018 at 10am PT | As an IT professional, you have a lot on your plate. You're managing corporate- and user-owned devices, deploying feature and quality updates, identifying and resolving compatibility issues, and more. Windows 10, version 1809 includes features that can help you simplify upgrade planning, identify and resolve compatibility blockers, monitor update compliance, and remediate end user impacting issues so you can get your job done with less frustration. Join this webinar to: (1) Discover how you can move away from traditional, image-based deployment with Windows Autopilot, (2) Learn about the steps you can take right away to better protect user identities, devices, and information, and (3) Find out how you can create more secure, scalable, and reliable desktop virtualization solutions that integrate with your modern desktop. | Resource: What's new in Windows 10, version 1809 for IT pros


[Rescheduled] Ask Microsoft Anything (AMA): Windows 10, version 1809 for IT Pros

When: Thursday, December 13, 2018 at 9am PT | If you're in IT, make sure you join us Thursday, December 13th to get up to speed and get your questions answered about Windows 10, version 1809. An AMA is a live online event similar to a "YamJam" on Yammer or an "Ask Me Anything" on Reddit. We've assembled a group of engineers and product managers from the Windows, Window Defender ATP, System Center Configuration Manager, Microsoft Intune, Microsoft Edge, and Microsoft 365 teams—and we'll be answering your questions live during what promises to be an exciting and informative "Ask Microsoft Anything" (AMA) event. Join in the Windows 10 AMA space, or add it to your calendar. We look forward to seeing you there!


BLOG ROUNDUP


What's new in Microsoft Teams – November round up

Microsoft Teams, the hub for teamwork in Office 365, continues to bring new capabilities to empower teams and organizations to achieve more. With new features like Drive Mode and Quiet Hours, users can enjoy enhanced experiences while commuting or engaging in non-work-related activities. Additionally, new functionality for admins such as creating teams based on dynamic group membership, reduces the overhead of manually updated team membership. There were also new third-party app integrations with Confluence Cloud, Meekan, Jira Cloud and more! Improved presence for Coexistence Mode brings a more accurate display of status to others in organizations during coexistence as organizations transition from Skype for Business to Teams.

Related:


ICYDK Microsoft Teams Migration with the SharePoint Migration Tool

Designed to simplify your journey to the cloud through a free, simple, and fast solution, the SharePoint Migration Tools enables you to migrate content from on-premises SharePoint sites and shares to SharePoint, OneDrive, and Microsoft Teams in Office 365. Using the SharePoint Migration Tool, you can quickly bring your most important content to Microsoft Teams to create a more open, digital environment. Since each team in Microsoft Teams has a team site in SharePoint Online, the SharePoint Migration Tool provides a quick and simple solution to bringing your files to Microsoft Teams in Office 365.


OneDrive Message Center Updates October 16 - 31, 2018

The team has been hard at work and we have some great new updates coming in November that you might be interested in! This month, we will be releasing the next version of the OneDrive mobile apps (on both iOS and Android) with support for new Mobile Capture scenarios and intelligent meeting note sharing. The Word, Excel and PowerPoint mobile apps will ship the common sharing dialog as well. On the web, we are releasing the new Recent and the new Manage Access experiences. Finally, we're making some updates to the Access Request Outlook Actionable Messages. All of these features will start arriving in your organization in November. We are also announcing deprecation plans for the OneDrive application on Mac OS X Yosemite (10.10) & El Capitan (10.11).


Solutions in Microsoft Flow

In a recent announcement, Microsoft shared news about a new Application Lifecycle Management (ALM) capability for PowerApps and Microsoft Flow. This new capability is built upon the Common Data Service solution system. In this blog post, we will share more details about how Microsoft Flow makers can use Solutions to bundle related flows (and apps) within a single deployable unit. | Related: Solutions in Power Apps | Introducing Mobile Application Management (MAM) support for Microsoft Flow Mobile Application


Collaborate with others and keep track of to-dos with new AI features in Word

Focus is a simple but powerful thing. When you're in your flow, your creativity takes over, and your work is effortless. When you're faced with distractions and interruptions, progress is slow and painful. And nowhere is that truer than when writing. Word has long been the standard for creating professional-quality documents. Technologies like Editor—Word's AI-powered writing assistant—make it an indispensable tool for the written word. But at some point in the writing process, you'll need some information you don't have at your fingertips, even with the best tools. When this happens, you likely do what research tells us many Word users do: leave a placeholder in your document and come back to it later to stay in your flow. We're starting to roll out new capabilities to Word that help users create and fill in these placeholders without leaving the flow of their work. For example, type TODO: finish this section or <<insert closing here>> and Word recognizes and tracks them as to-dos. When you come back to the document, you'll see a list of your remaining to-dos, and you can click each one to navigate back to the right spot. Over time, Office will use AI to help fill in many of these placeholders. In the next few months, Word will use Microsoft Search to suggest content for a to-do like <<insert chart of quarterly sales figures>>. You will be able to pick from the results and insert content from another document with a single click. These capabilities are available today for Word on the Mac for Office Insiders (Fast) as a preview. We'll roll these features out to all Office 365 subscribers soon for Word for Windows, the Mac, and the web.


NOTEWORTHY


Plan, deliver, and adopt Outlook for iOS and Android in your organization

Published: November 5, 2018 | Use the resources in the Outlook Mobile Customer Adoption Pack to make the most of Microsoft Outlook for iOS and Android for your organization. This adoption pack contains a wide range of customizable onboarding templates, flyers, and posters, that IT Pros, administrators, and trainers can use to roll out and drive the adoption of Outlook mobile to end users in their organization. Included in this pack: (1) Customizable onboarding email templates with links to demo video and installation instructions, and (2) Posters and flyers to drive buzz and excitement.


Announcing data residency in Canada for Microsoft Stream

Microsoft Stream is a global service and already widely in use by customers around the world. In our ongoing commitment to support local governments and other needs, we continue to enable more regions in which customers can store their Stream data. Towards this, we are excited to announce the option to store Microsoft Stream data in the Canada region. Starting September 24, 2018, any new Canada-based tenants automatically benefited from this new Stream region. At this time, content for customers in Canada already using Microsoft Stream prior to September 24, 2018 will remain in the region where it was originally stored. To determine the region in which your Stream data is stored,  click on the "?" in your Stream portal and then click on "About Microsoft Stream."


Office 365 for Windows Desktop - October 2018 release details

On October 30th, 2018, Microsoft released Office for Windows Desktop version 1810 (Build 11001.20074). Our Office International team translated this update into 44 languages. Here are some of our favorite new features that shipped in this release: (1) Insert animated 3D graphics into your Microsoft Word document. You can see T-Rex giving you the evil eye in your word document, and (2) In PowerPoint you can now change hand-drawn text and shapes into refined diagrams. You can also write over a shape with your pen and use the Ink to Text button to automatically convert your handwritten ink to typed text on the shape. More information and help content on this release can be found in the What's New in Office 365 page.


Microsoft Mechanics: User Communications and Training - Step 8 of Modern Desktop Deployment

Format: Video (8 minutes) | This is step 8 in the desktop deployment process - ensuring that your users are informed, ready and able to benefit from updates to Windows, Office and more. In this step, you'll learn about best practices for communicating to users, phased deployment to move at a measurable pace and pre-built user training for Office 365 via FastTrack's free Productivity Library. | Resource: Modern Desktop Deployment Center


Extended support for SharePoint Server 2010 ends in October 2020

This month marks the beginning of the 24-month countdown before SharePoint Server 2010 reaches end of extended support. It's not too late to start planning an upgrade or migration to the latest version of SharePoint whether your plans are on-premises, in the cloud, or somewhere in between. Mainstream support for SharePoint Server 2010 ends in October 2020. SharePoint Server 2010 has been on extended support since then, which means only security updates are released. On October 13, 2020, Microsoft will completely end support for SharePoint Server 2010. Here's what end of support means: (1) No critical updates where released in 2017 for SharePoint Server 2010 under extended support, (2) No security updates will be developed or released after end of support, and (3) More importantly the operating systems supporting SharePoint Server 2010 are reaching or have reached end of support.


BlogMS Microsoft Team Blogs – October 2018 Roll-up

Install and configure additional SPMAs

$
0
0

Install and configure additional SPMAs

Recently I was asked to connect multiple SharePoint farms to a single MIM 2016 instance. I had already followed the articles for  downloading and installing MIM and configuring the SPMA and ADMA.  I am making the assumption that you have already done this step and have a working MIM setup.

I Copied all my files to D:MIM

  1. Open up the MIM/FIM Synchronization Service.
  2. Click Management Agents
  3. Highlight SPMA then click Export Management agent on far right
  4. Save the XML file. Then click Import Management Agent and point to the saved XML file and click OPEN.
  5. Change the Name to SPMA_QA (or whatever you feel is a better descriptor). Click Next.
  6. Enter the information for the additional SharePoint CA. (Server, port, domain, User Name, Password) then click Next. You may now click next through the rest of the wizard as everything will be the defaults.
  7. Open SynchronizationRulesExtensions.cs located at D:MIMSharePointSynchronization to edit. I used NotePad.
  8. Look for ProvisionUPSA(mventry, "SPMA"); (Should be line 47) Copy this line and paste below it and change the SPMA to SPMA_QA. Close and save file.
  9. Open PowerShell ISE as admin and edit SharePointSynchronization.psm1 located at D:MIMSharePointSynchronization.
  10. Go to line 222/223 look for Start-ManagementAgent -Name SPMA –RunProfile (there should be 2 lines) Copy/Paste those two lines and change SPMA on those lines two SPMA_QA
  11. Go to line 229/23 look for Start-ManagementAgent -Name SPMA –RunProfile (there should be 2 lines) Copy/Paste those two lines and change SPMA on those lines two SPMA_QA.
  12. Go to line 244/246 look for Start-ManagementAgent -Name SPMA –RunProfile (there should be 3 lines) Copy/Paste those three lines and change SPMA on those lines three lines to SPMA_QA. Save script.
  13. Click the Green arrow in the top ribbon to load the script module.
  14. Now that the module is loaded. Run Publish-SynchronizationAssembly -Path D:MIMSharePointSynchronizationSynchronizationRulesExtensions.cs –Verbose this will recompile SharePointSynchronization.dll and update the directory C:Program FilesMicrosoft Forefront Identity Manager2010Synchronization ServiceExtensions.
  15. Run a full import

You can also Schedule Full and Incremental imports with task Scheduler.


Be Prepared with the New Playbooks in Dynamics 365 for Sales

$
0
0

Playbooks

Dynamics 365 for Sales is introducing Playbooks, a new capability to help you automate repeatable sales activities and respond to external events.

In the age of the customer, buyers have the upper hand in the relationship with sellers. With nearly limitless access to information, they can dictate their own customer journeys, rather than follow a predefined business process. It is thus important to move from a reactive process-driven data repository on systems of record to proactive and predictive event-driven guidance engines that can suggest next best actions and surface relevant sales activities to successfully respond to external events.

Playbooks provide users with guidance on recurring tasks in which consistent actions are expected. Playbooks can also contain best practices based on practices that have worked in similar situations before.

If a decision maker and top champion of the product leaves the organization in the middle of a deal, this can become an event with the potential to jeopardize the entire commercial transaction.

With Playbooks, however, automation can trigger a play that creates a set of tasks and activities needed to remedy the situation. A task to reach out to current contacts at the customer account and identify the new stakeholder could be immediately followed by an introductory phone call to better understand the new stakeholder’s priorities. This carefully crafted orchestration of activities ensures that the new decision maker is successfully identified and turned into a new champion for the product so that the deal can be salvaged.

The new capabilities released allow organizations to:

  • Configure Playbooks against any Dynamics 365 entity
  • Define the set of tasks and activities to automate once triggered
  • Track the status progress of running Playbooks against their outcome, successful or not

Demo intro

We will create a playbook to handle a scenario in which an opportunity goes Cold. This can be automated, but in this example, I'll focus more on the manual scenario.

To get started we'll create a new Playbook category, and then a new Playbook template (related to the Opportunity entity). The playbook will create a phone call activity and an appoinment activity to in attempt to heat up the opportunity again. Having created the playbook, going forward we can launch the playbook from any opportunity record using a new Launch Playbook command in the commandbar

Demo steps

Navigate to App Settings (1) and then Playbook categories (2) to open the Active Playbook Categories grid

In the Active Playbook Categories grid click New (1) to open the New Playbook category form

In the New Playbook category form fill out the Name and (optional) Description fields (1) and then click Save & Close (2)

Navigate to Playbook templates (1)

In the All Playbook Templates grid click +New (1) to open the New Playbook template form

In the New Playbook template form fill out the fields

  1. Category. Select the category for which you want to create the playbook template. Think of category as an event or an issue that you want to address using this template.
  2. Name. Enter a descriptive name for the template.
  3. Track progress. Select whether to track the progress of the playbook by creating the activities under a playbook, which is in turn linked to the record type the playbook applies to.
    For example, if you have a template created for an opportunity, and you set Track Progress to Yes, all playbook activities are created under the playbook that is launched from the opportunity record in the following hierarchy: Opportunity record → playbook record → activities.
    If you set this to No, the playbook activities are created directly under the opportunity record in the following hierarchy: Opportunity record → activities.
  4. Estimated duration (days). Enter the estimated duration in days to indicate the time it may take to complete the playbook template once launched

Click Save (5) to create the Playbook template record

In the Playbook Template form you'll see a couple of sections to handle which entities to target with the playbook, and which activitites to create when the playbook is launched.

  1. Select record types that this playbook applies to - in this section the Available for box lists all the entities that are enabled for using playbooks. Select and move the record types to which the current playbook template applies into the Applies to box.
  2. Playbook activities - in this section, select Add Activity, and then select the activity you want to create.


We will select Opportunity (1) and then add a couple of activities (2)

When you click Add Activity in the Playbook Activities section, a drop down with activity types (task, phone call, appointment) is displayed.

Select eg Appointment, to open a task pane Quick create: Playbook appointment

In the Quick create: Playbook appointment task pane, fill out the below fields (1), and then select Save (2) to save the appointment activity:

  • Subject. Type a short description of the objective of the activity
  • Description. Type additional information to describe the playbook activity
  • Relative start date (days). Enter the number of days in which the activity must start. This date is relative to when the playbook is launched
  • Relative start time. Enter the time of day when the activity must start
  • Relative end date (days). Enter the number of days by which the activity must end. This date is relative to when the playbook is launched
  • Relative end time. Enter the time of day when the activity must end
  • Priority. Select the priority of the activity

The appointment activity is now listed in the Playbook activities section (1). Click Add Activity (2) and then Phone Call to create a phone call activity

In the Quick create: Playbook phone call task pane fill out the below fields (1), and then select Save (2) to save the phone call activity

  • Subject. Type a short description of the objective of the activity
  • Description. Type additional information to describe the playbook activity
  • Relative due date (days). Enter the number of days in which the activity will be due. The number of days is counted from the launch date of the playbook. This field is available only for task and phone call activities
  • Relative due time (hours). Enter the time when the activity will be due
  • Duration. If you’re creating a task or a phone call, select the duration for the task or phone call activity
  • Priority. Select the priority of the activity

The phone call activity is now listed in the Playbook activities section (1).

You must publish a playbook to make it available for your users. Click Publish (2) to publish the playbook

Once the Playbook is published we can open an opportunity and find a new Launch playbook command in the commandbar (1). Click the command button to display the Playbook templates dialog

In the Playbook templates dialog select the playbook you created (1) and click Launch to launch the playbook


To see the activities created navigate to the playbook template, click the Monitoring tab (2) and verify that a playbook list entry with two activitites is created (as expected) - note also that regarding column shows the name of the opportunity ("Social Engagement"). You can double click the playbook list entry (3) to navigate to the playbook record

On the playbook form you'll find sections for the playbook record, including the associated opportunity (1) and activities (2)


You can also navigate to the My Activities list and find the activities there.

I hope this example has inspired you to explore how Playbooks can help you successfully respond to external events. Enjoy.

See also

  • Enforce best practices with playbooks - link

Note

  • The playbook capability is currently available only in the Sales Hub app in Dynamics 365 (online). It is being released with Dynamics 365 for Sales application version 9.0.1810.4006 or later and the server version 9.1.0.0263 or later, as part of weekly release of the product to individual geographies
  • The playbook capability is currently enabled on five entities: Lead, Quote, Opportunity, Order, and Invoice

北海道/仙台/金沢/名古屋/大阪/広島/香川/福岡/熊本/沖縄のパートナー様向け「最新クラウド環境(Microsoft 365)と最新デバイス(Surface)で実現する、お客様のIT環境のモダナイゼーション」トレーニングツアーを開催【11/12 更新】

$
0
0

日本マイクロソフトでは2020 年に予定されている Windows 7 および Office 2010 のサポート終了に向けて、お客様に新たな価値を提供していくべく、Microsoft 365 および Surface についてご紹介するセミナーを全国10地方のパートナー様向けに開催いたします。Microsoft 365 Surface の製品説明や、パートナー様の今後のビジネスにつなげていただけるポイントの解説、ビジネスを展開いただくにあたって社内のレディネスにご活用いただけるトレーニング情報やパートナー様向けプログラムなど、パートナー様のお役立ていただける情報をご紹介いたします。地方を拠点とされているパートナー様が、マイクロソフト担当者より直接最新情報を得る事ができる機会ですので、ぜひご参加ください。

■アジェンダ

  • パートナー様向けセッション(M365SurfaceMPN
  • Surface新製品体験展示


お申込みはお近くの会場をご選択ください

主 催 :           日本マイクロソフト株式会社

参加費 :           無料 (事前登録制)

■時間              13:00 – 17:00 (12:30受付開始)全会場共通

対 象 :

Office 365 Windows に関わるビジネスを推進されており、さらなるビジネスの拡大のため、Microsoft 365 を活用したビジネスの展開をご検討されているパートナー様

Surface ビジネスに携わるパートナー様、Surface に加えて Microsoft 365 を組み合わせたビジネスの展開をご検討されているパートナー様

・既に Microsoft 365Surface のビジネスを推進されており、改めて最新情報や注力ポイント等を整理されたいパートナー様


■日程とお申込みURL

2018/11/21(水)


広島 TKPガーデンシティPREMIUM広島駅前

広島県広島市南区大須賀町13-9 ベルヴュオフィス広島

▶お申込みはこちら

2018/11/22(木) 仙台 TKPガーデンシティPREMIUM仙台西口

宮城県仙台市青葉区花京院1-2-15 ソララプラザ 7F/8F

▶お申込みはこちら

2018/11/27(火) 高松 オフィスサポートセンター

香川県高松市サンポート2番1号高松シンボルタワー17階

▶お申込みはこちら

2018/11/30(金) 金沢 TKP金沢カンファレンスセンター

石川県金沢市上堤町1-33アパ金沢ビル6F/7F/8F/9F

▶お申込みはこちら

2018/12/4(火) 那覇 TKPネストホテル那覇センター

沖縄県那覇市西1-6-1 ネストホテル那覇2F/3F/10F

▶お申込みはこちら

2018/12/6(木) 熊本 TKPガーデンシティ熊本

熊本県熊本市中央区下通1-7-18ホテルサンルート熊本3F/5F

▶お申込みはこちら

2018/12/7(金) 福岡 マイクロソフト九州支店

福岡県福岡市博多区上川端町12-20 ふくぎん博多ビル10 F

▶お申込みはこちら

2018/12/10(月) 名古屋 マイクロソフト中部支店

愛知県名古屋市西区牛島町6-1 名古屋ルーセントタワー21F

▶お申込みはこちら

2018/12/12(水) 大阪 マイクロソフト関西支店

大阪府大阪市福島区福島5 丁目6 番地16 ラグザタワーノースオフィス2F 受付

▶お申込みはこちら

2018/12/14(金) 札幌 TKP札幌カンファレンスセンター

北海道札幌市中央区北3条西3丁目16 札幌小暮ビル6F/7F

▶お申込みはこちら

1116日から1214日へと日程が変更になりました。


■アジェンダ詳細:

Time 内容
12:30-13:00 受付、Surface展示開始
13:00-13:05 オープニング - 本セミナーの趣旨について
13:05-15:05

第一部:「より一層活躍する働き方」を実現する Microsoft 365 製品概要とパートナービジネス

1. Microsoft 365 の概要と最適なプラン提案

2. チームワークを活性化させる Microsoft Teams

3. 働き方改革を支える Microsoft 365 セキュリティ

4. 改めて理解したい Windows 7/Office 2010 EOS

5. パートナー様のレディネスを支援するトレーニングご紹介

15:05-15:15 休憩
15:15-16:15

第二部:Microsoft 365 に最適な最新デバイス=Surfaceで働き方改革を実現。新製品と顧客に響く提案方法をご紹介

1. 新製品 Surface Pro 6Surface Laptop 2Surface Go の製品紹介と、ターゲット顧客や販売シナリオの徹底解説

2. 働き方改革の課題と、Surface Family製品の提案ポイントのご紹介

3. 業種別ケーススタディのご紹介

4. Surface パートナープログラムのご紹介

16:15-16:30

クロージング - パートナー様向けプログラムのご案内

1.       Microsoft Partner Networkのご案内

2.       各種リソース、トレーニングのご案内

その他

16:30-17:00 Q&A、個別相談


*上記の内容は予告なく内容する場合があります。あらかじめご了承ください。

Time to upgrade: How to prepare for Windows Server 2008 end of support

$
0
0

Jeff Mitchell, Cloud Solution Architect

The end is nigh! End of support for Windows Server 2008 is right around the corner, coming on January 14, 2020.

I know what you’re thinking: “My customers’ Data Center Migration’s got time, that’s over a year away.” I would encourage you to dig deeper into that thought. Halloween has passed, and we’re now heading into the holiday season. Next thing you know, it will be 2019 and you’ll have less then a year remaining on the end of support timeline.

For our partners, the time to start is now! Customers can choose from one of three options:

  1. Upgrade to Windows Server 2016 or 2019 and continue running on-premises
  2. Migrate Windows Server 2008 into Azure to become eligible for 3 years of free Extended Security Updates
  3. Modernize applications that are running on your at-risk servers into containers (and ideally run them in Azure)

In-place upgrade

Be aware that there is no direct path to upgrade from Windows Server 2008 to Windows Server 2016 and beyond. First, you’ll need to upgrade to Windows Server 2012, and to Windows Server 2016 from there. Also know that you won’t be able to change from 32-bit to 64-bit in the upgrade process. No need to worry if reading about this process make you uncomfortable? Visit our Upgrade Center to learn more and get the help you need.

Migrate

Azure Site Recovery recently announced support for migrating Windows Server 2008 into Azure including 32-bit versions. As mentioned above, customers who move their Windows Server 2008 workloads into Azure virtual machines will receive 3 more years of extended security updates free of charge.

If you and/or your customers already have a preferred migration tool, don’t feel like you have to choose Azure Site Recovery. Check with your tool vendor to see if they support moving Windows Server 2008 into Azure.

Another opportunity to explore is migrating those Server Roles. You can certainly migrate traditional server roles like Active Directory, File Servers, RDS, and IIS by deploying a new modern server instance, then promoting the new server to take over from the aging Windows Server 2008 Server Roles.

Modernize

For the final option, evaluate the Application being hosted on Windows Server 2008 to run in Containers or run on one of Azure’s many PaaS Services, like Azure SQL Database and Web Apps.

You could even choose to deliver the app differently using Application virtualization with RDS, Citrix, or VMware.

In terms of total cost of ownership, Azure is the most cost-effective cloud destination for customers with Windows Server 2008 workloads. We’ve illustrated a cost model that shows how AWS can be up to 5 times more expensive than Azure.

We’ve gathered some of the resources partners have found most helpful:

For more technical information, check out the following:

Finally, please join us as Steve Luper, Jeff Mitchell, and Jeff Wagner host the Azure Apps and Infrastructure Community Call on November 16 at 9:00 am PT

Applications and Infrastructure Technical Community


Update to the AAD Connect Remove Proxy Addresses Script

$
0
0

This week, while working with one of my customers in a custom Office 365 deployment, I had the opportunity to revisit and update one of my scripts (Remove Proxy Addresses via AAD Connect).  I had originally built that script for a large state government Office 365 migration from BPOS-D.  The scenario was that the organizations were in a shared environment and the deployment had a managed subdomain for internal routing and provisioning.

The subdomain was part of the AD proxyAddresses array in the customer's on-premises environment and required while the mailboxes lived in BPOS-D, but if we synchronized the proxyAddresses as-is to Office 365, we'd receive the error about the managed subdomain not being an accepted domain in the tenant.

Quite the sticky wicket.

So, the solution we worked up was to create an Out-to-AAD rule that would strip the unwanted domains from the user's proxyAddress array on the export to Office 365, leaving the on-premises attribute in place so it could still be synced to BPOS-D.

Back to my customer at hand:  we were faced with a similar situation (two organizations with a shared Active Directory infrastructure, going to two different tenants) with an added twist: one of the organizations needed to keep legacy domains on their mail-enabled user objects so they could continue to receive mail from the outside world at their old addresses.

The ultimate scenario: Company 1 needed to keep its domains for all 20,000 of its users going to Tenant 1.  Company 2 needed to keep Company 1's domains as proxy addresses on their users as well, but couldn't add those domains to Tenant 2 (since they were already verified in Tenant 1).

The original incarnation of the tool just allowed you to specify a single proxy address pattern.  I've updated to to support multiple domains.  To use it, just enter the domains comma-separated (or add them to an array variable) and you're off to the races.

The output at the end will tell you the rule's name and guid, as well as how it's configured.

To get the updated script, head out to https://gallery.technet.microsoft.com/AADConnect-Rule-to-Remove-a922e82a. Happy customizing!

Should You Send Your Pen Test Report to the MSRC?

$
0
0

Every day, the Microsoft Security Response Center (MSRC) receives vulnerability reports from security researchers, technology/industry partners, and customers. We want those reports, because they help us make our products and services more secure. High-quality reports that include proof of concept, details of an attack or demonstration of a vulnerability, and a detailed writeup of the issue are extremely helpful and actionable. If you send these reports to us, thank you!

Customers seeking to evaluate and harden their environments may ask penetration testers to probe their deployment and report on the findings. These reports can help that customer find and correct security risk(s) in their deployment.

The catch is that the pen test report findings need to be evaluated in the context of that customer’s group policy objects, mitigations, tools, and detections implemented. Pen test reports sent to us commonly contain a statement that a product is vulnerable to an attack, but do not contain specific details about the attack vector or demonstration of how this vulnerability could be exploited. Often, mitigations are available to customers that do not require a change in the product code to remediate the identified security risk.

Let’s look at the results of an example penetration test report for a deployment of Lync Server 2013. This commonly reported finding doesn’t mention the mitigations that already exist.


Whoa—my deployment is vulnerable to a brute-force attack?

In this scenario, a customer deployed Lync Server 2013 with dial-in functionality. The deployment includes multiple web endpoints, allowing users to join or schedule meetings. The customer requests a penetration test and receives the report with a finding that states “Password brute-forcing possible through Lync instance.”

Let’s look at this in more detail.

Lync Server 2013 utilizes certain web endpoints for web form authentication. If these endpoints are not implemented securely, they can open the door for attackers to interact with Active Directory. Penetration testers that analyze customer deployments often identify this issue, as it represents risk to the customer environment.

The endpoint forwards authentication requests to the following SOAP service /WebTicket/WebTicketService.svc/Auth. This service makes use of LogonUserW API to authenticate the requested credentials to the AD.

Figure 1 - SOAP authentication with correct credentials and server response.

Figure 1 - SOAP authentication with correct credentials and server response.

In this scenario, there is a brute-force attack risk to customers when exposing authentication endpoints.   

This is not an unsolvable problem. In environments with mitigations on user accounts (such as a password lockout policy), this would cause a temporary Denial of Service (DoS) for the targeted user, rather than letting their account be compromised. Annoying to the user (and a potential red flag of an active attack if this keeps happening) but not as serious as a compromised account.

Figure 2 - Brute-forcing attempt against the same user, showing that after 5 unsuccessful login attempts the user is not able to login with the correct password due to account-lockout.

Figure 2 - Brute-forcing attempt against the same user, showing that after 5 unsuccessful login attempts the user is not able to login with the correct password due to account-lockout.

Mitigating brute-force AD attacks via publicly exposed endpoints

We advocate for defense in depth security practices, and with that in mind, here are several mitigations to shore up defenses when an endpoint like this is publicly exposed.

  1. Have a strong password policy.

Having a strong password policy in place helps prevent attacks using easily guessed and frequently used passwords. With dictionaries of millions of passwords available online, a strong password can go a long way in preventing brute-forcing. Microsoft guidance on password policies (and personal computer security) is published here - https://www.microsoft.com/en-us/research/publication/password-guidance/ - and provides some great tips based on research and knowledge gained while protecting the Azure cloud.

  1. Have an account lockout policy.

The second step to protecting the environment and taking advantage of a strong password policy is having an account lockout policy. If an attacker knows a username, they have a foothold to perform brute-force attacks. Locking accounts adds a time-based level of complexity to the attack and adds a level of visibility to the target. Imagine attempting to log into your own account, and you’re notified that it’s been locked. Your first step is to contact your IT/support group or use a self-service solution to unlock your account. If this continues to happen, it raises red flags. Guidance and information regarding account lockout policies may be found on our blog here - https://blogs.technet.microsoft.com/secguide/2014/08/13/configuring-account-lockout/.

  1. Log (and audit) access attempts.

Another step to detect and prevent this behavior is related to event logging and auditing, which can be done in multiple locations. Depending on the edge or perimeter protections, web application filtering or rate limiting at the firewall level can reduce the chances of a brute-force attack succeeding. Dropped login attempts or packets mitigate an attack from a single IP or range of IPs.

  1. Audit account logon attempts.

On any servers used for authentication, a Group Policy auditing account logon events could give visibility into any attempts at password guessing. This is a best practice in any network environment, not only those with web-based endpoints that require authentication. Guidance on securing an Active Directory environment through Group Policy auditing can be found in our guide here - https://docs.microsoft.com/en-us/windows-server/identity/ad-ds/plan/security-best-practices/monitoring-active-directory-for-signs-of-compromise.

  1. Use Web application filtering rules.

When one of the above recommendations is not a viable option, alternate mitigations may be needed to reduce risk in the environment. To verify the viability of a potential mitigation, we have setup a test environment for Lync Server 2013 with IIS ARR (application request routing) reverse proxy to test the requirements:

  1. Disable windows auth externally
  2. Allow anonymous user sign externally.

In this environment, the following Web Apps under "Skype for Business Server External Web Site" were blocked by using IIS rewrite rules returning error code 403 on the reverse proxy:

  1. Abs
  2. Autodiscover
  3. Certprov
  4. Dialin
  5. Groupexpansion
  6. HybridConfig
  7. Mcx
  8. PassiveAuth
  9. PersistentChat
  10. RgsCients
  11. Scheduler
  12. WebTicket/WebTicketService.svc/Auth

The following web apps were not blocked in reverse proxy:

  1. Collabcontent
  2. Datacollabweb
  3. Fonts
  4. Lwa
  5. Meet
  6. Ucwa

Under this environment - Windows Authentication is blocked on the meeting web app and sign-in fails. Anonymous users could join a conference and still work with the following modalities:

  1. Chat message in meeting
  2. Whiteboard
  3. PPT share
  4. Poll
  5. Q n A
  6. File transfer
  7. Desktop share

Each customer needs to consider the functionality needed for external users. In the example provided, this assumes that you would not need the following functionality externally:

  1. Dial-in page (shares number to dial-in etc.)
  2. Web Scheduler
  3. PersistentChat
  4. Rgsclients
  5. Hybrid PSTN (Skype for Business using on-prem PSTN infra)
  6. No mobility client users

For reference, we’ve included a sample rule that blocks external access requests to the Dialin folder. Rules are stored in the ApplicationHost.config file, and the rule is added under the configuration/system.webserver/rewrite/globalrules/ section.


<rule name="BlockDialin" patternSyntax="Wildcard" stopProcessing="true">

<match url="*" />

<conditions logicalGrouping="MatchAny" trackAllCaptures="false">

<add input="{HTTP_HOST}" pattern="dialin.foo.bar.com" />

<add input="{REQUEST_URI}" pattern="/dialin/*" />

</conditions>

<action type="CustomResponse" statusCode="403" statusReason="Access denied." statusDescription="Access denied." />

</rule>


Additional guidance on Application Request Routing (ARR) in IIS for Lync servers can be found on our blog - https://blogs.technet.microsoft.com/nexthop/2013/02/19/using-iis-arr-as-a-reverse-proxy-for-lync-server-2013/

The best use for pen test reports

Recommendations will depend on how an environment is configured, it’s best to dig into the report for available mitigations before sharing the results outside your organization. If the report comes up with an unpatched vulnerability that has no mitigations, please send us the report and POC.

For more information, please visit our website at www.microsoft.com/msrc


This article was written with contributions from Microsoft Security Center team members--Christa Anderson, Saif ElSherei, and Daniel Sommerfeld; as well as Pardeep Karara from IDC Skype Exchange R&D, and Caleb McGary from OS, Devices, and Gaming Security.

Get technical tips to successfully build Office 365, Azure and Dynamics 365 apps with Dev Chat

$
0
0

From architecture and design to deployment, implementation and migration, get the technical tips you need to successfully build Office 365, Azure and Dynamics 365. You will chat with Microsoft Support Engineers for development tips to quickly resolve programming questions regarding capability and services.

Dev Chat for Azure, Office 365 and Dynamics 365

  • Chat with a Microsoft support engineer and get the technical tips you need to build apps. (English and Mandarin only)

 Azure technical scenarios covered (but not limited to):

  • Azure App Services: Web App, Logic App, API App
  • Azure API Management
  • Azure Notification Hub

Office 365 technical scenarios covered (but not limited to):

  • Office 365 Application and Add-ins
  • SharePoint Rest API
  • Azure Active Directory and Security

Dynamics 365 technical scenarios covered (but not limited to):

  • Sales and Customer Service in Dynamics 365
  • Customization
  • Development assistance (develop with SDK or API, manage customer data, extend existing features, authentication)

Don’t forget to check out the full suite of webinars and consultations available for the Apps & Infrastructure technical journey at aka.ms/AzureAppInnovation or aka.ms/O365AppInnovation.

Unable to start ACS collector service – Event ID 4661

$
0
0

Problem Description and Symptoms:

The Operations Manager Audit Collections Service is not starting with the following errors and event Id:

Event ID 4661 Error :
AdtServer encountered the following problem during startup:
Task: Load Certificate
Failure: Certificate for SSL based authentication could not be loaded
Error:
0x80092004
Error Message:
Cannot find object or property.

1

Solution:

1. Ensure that the certificate exists on the Management Server acting as ACS collector and is valid (If not, issue one for the Collector and import it in the Local Computer –> Personal –>Certificates Store)

image

2. Open CMD as Administrator

3. Go to the following path “%systemroot%system32SecurityAdtServer”

4. Execute the following: adtserver.exe -c and choose the certificate to be used (This command will allow you to bind the certificate to the service)

image

5. Start the Audit Collection Service by executing: net start adtserver

image

6. Check the collector health

image

In which scenarios certificates are needed and why?

ACS requires mutual authentication between Forwarder(s) and Collector(s) servers, prior to the exchange of information between them, to secure the authentication process is encrypted between these two. When the Forwarder and the Collector reside in the same Active Directory domain or in Active Directory domains that have established trust relationships, they will use Kerberos authentication mechanisms provided by Active Directory.

But when the Forwarder and Collector are in different domains with no trust relationship, other mechanisms must be used to satisfy the mutual authentication requirement in a secure way. Here comes the use of certificates to ensure that authentication between these 2 parties (Forwarder and Collector) can take place, thus start exchanging information between them.


Header, header, wherefore art thine fields?

$
0
0

Today, I got it in my head that I wanted to create a script that would accept CSV input.  In so doing, I wanted to make sure the CSV passed some sort of validation so that I didn't end flooding a screen with errors, because nobody likes that.

So, I fiddled around for a while, and came up with (what I think) is a pretty nifty solution.  Let's say you have a requirement that your input file has three columns:

FirstName,MiddleName,LastName
Steve,Grant,Rogers
Peter,Benjamin,Parker

And you want to be able to ensure that at a minimum, those three columns exist.  The secret sauce lies in the NoteProperty exposed when you import the CSV.

PS C:temp> $Users = Import-Csv UsersList.txt
PS C:temp> $Users | Get-Member
TypeName: System.Management.Automation.PSCustomObject
Name MemberType Definition
---- ---------- ----------
Equals Method bool Equals(System.Object obj)
GetHashCode Method int GetHashCode()
GetType Method type GetType()
ToString Method string ToString()
Firstname NoteProperty string Firstname=Steve
LastName NoteProperty string LastName=Rogers
MiddleName NoteProperty string MiddleName=Grant

Oh, looky! We have NoteProperty names that matches our CSV headers! Woot!

So, we can create a nifty regular expression to test for the presence of those Note Property values!

$RequiredColumns = "firstname","middlename","lastname"
$RegexMatch = "^(?i)(?=.*b" + (($RequiredColumns | foreach {[regex]::escape($_)}) -join "b)(?=.*b" ) + "b).*`$"

And the resulting value:

PS C:temp> $RegexMatch
^(?i)(?=.*bfirstnameb)(?=.*bmiddlenameb)(?=.*blastnameb).*$

So, put it together:

PS C:temp> $RequiredColumns = "firstname", "middlename", "lastname"
PS C:temp> $RegexMatch = "^(?i)(?=.*b" + (($RequiredColumns | foreach { [regex]::escape($_) }) -join "b)(?=.*b") + "b).*`$"
PS C:temp> $NoteProperties = ($Users | Get-Member -MemberType NoteProperty).Name -join ","
PS C:temp> If ($NoteProperties -match $RegExMatch) { "Header appears to be correct."}
Header appears to be correct.

You can even test it by adding either another column to $RequiredColumns or by taking away a NoteProperty:

PS C:temp> $NoteProperties = $NoteProperties.Replace(",MiddleName","")
PS C:temp> $NoteProperties
Firstname,LastName
PS C:temp> If ($NoteProperties -match $RegExMatch) { "Header appears to be correct."}
PS C:temp> If ($NoteProperties -match $RegExMatch) { "Header appears to be correct."} else { "NoteProperties does not match." }
NoteProperties does not match.

I'm sure there are plenty of other ways to do it, but this one appealed to me due to its simplicity.  If you have another way, I'd love to hear about it!


Update to the Create-LabUsers tool

$
0
0

While working on my last mini-series, I utilized my Create-LabUsers tool to automate the creation of a few thousand objects.  When I was synchronizing my AD users to another directory, I noticed that I didn't have mailNickname populated and had to add a quick script to fill that value in.  I decided to populate it as a default value using sAMAccountName (which is what Exchange does anyway when you mailbox-enable someone).  This will be helpful if you're trying to emulate users and groups with more messaging values filled out.

I also fixed the CreateGroups parameter. It erroneously checked for an Exchange server session during AD group creation.

And, it wouldn't be an update if I didn't add a new parameter:

THEWHOLESHEBANG

Yes, it's just like it sounds.  Use this parameter with -ExchangeServer and you'll automatically create 10,000 user mailboxes, oodles of resource mailboxes, configure all the nested security memberships you can shake a USB stick at, assign manager / direct report relationships, and inflate mailboxes like a boss (NSFW). The only thing it really doesn't do is send some faxes.

From a user comment in the gallery where I host the tool, I received a request to allow user input so you can supply your own list of names.

IT IS NOW SO.  Just use the UserList parameter, and submit a CSV with Firstname,MiddleName,LastName columns so labelled.  If you enter a value for Count that exceeds the number of users in the UserList, the script will fill in the difference with the already included seed data.

WOOT.

I also added a method of detecting an Exchange server:

function LocateExchange
{
    If (!$ExchangeServer)
    {
        Write-Log -ConsoleOutput -LogFile $Logfile -LogLevel WARN -Message "No Exchange sever specified. Attempting to locate Exchange Servers registered in configuration container."
        [array]$ExchangeServers = (Get-ADObject -Filter { objectCategory -eq "msExchExchangeServer" } -SearchBase (Get-ADRootDSE).configurationNamingContext).Name
        If ($ExchangeServers)
        {
            $SuccessfulTest = @()
            Write-Log -ConsoleOutput -LogFile $Logfile -LogLevel INFO -Message "Found $($ExchangeServers.Count) Exchange servers registered in configuration partition. Selecting a server."
            ForEach ($obj in $ExchangeServers)
            {
                $Result = Try { Test-NetConnection $obj -ea stop -wa silentlycontinue -Port 443 }
                catch { $Result = "FAIL" }
                If ($Result.TcpTestSucceeded -eq $True) { $SuccessfulTest += $obj }
            }
            If ($SuccessfulTest -ge 1)
            {
                $ExchangeSever = (Get-Random $SuccessfulTest)
                Write-Log -Logfile $Logfile -LogLevel SUCCESS -Message "Selected Exchange Server $($ExchangeServer)."
            }
            Else
            {
                Write-Log -LogFile $Logfile -LogLevel ERROR -Message "Cannot locate or connect to an Exchange server. ExchangeServer parameter must be specified if CreateMailboxes parameter is used. Error Code: EXERR01" -ConsoleOutput
                Break
            }
        }
    }
    Else
    {
        Write-Log -ConsoleOutput -LogFile $LogFile -LogLevel ERROR -Message "Cannot locate or connect to an Exchange Server.  ExchangeServer parameter must be specified if CreateMailboxes parameter is used. Error Code: EXERR02"
        Break
    }
}

You can get the updated version at http://aka.ms/createlabusers.

AAD Connect, a dedicated resource forest, a custom connector, and a bunch of transform rules: a GalSync story (Part 1)

$
0
0

A few years ago, I worked with one of my close consultant peers to build a GALSync-style solution for a big state government that was going through a divestiture from a single BPOS-D (yes, I am old) and a single managed hosted Exchange environment to multiple O365 multi-tenant instances.  It was the equivalent of 100 agencies and 225,000 users going from two large hosted environments to 100 separate tenants.

Welcome to GALSync on a truly enterprise scale, since each instance was going to have about 250,000 contact objects for users and distribution groups.  Throughout the course of our deployment, we were going to add nearly 25,000,000 objects to the global Azure AD footprint.  Good thing Azure AD is pretty scalable. This design was the result of trying to overcome a significant number of challenges.  We had considered a single large-scale MIM deployment, but with the number of connected data sources (over 100), we'd only be able to get a delta sync cycle out to every remote forest once every 2 or 3 days.  Plus, it was really an unknown what kind of hardware we'd need to have 100+ connector spaces, each with hundreds of thousands of objects.  At some point (like, probably 4 minutes after deployment), providing capacity and redundancy for the GALSync infrastructure would become a full-time job.

Our final solution was a centralized resource forest that would hold a contact object for every user in every organization in a tree structure.  We decided to use AAD Connect's native Active Directory connector to be the conduit between the remote agency's local Active Directory forest and the resource forest.  Agencies would export their users as contacts to OU=Agency <x>,OU=Shared GAL,DC=resource forest,DC=com, and then would import from OU=Shared GAL,DC=resource forest,DC=com.  Due to deployment timeline issues, our solution brought along with it an enormous amount of challenges and baggage.  I've revisited it, modified it, and stripped it down to provide a simple (yet effective) sync solution for organizations that need a shared GAL but don't have Microsoft Forefront Identity Manager or Microsoft Identity Manager deployed (nor do they want to).

To walk through how this is going to look, I'm going to build a brand new lab in Azure and spin up two new Office 365 subscriptions. The solution involves building a central resource forest to hold contacts, and then connecting each of the forests via the Active Directory connector to import and export contacts to N's Azure AD Connect's connector space, and then utilizing default rules to export them to the respective tenants.

Lost yet? Good.

Also, please don't call Premier asking for support on this. They will hunt me down and give me a stern talking to.  As any custom solution is, this is also unsupported.  While it does work and only utilizes built-in connectors, AAD Connect (like Office 365) is an evergreen product, so there is potential that the steps outlined here may someday cease to work or functionality may be deprecated.  This works with the build version of AAD Connect current as of this writing: 1.1.882.0 (September 8, 2018).

Without further ado ... Onward!

[toc]

Overview

The lab will consist of 3 virtual machines running Windows Server 2016 (the version doesn't matter, as long as it's new enough for AAD Connect to install successfully).  Each of the 3 servers will be configured as its own forest (something like GalSyncTenantA, GalSyncTenantB, and GalSyncShared, since I'm well-known for my creativity).  Because we at Microsoft like to make acronyms out of everything, I'm calling them GSTA, GSTB, and GSS.  GSTA and GSTB will each be connected to their own respective tenants, synchronizing their own identities.  GalSyncShared (GSS) will be the central forest that we use to export and import the shared contacts.  While this solution only has three forests (2 account forests and one resource forest), it can be expanded by repeating the steps for any of the account forests.

When we get to the sync configuration in part 2 of this series, we'll be leveraging the native Active Directory Connector, which requires SRV lookup capability to the resource forest.

And, since I'm not one to miss an opportunity for shameless promotion, I'm going to make use of a handful of tools that I've developed: CreateLabUsers, AAD Permissions, and AAD Network Test.

Prepare Office 365 Tenants

First thing's first.  I need some tenants.  So, I head over to https://www.office365.com and sign up for two E3 trial tenants.  My creativity in naming them carried on to the tenant names--galsynctenanta.onmicrosoft.com and galsynctenantb.onmicrosoft.com.

Prepare Azure AD Virtual Infrastructure

If you don't have a lot of experiencing deploying virtual infrastructure in Azure, I'm going to go through the steps I used to create this environment.  Specifically, I'm going to create:

  • Virtual Networks - One of the requirements is that all three of the environments be able to talk to each other.  In the real world, you may have separate infrastructures separated by VPNs and physical networking.  For purposes of the lab, all three of these machines will be in the different networks, since that's how you'll probably encounter it.  If you go to do this for real, you'll have to ensure the each of the account forests (GalSyncTenantA and GalSyncTenantB) have line of sight and connectivity to the resource forest (GalSyncShared).  We'll go over the specific networking requirements later.
  • Network Security Groups - Think of Network Security Groups as firewall rules or router access control lists in the cloud.  NSGs are sets of rules that determine what traffic is allowed to move between networks and hosts.
  • Virtual Machines - In order to meet the requirements for installing AAD Connect, I'll need a machine that meets the minimum specifications.  I'll be preparing the environments by extending them with the Exchange 2016 schema so they host all of the attributes that we're going to need.  Then, I'll be stocking them with about 10,000 users each.

Create virtual networks

I want all of the virtual machines in my lab to be able to talk to each other.  I'm going to create three virtual networks (one representing each forest).  My virtual network settings:

  • GalSyncTenantA 10.0.0.0/24
  • GalSyncTenantB 10.0.1.0/24
  • GalSyncShared 10.0.2.0/24
  1. Log into https://portal.azure.com.  If you don't already have any subscriptions, you'll need to acquire one of those.  We do offer some trial subscriptions, so if you want to follow along with me, you'll need some way to do this.  You can also do this in your on-premises infrastructure or (gasp) with another provider.
  2. Select +Create a resource, start typing virtual and select Virtual network from the list.
  3. Ensure Resource manager is selected as the deployment model (since this is 2018) and click Create.
  4. Select the options for your first virtual network and click Create.  I'm going to name them to match the forests and tenants that we'll be using, so hopefully it will be obvious which ones we're acting against in the later parts of this lab.  I created a new resource group, because I want to be able to identify all of the resources associated with this project. Note: You can create a virtual network and then divide it logically into smaller subnets--for example, you could create a network of 10.0.0.0/24, and then create subnets of 10.0.0.0/25 (10.0.0.0-10.0.0.127) and 10.0.0.128/25 (10.0.0.128-10.0.0.255).  In order to route between subnets, you need to create a standard subnet and a Gateway subnet inside the same network.  As a bonus, they can't overlap.  To keep my math simple, I'm going to create two subnets per network: a standard subnet to be used for "devices" at 10.0.x.0/25, and a Gateway subnet configured in the same virtual network at 10.0.x.128/25.
  5. Lather, rinse, and repeat steps 2-4 for your other two virtual networks.
  6. After you've created your virtual networks, go check them out! Click All services, type Virtual Networks and then click the Virtual Networks link (not the Virtual Networks (Classic) link).
  7. You should be greeted with something similar to this (a resource group and three virtual networks associated with it):
  8. Click on a virtual network, and then select Subnets.  As I described earlier, I created a "normal" subnet in the 10.0.x.0/25 space, and then a "gateway" subnet in the 10.0.x.128/25 space.
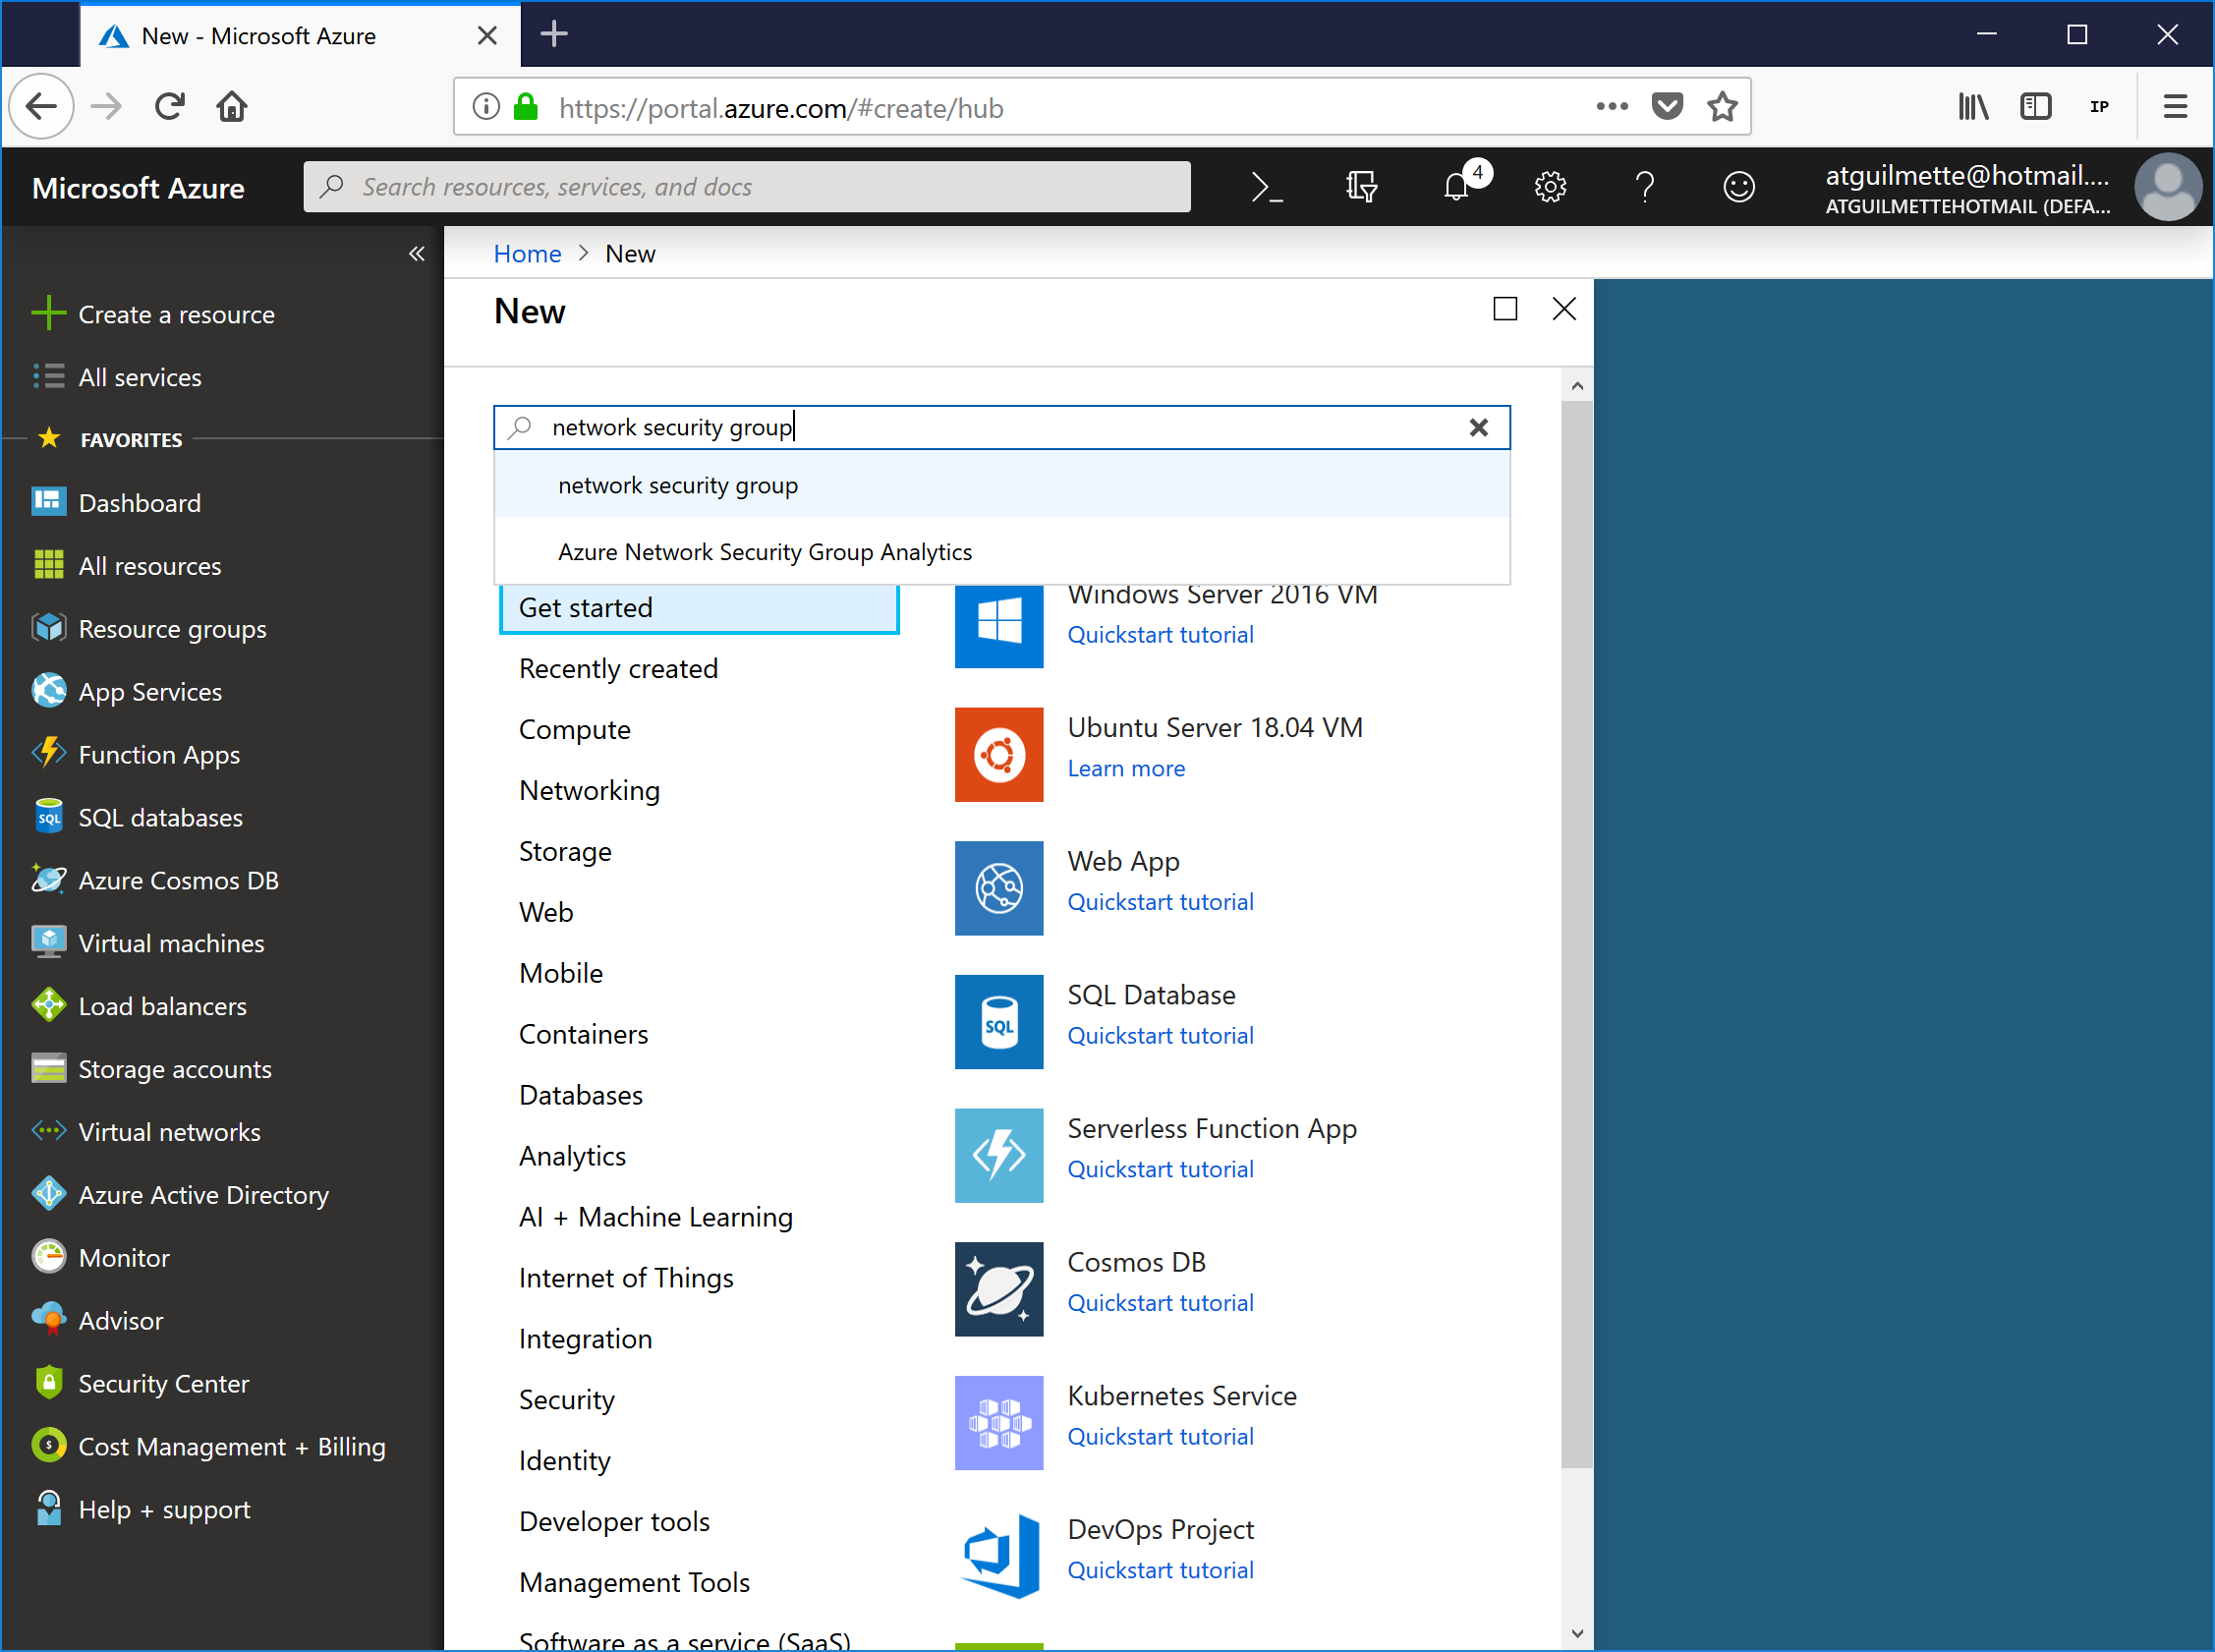
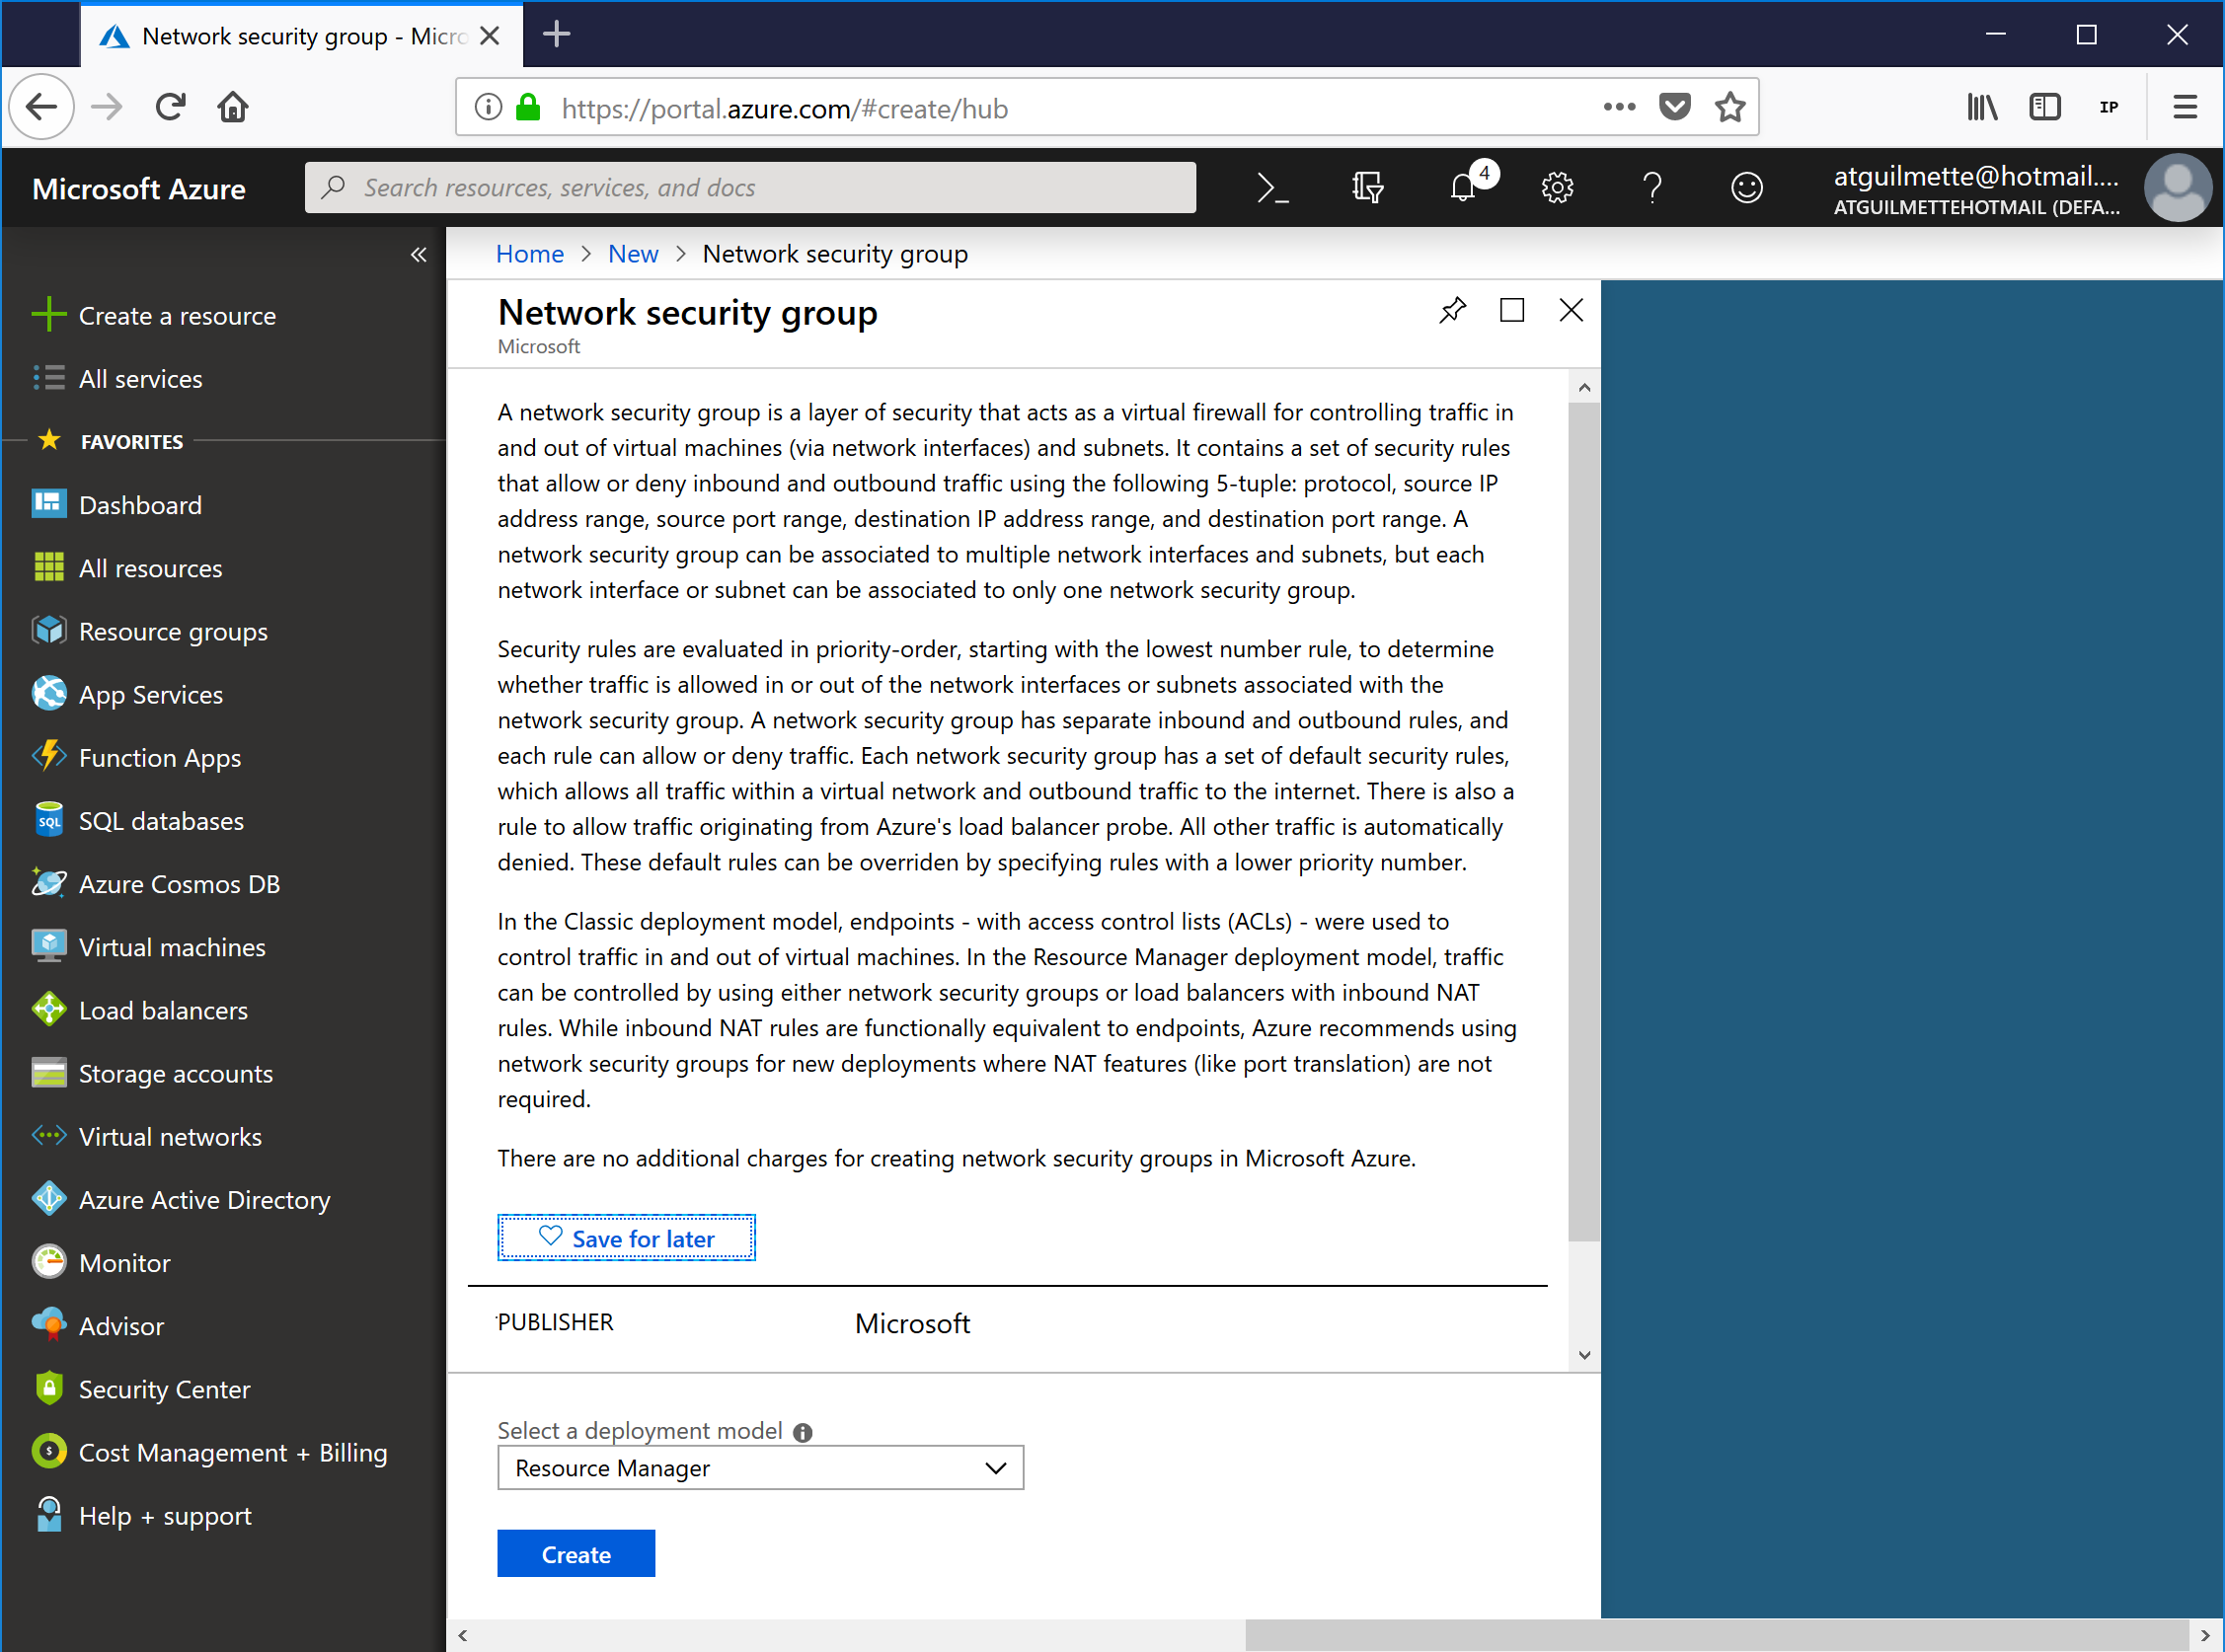
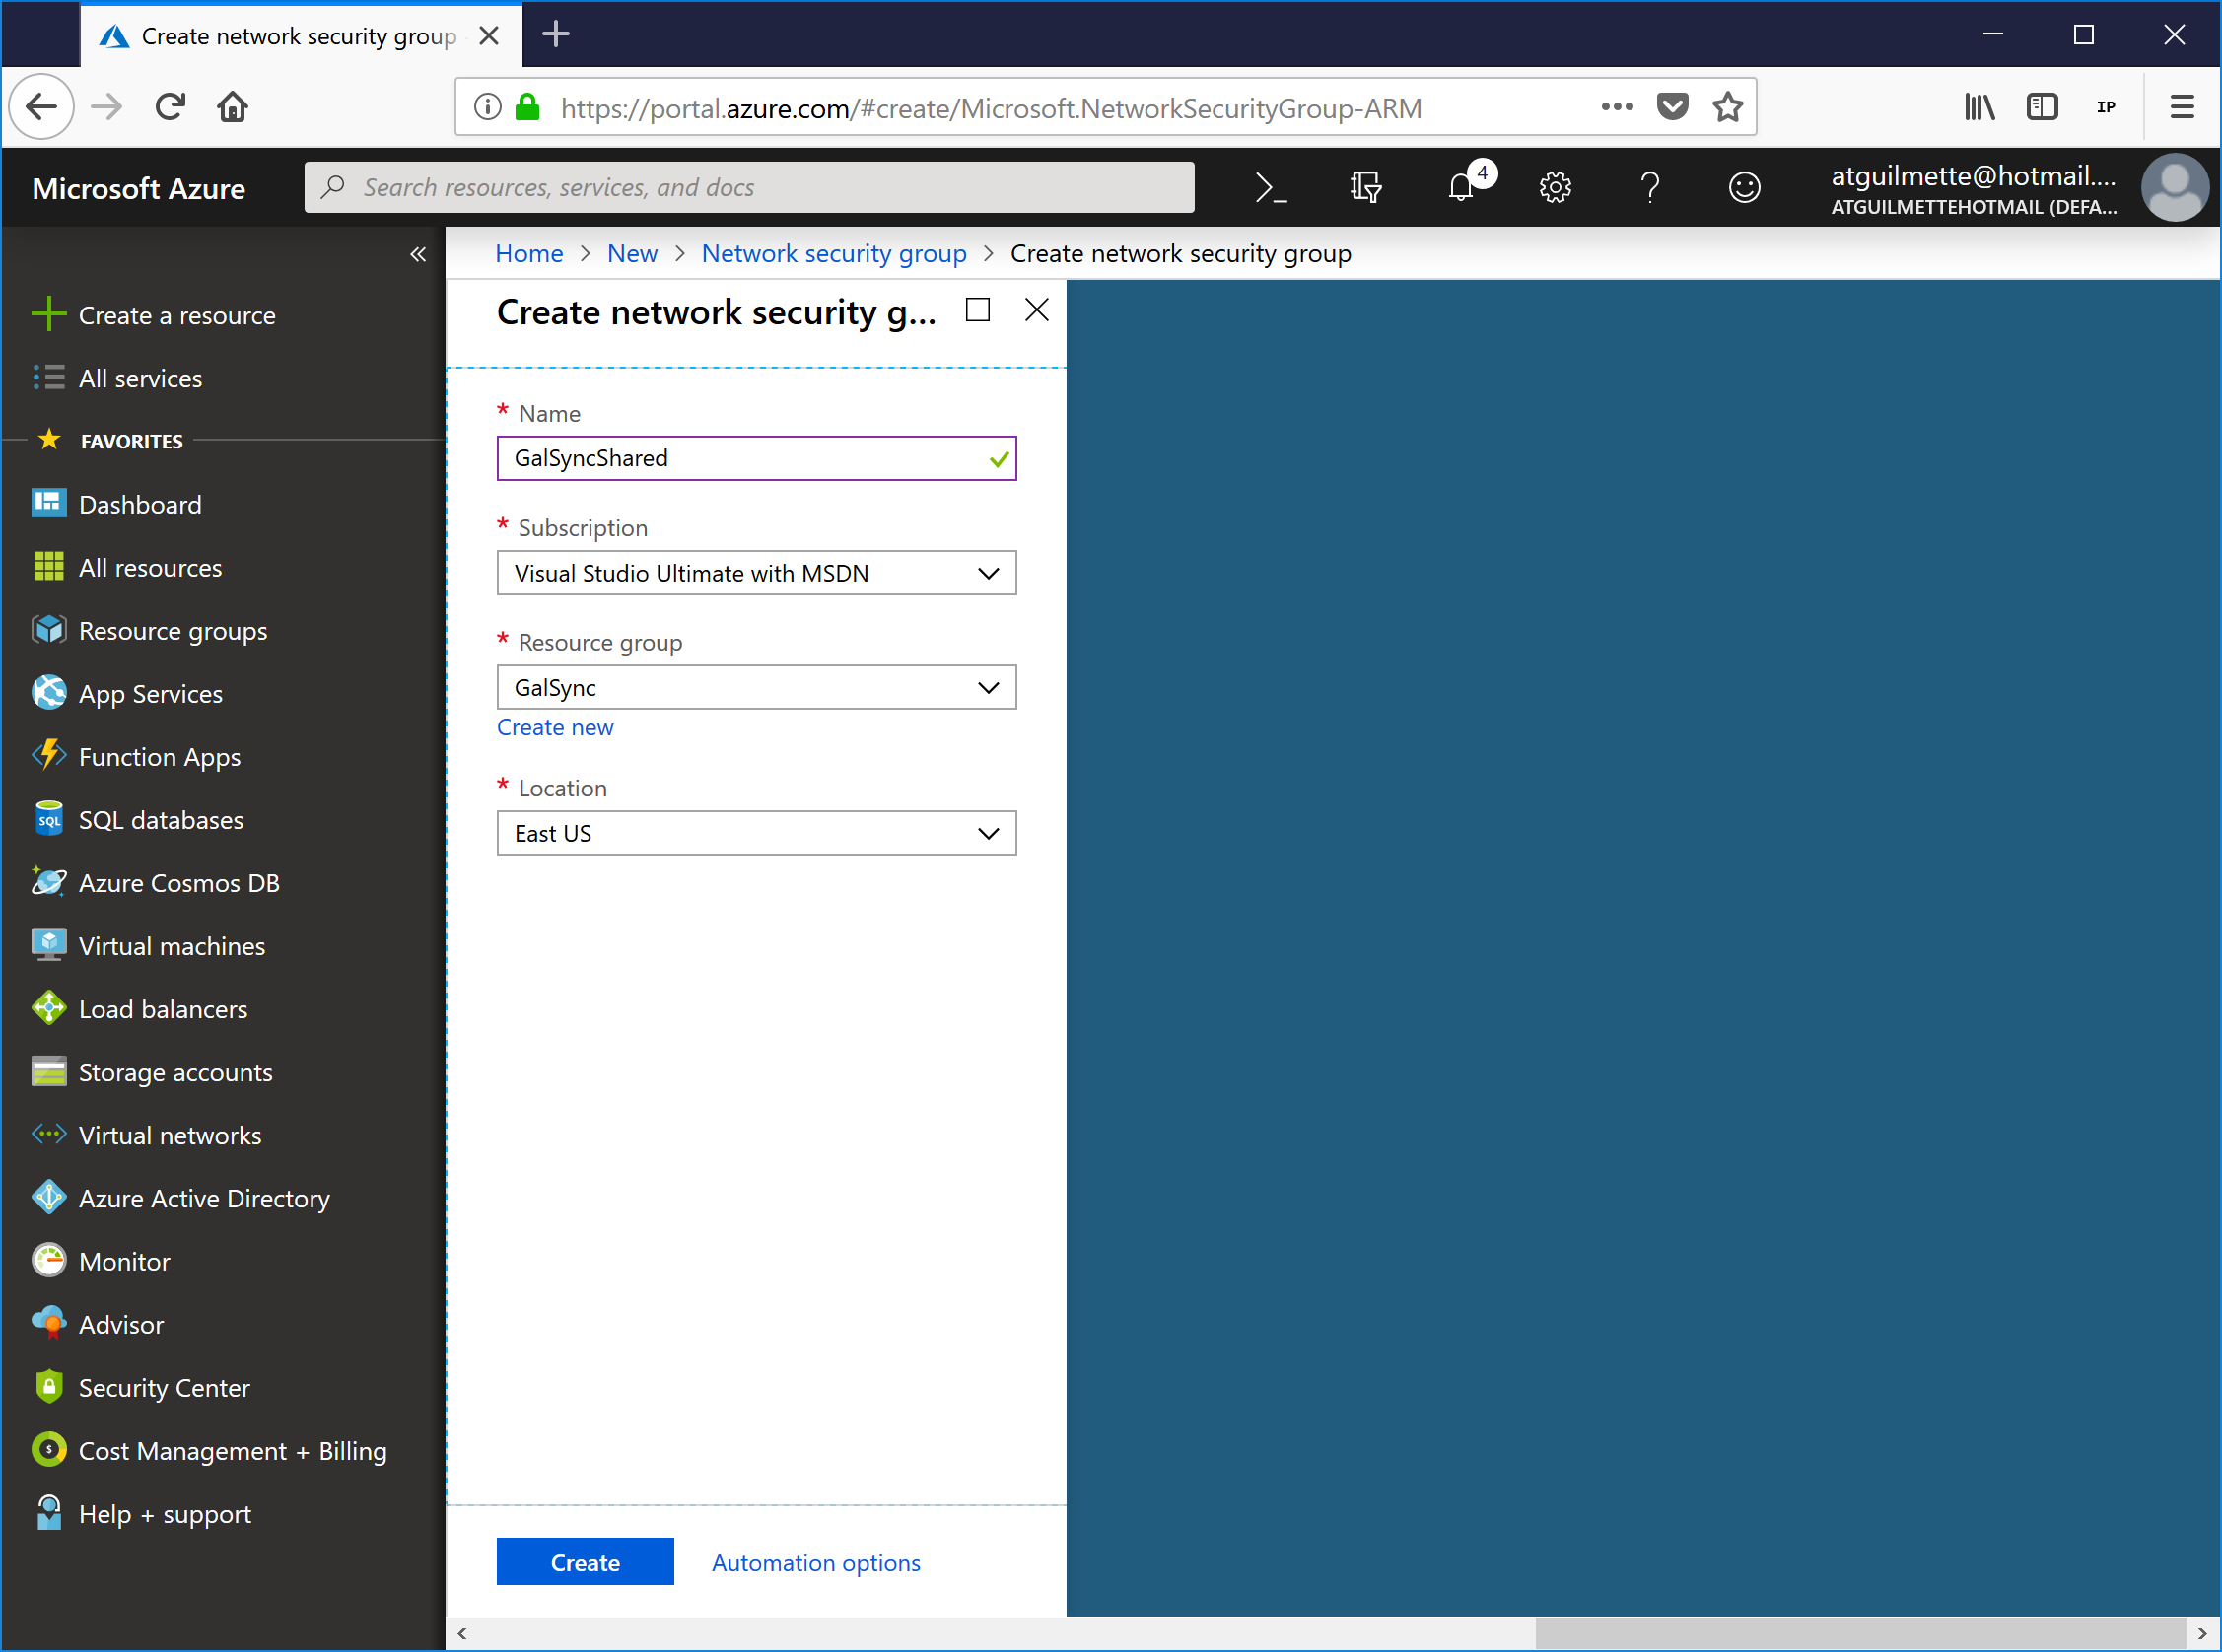
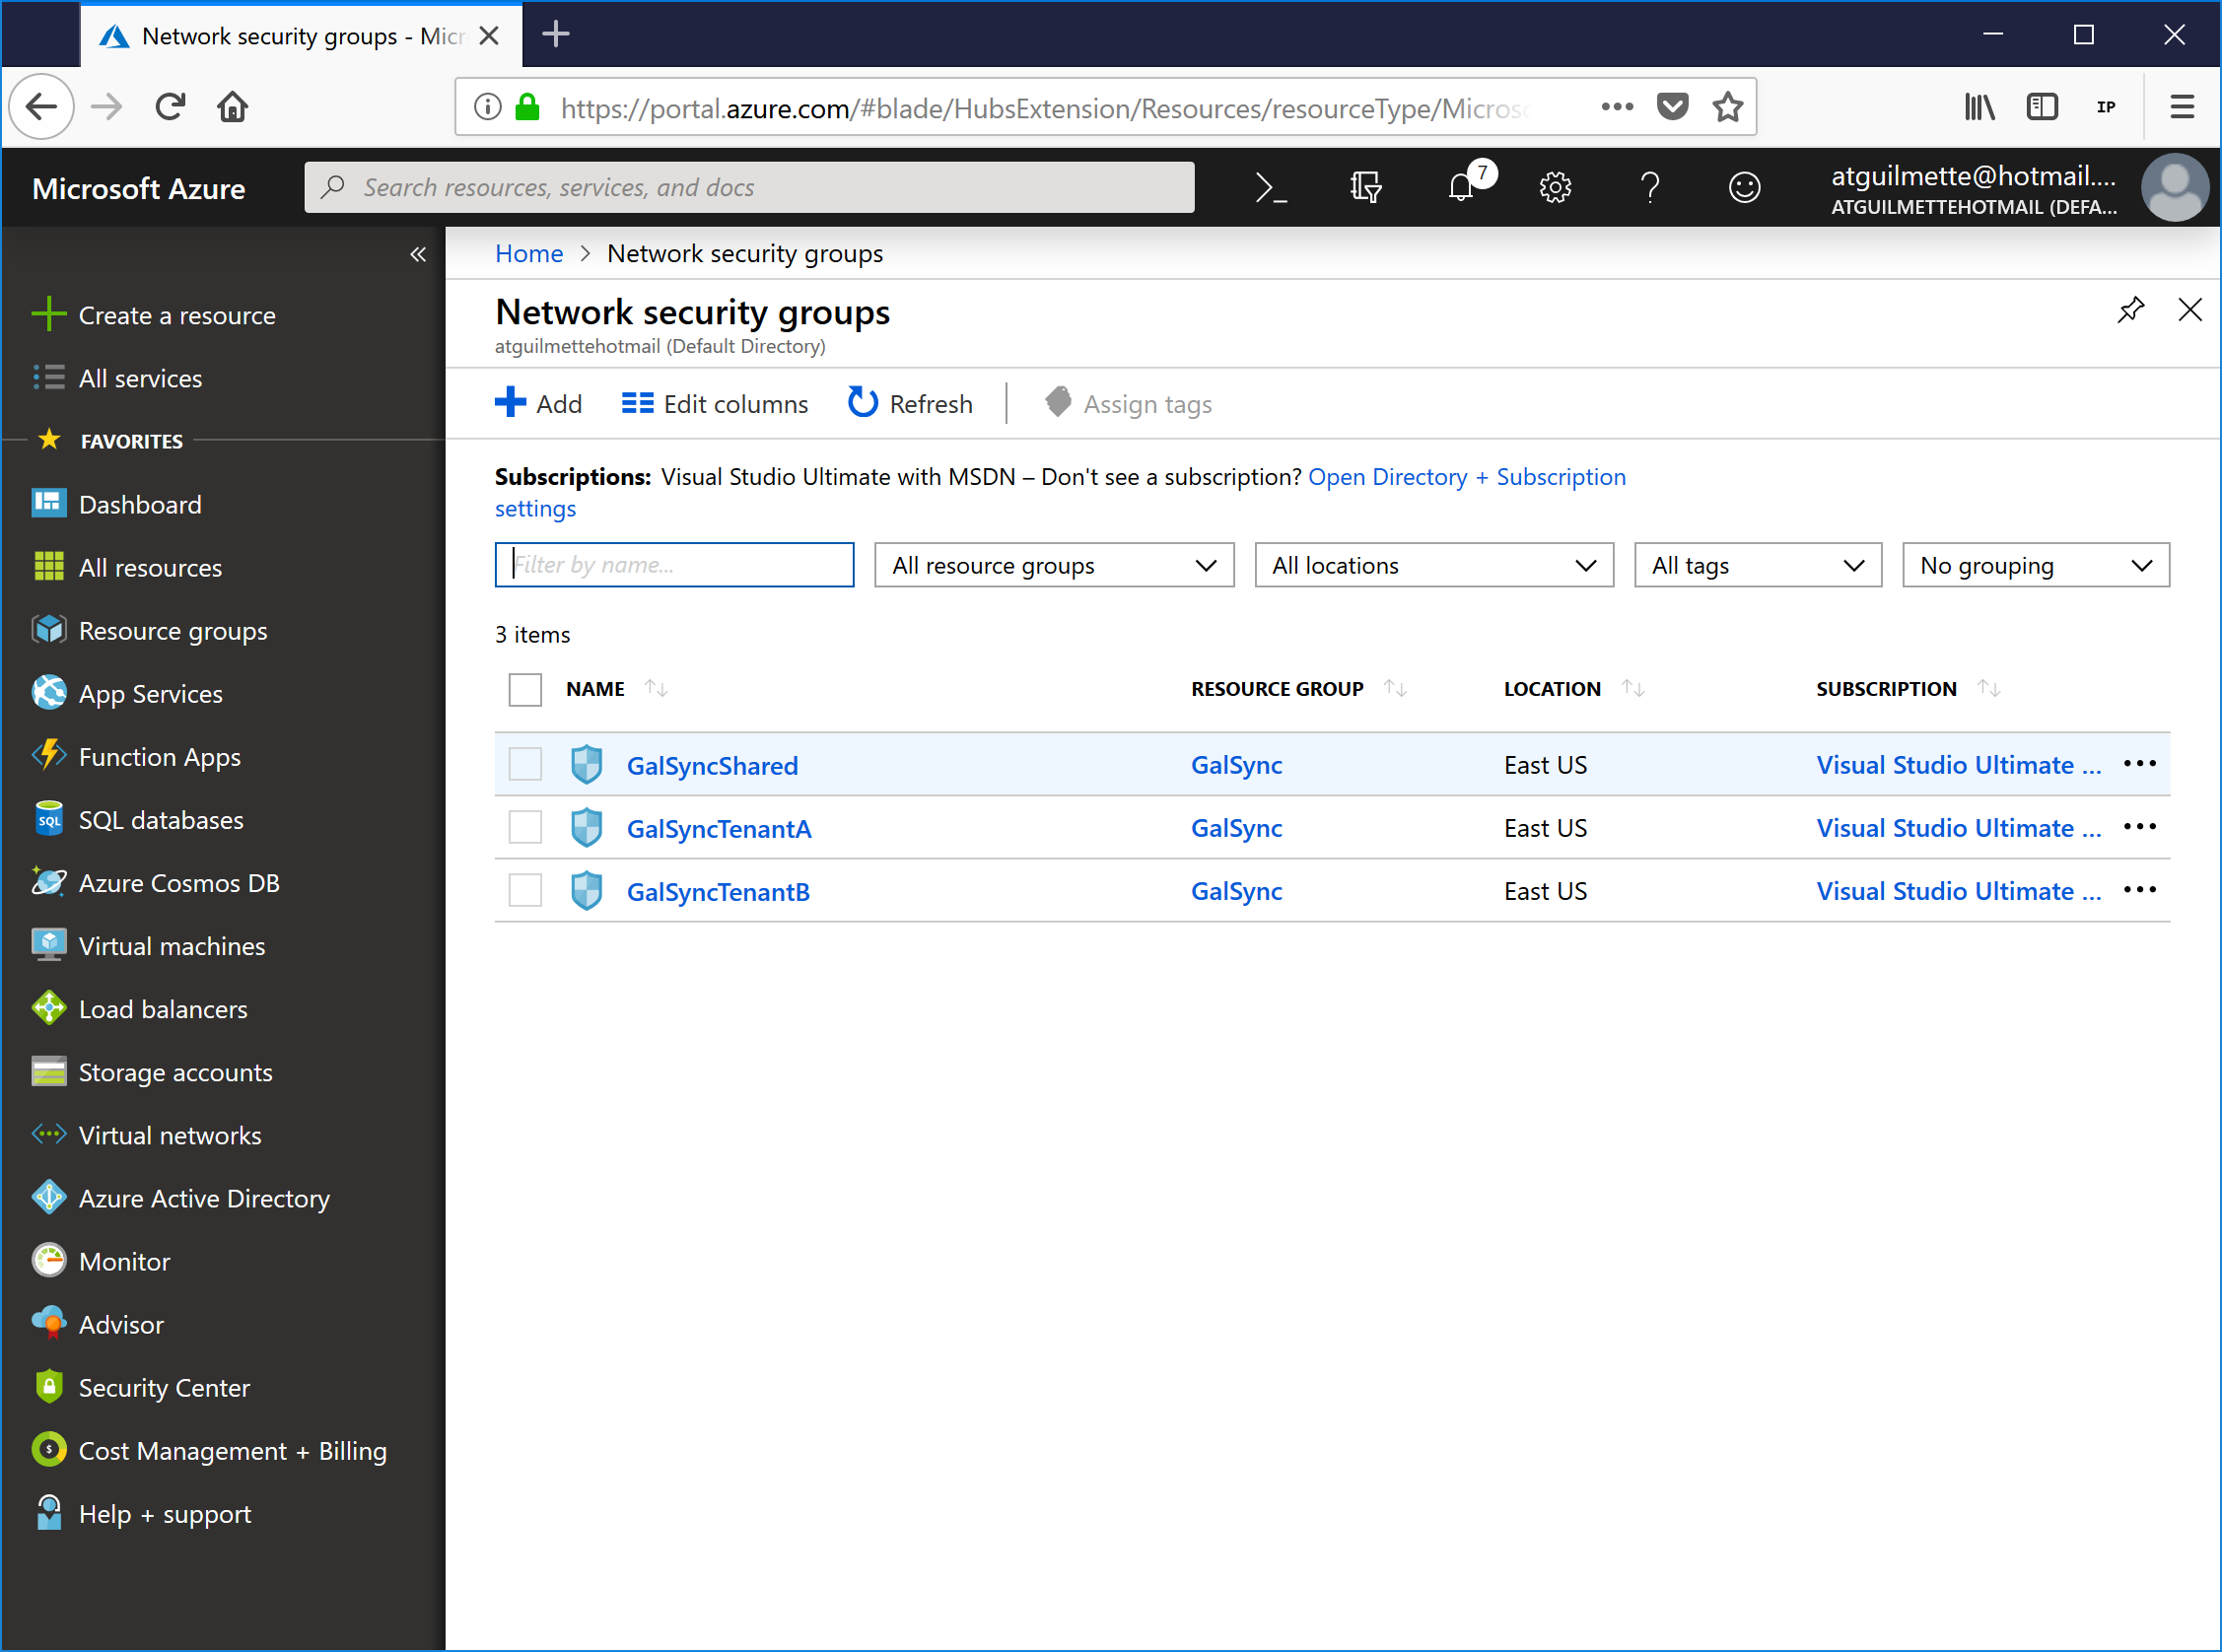
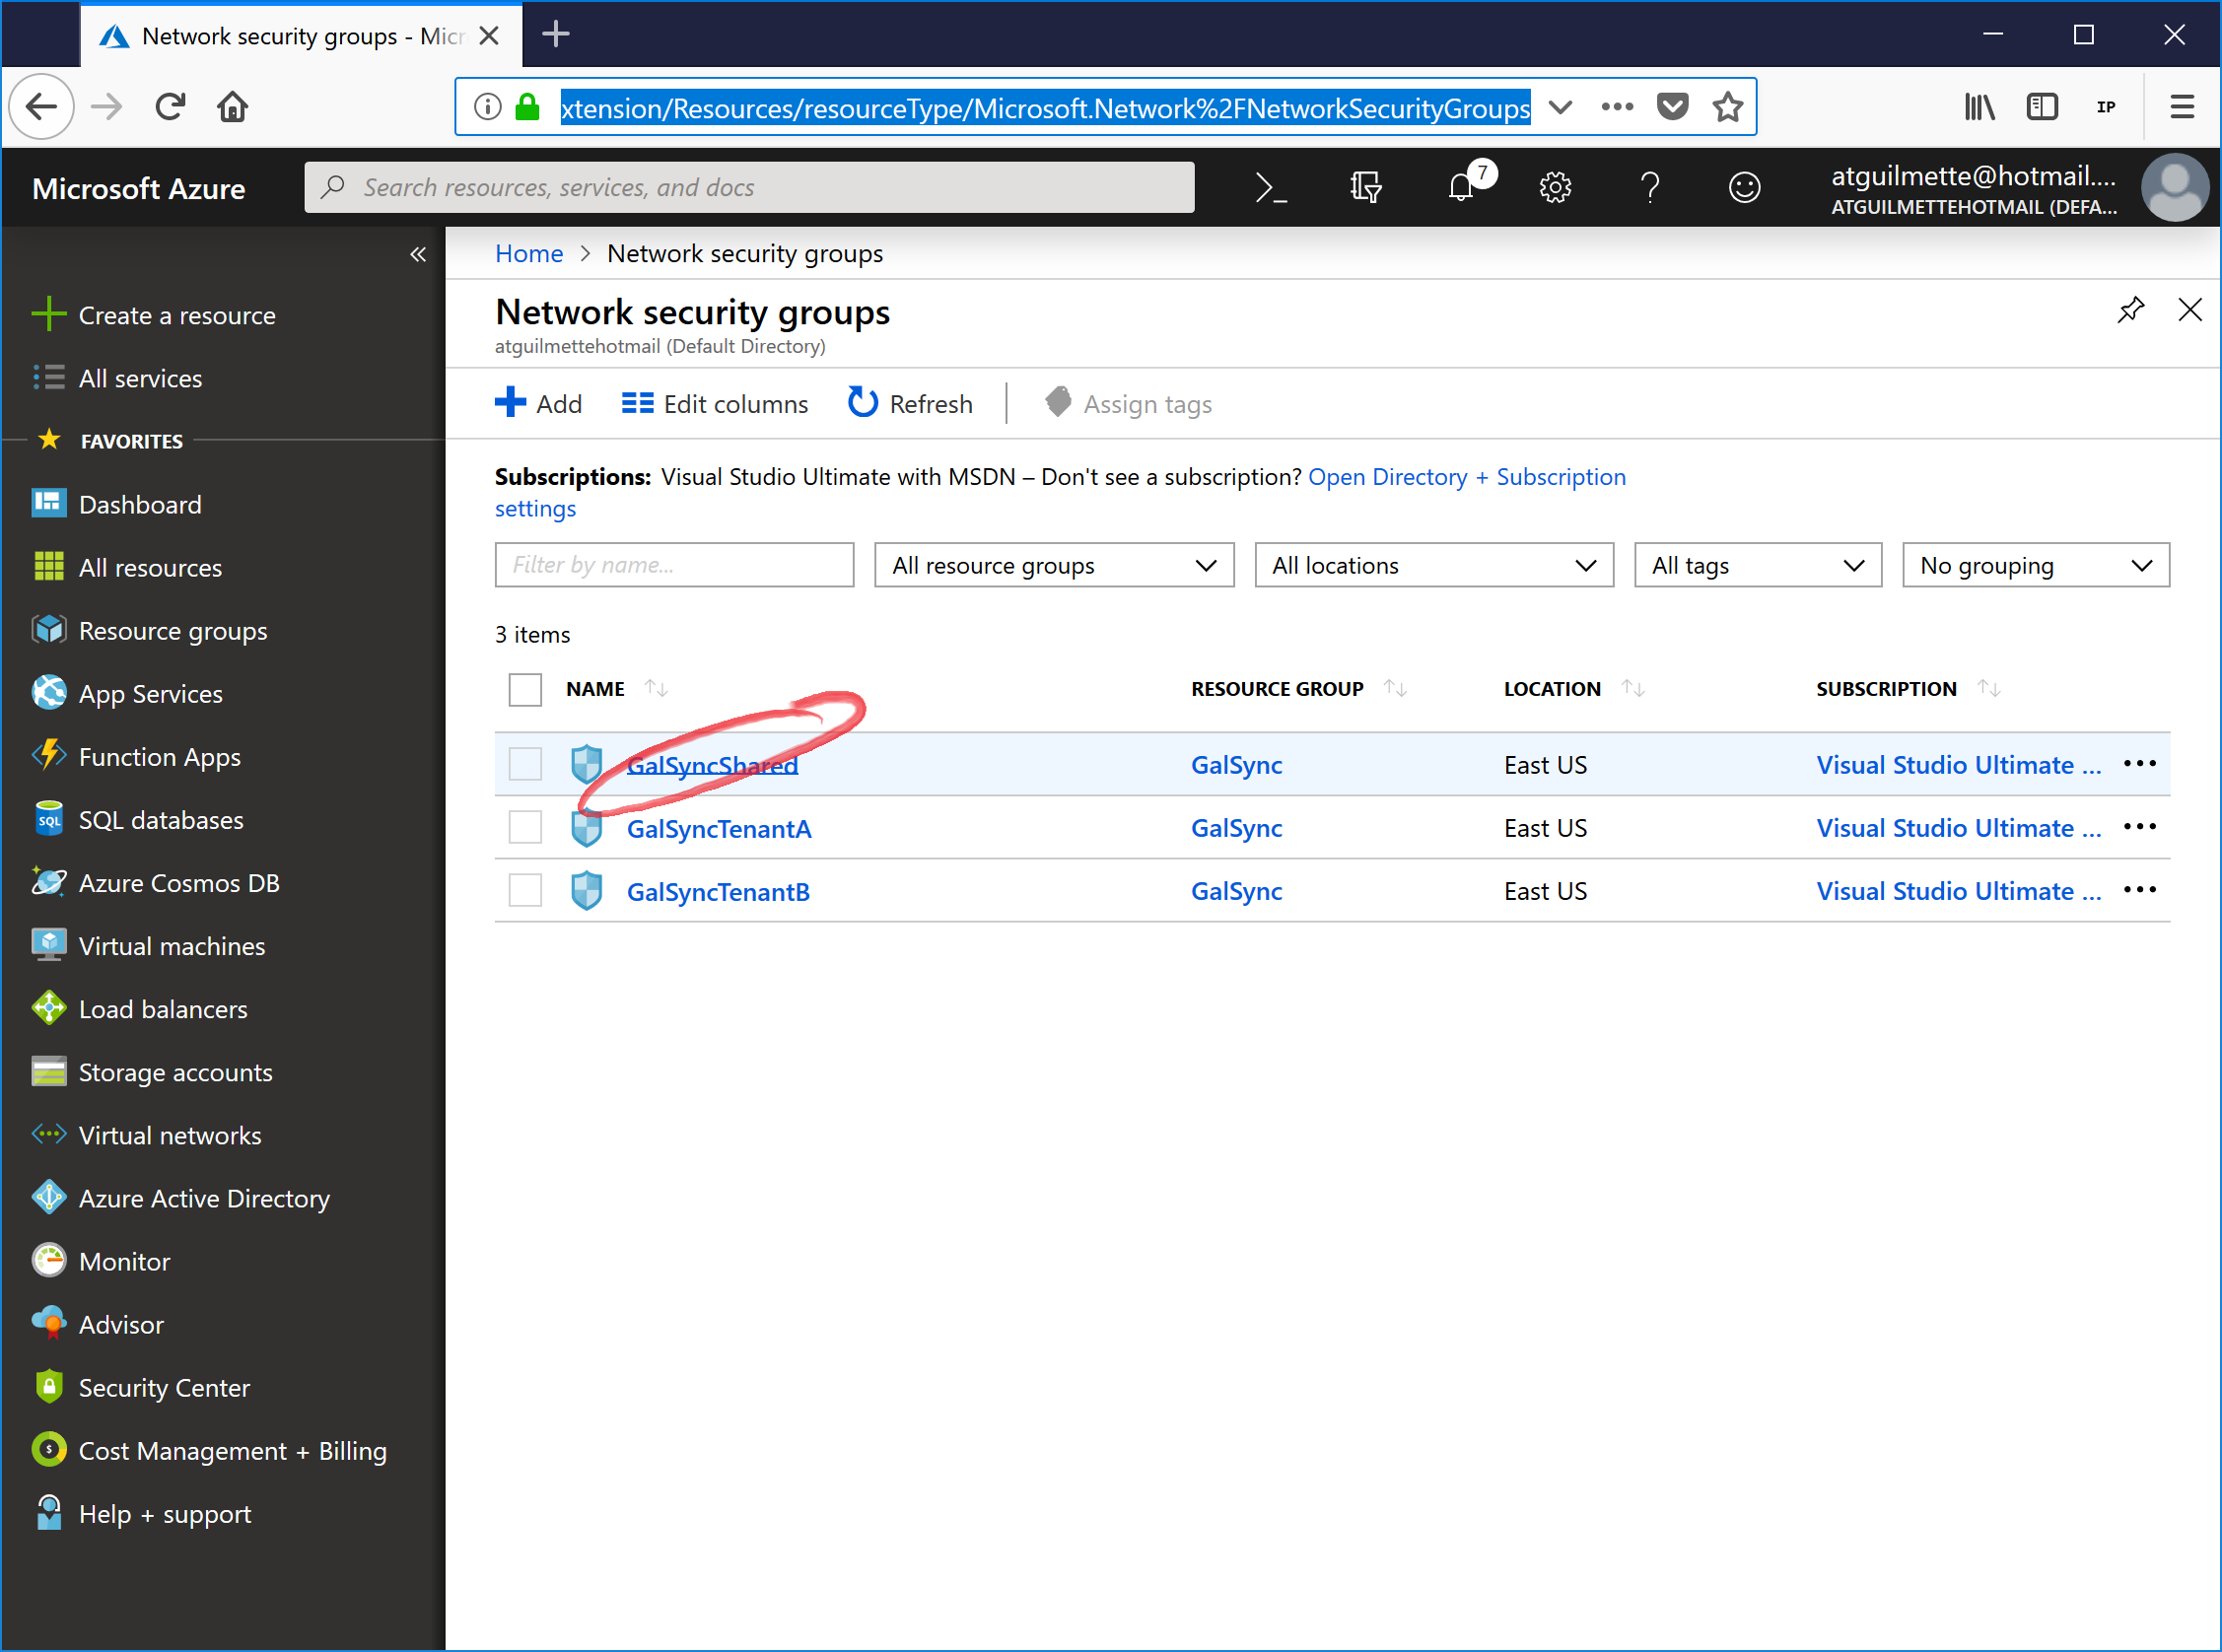
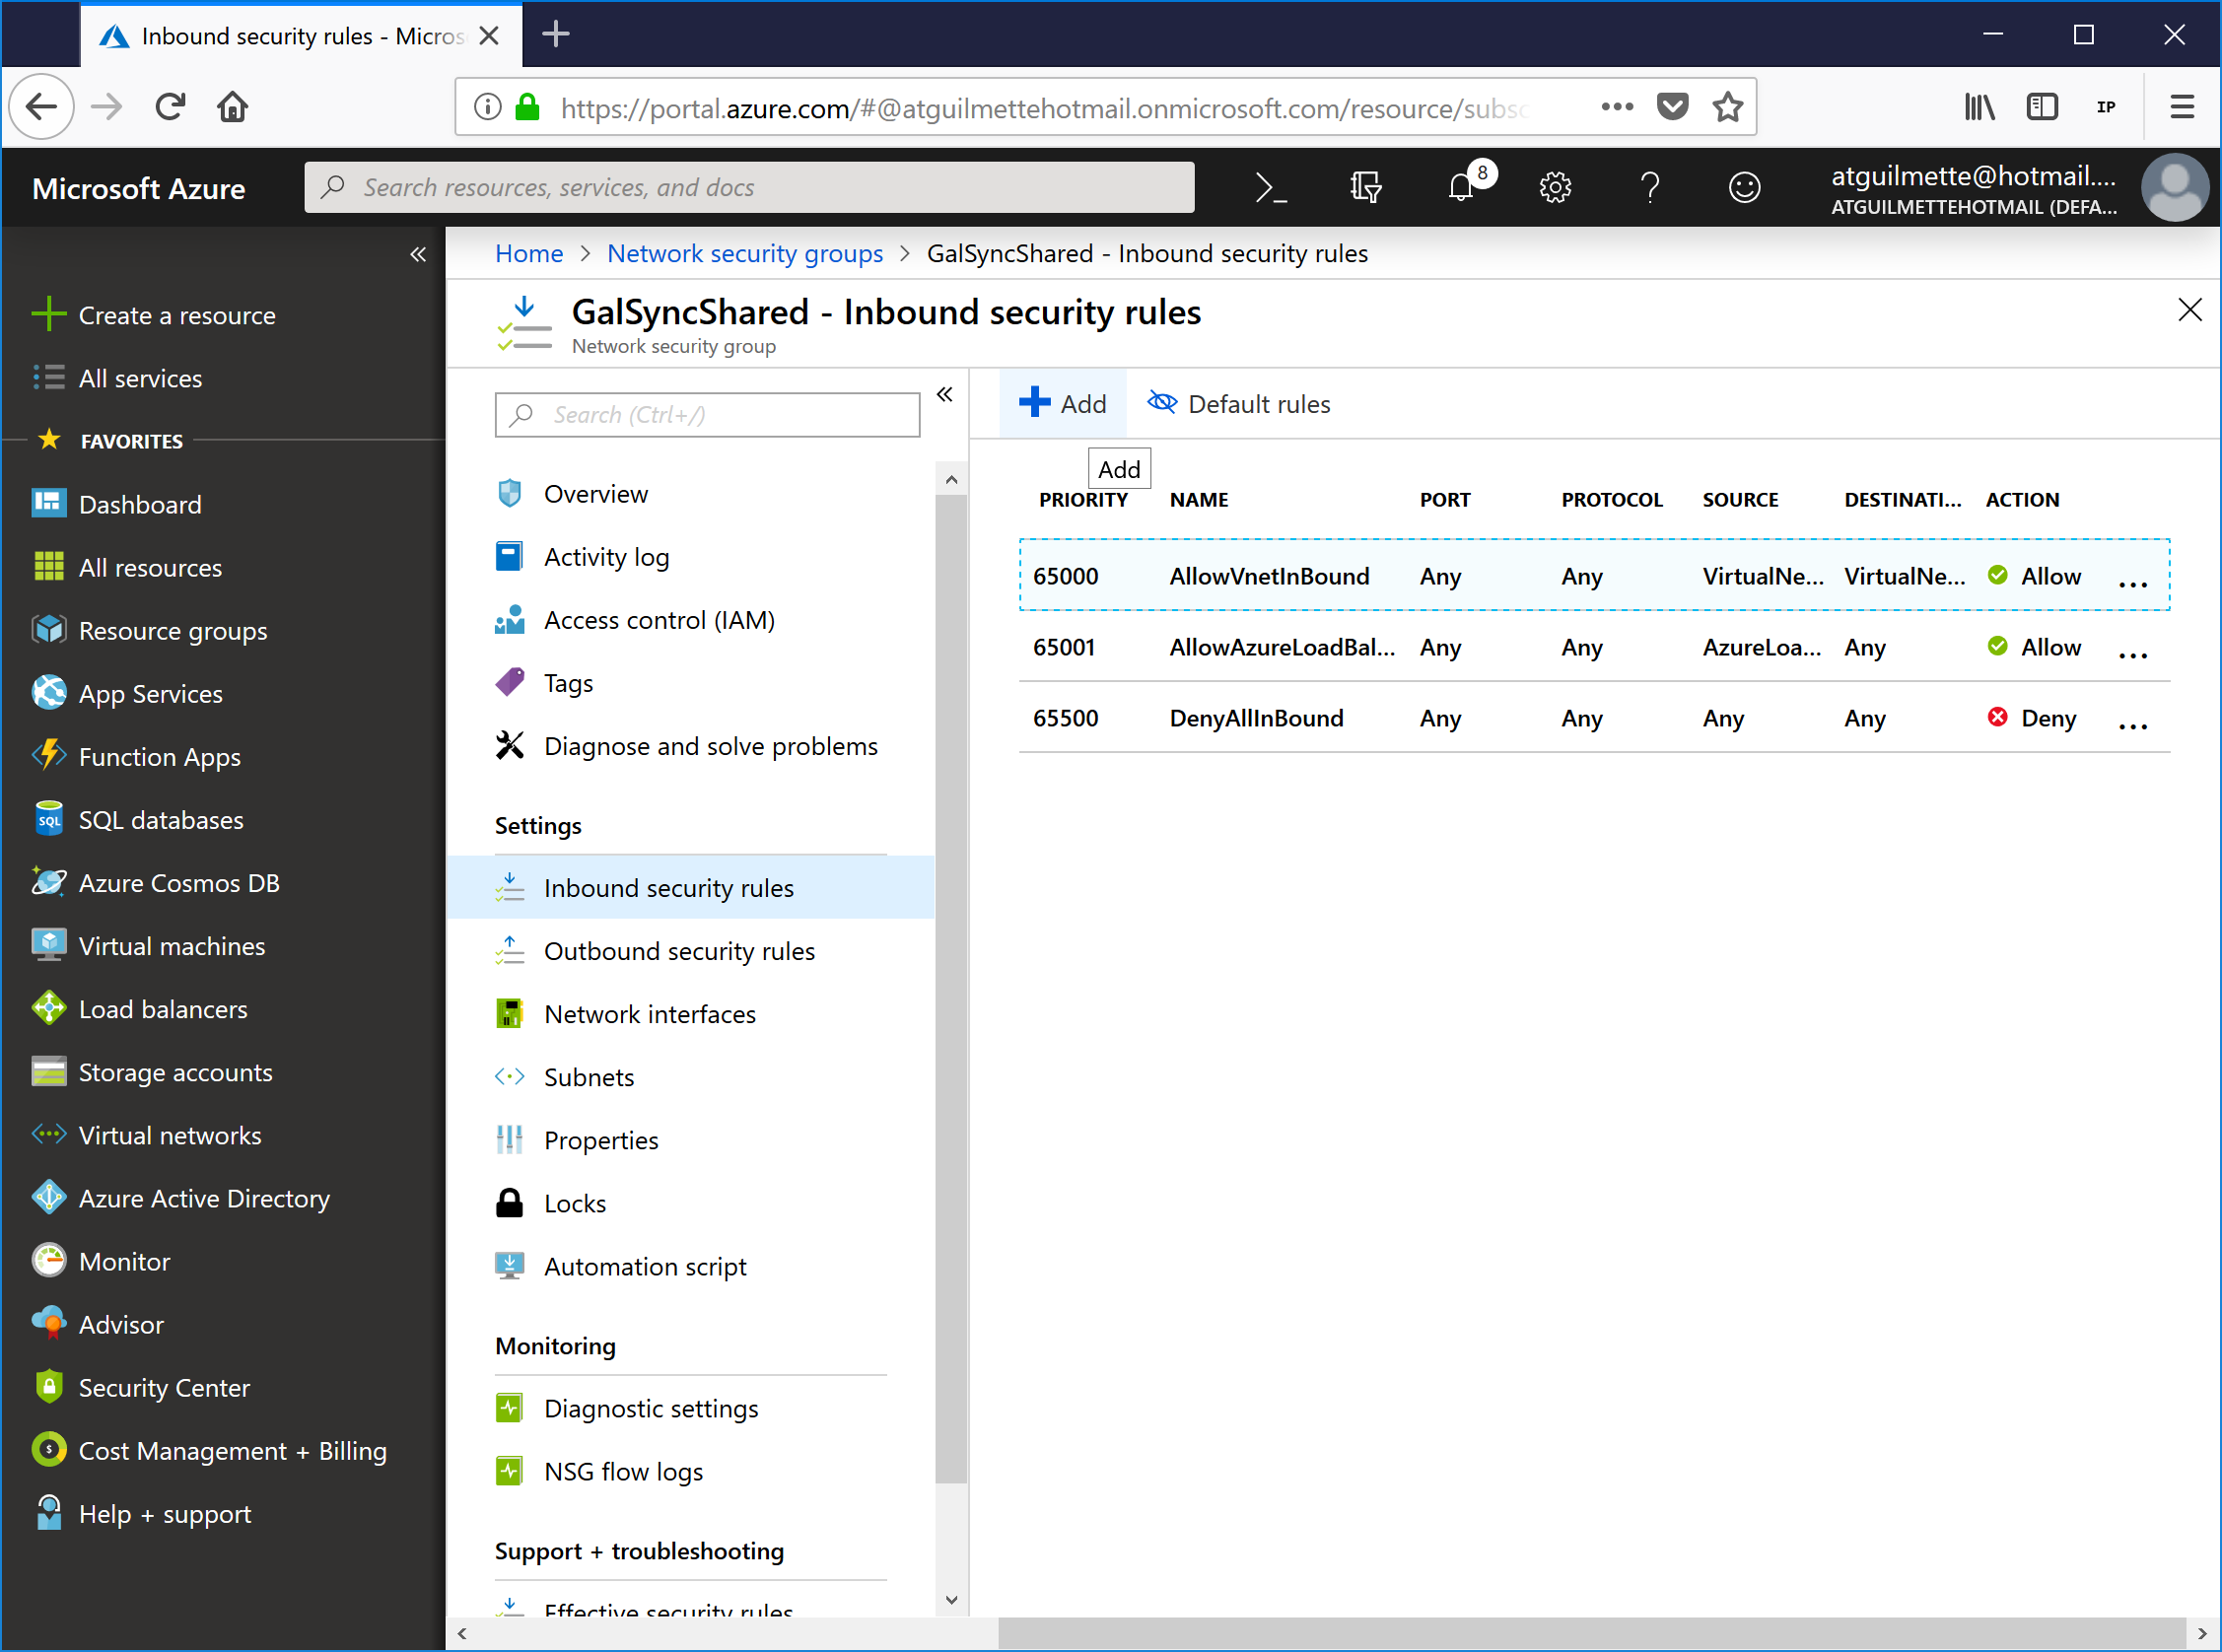
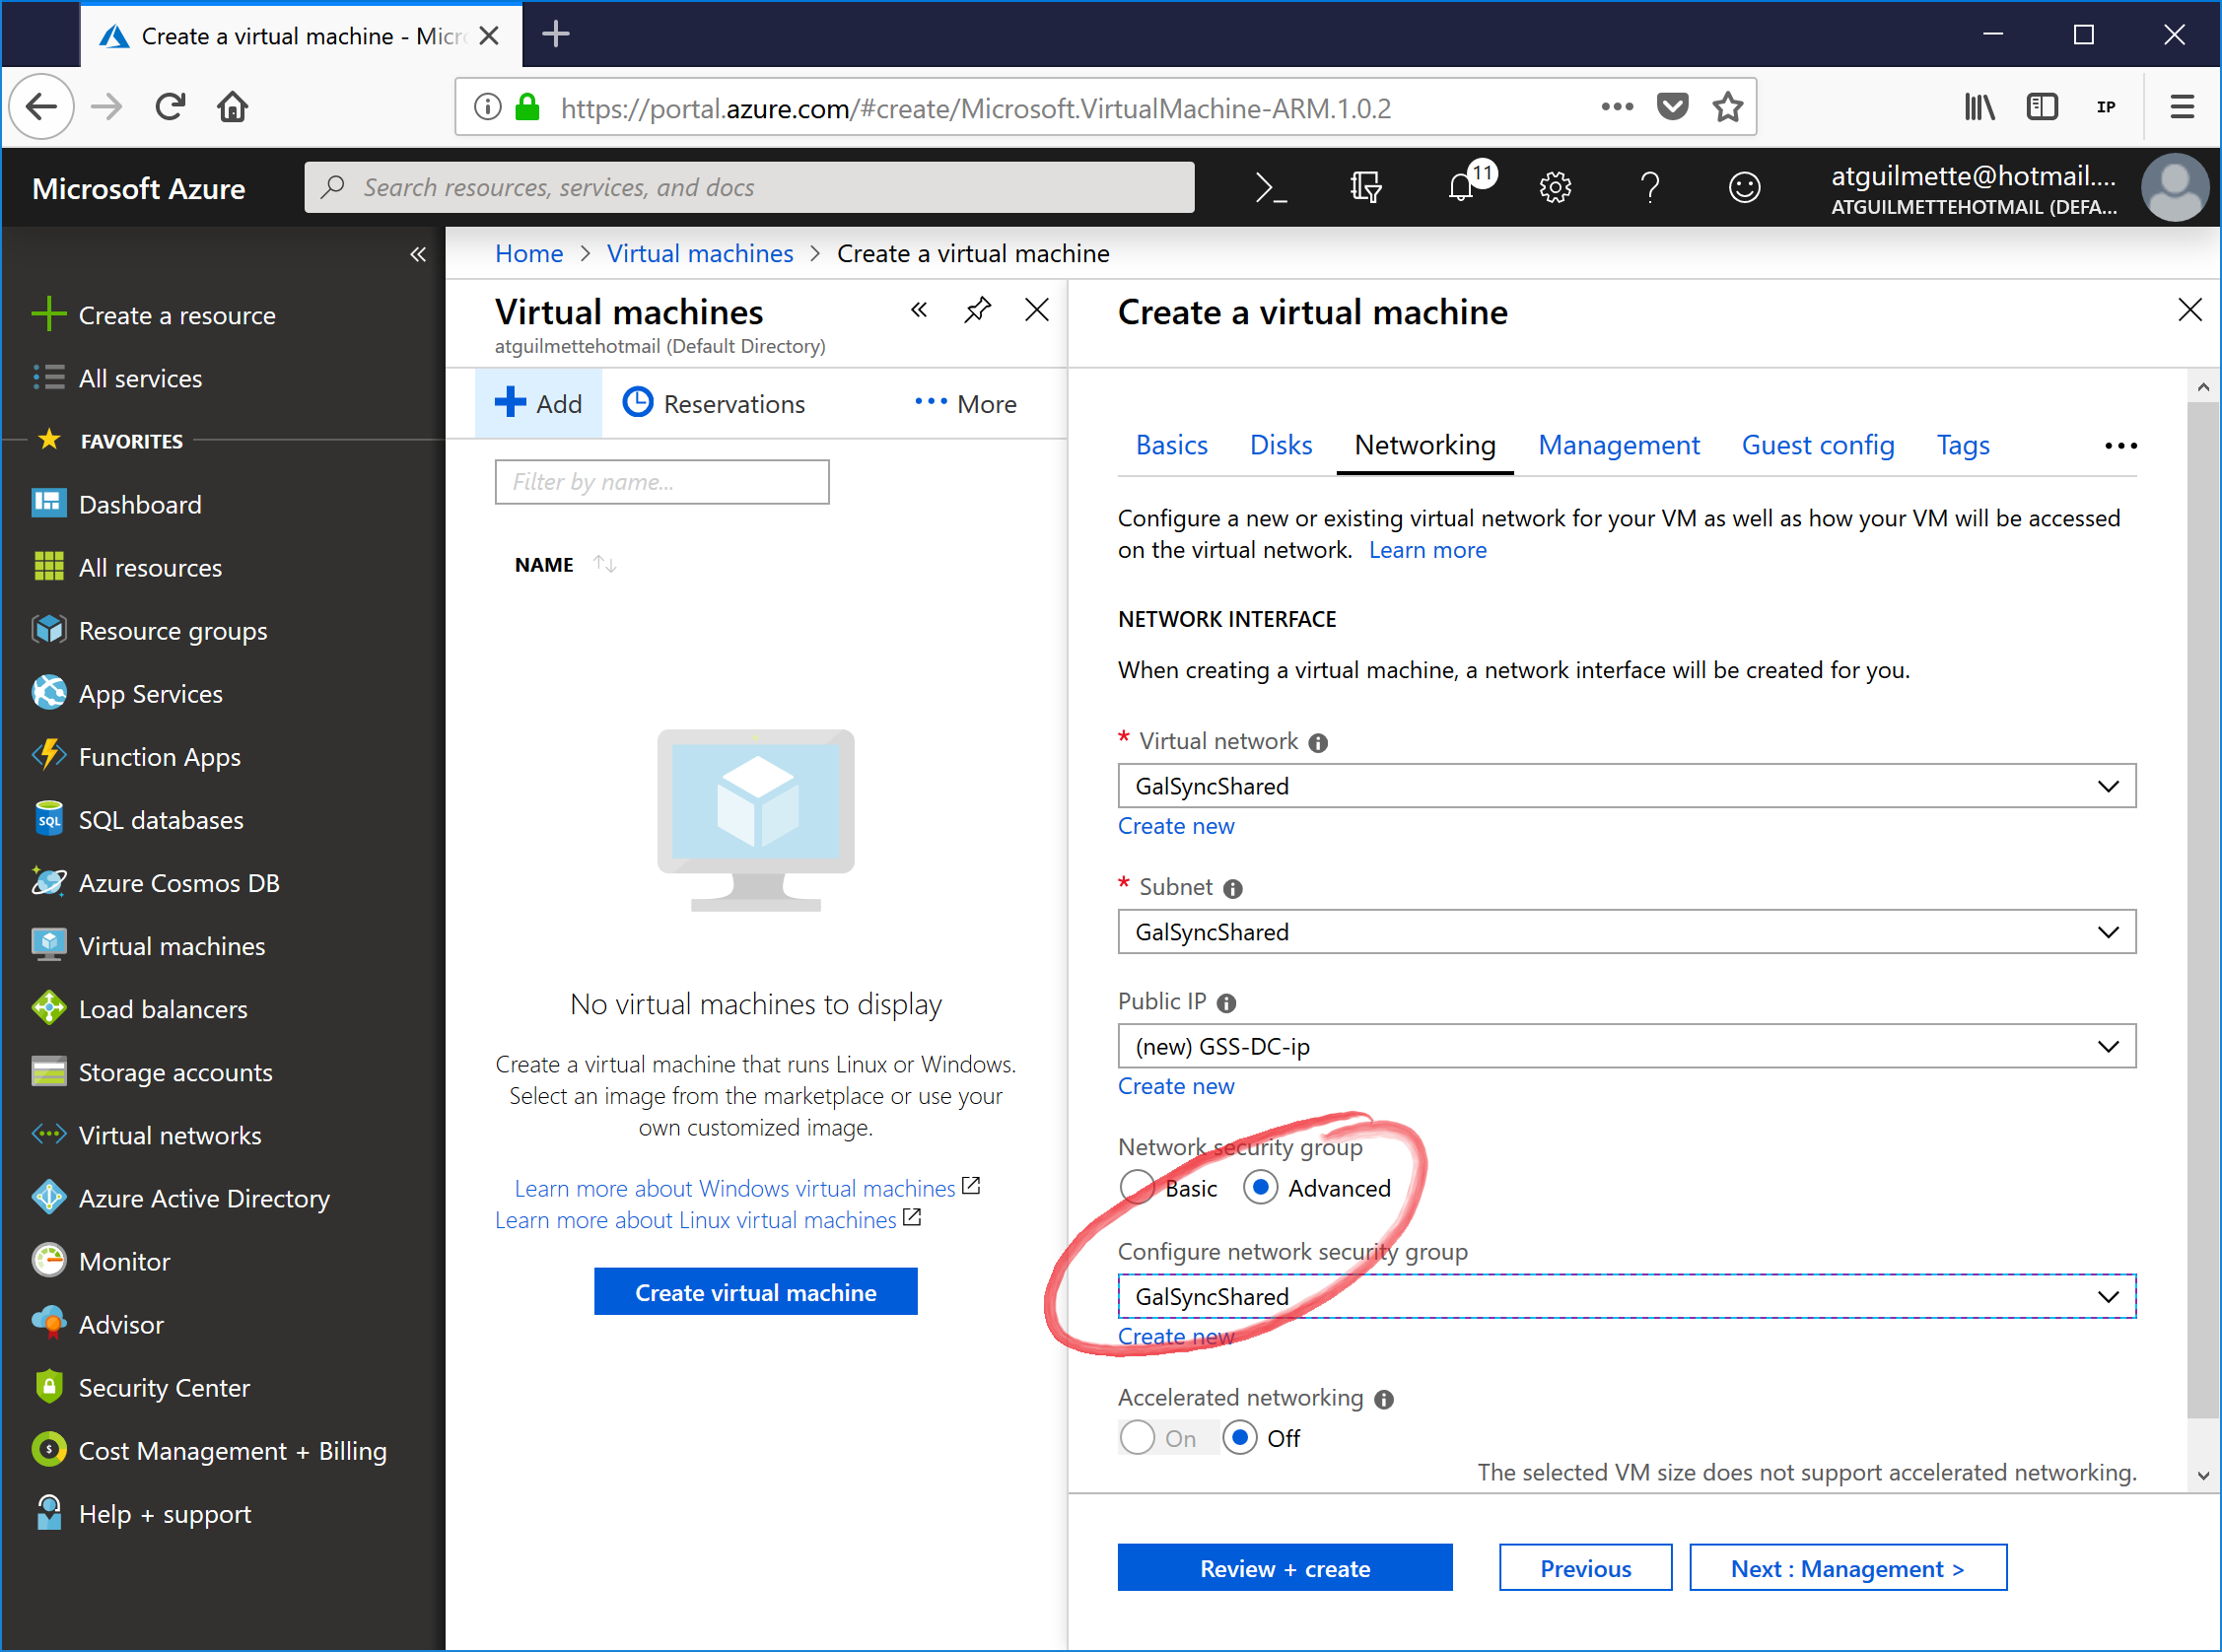
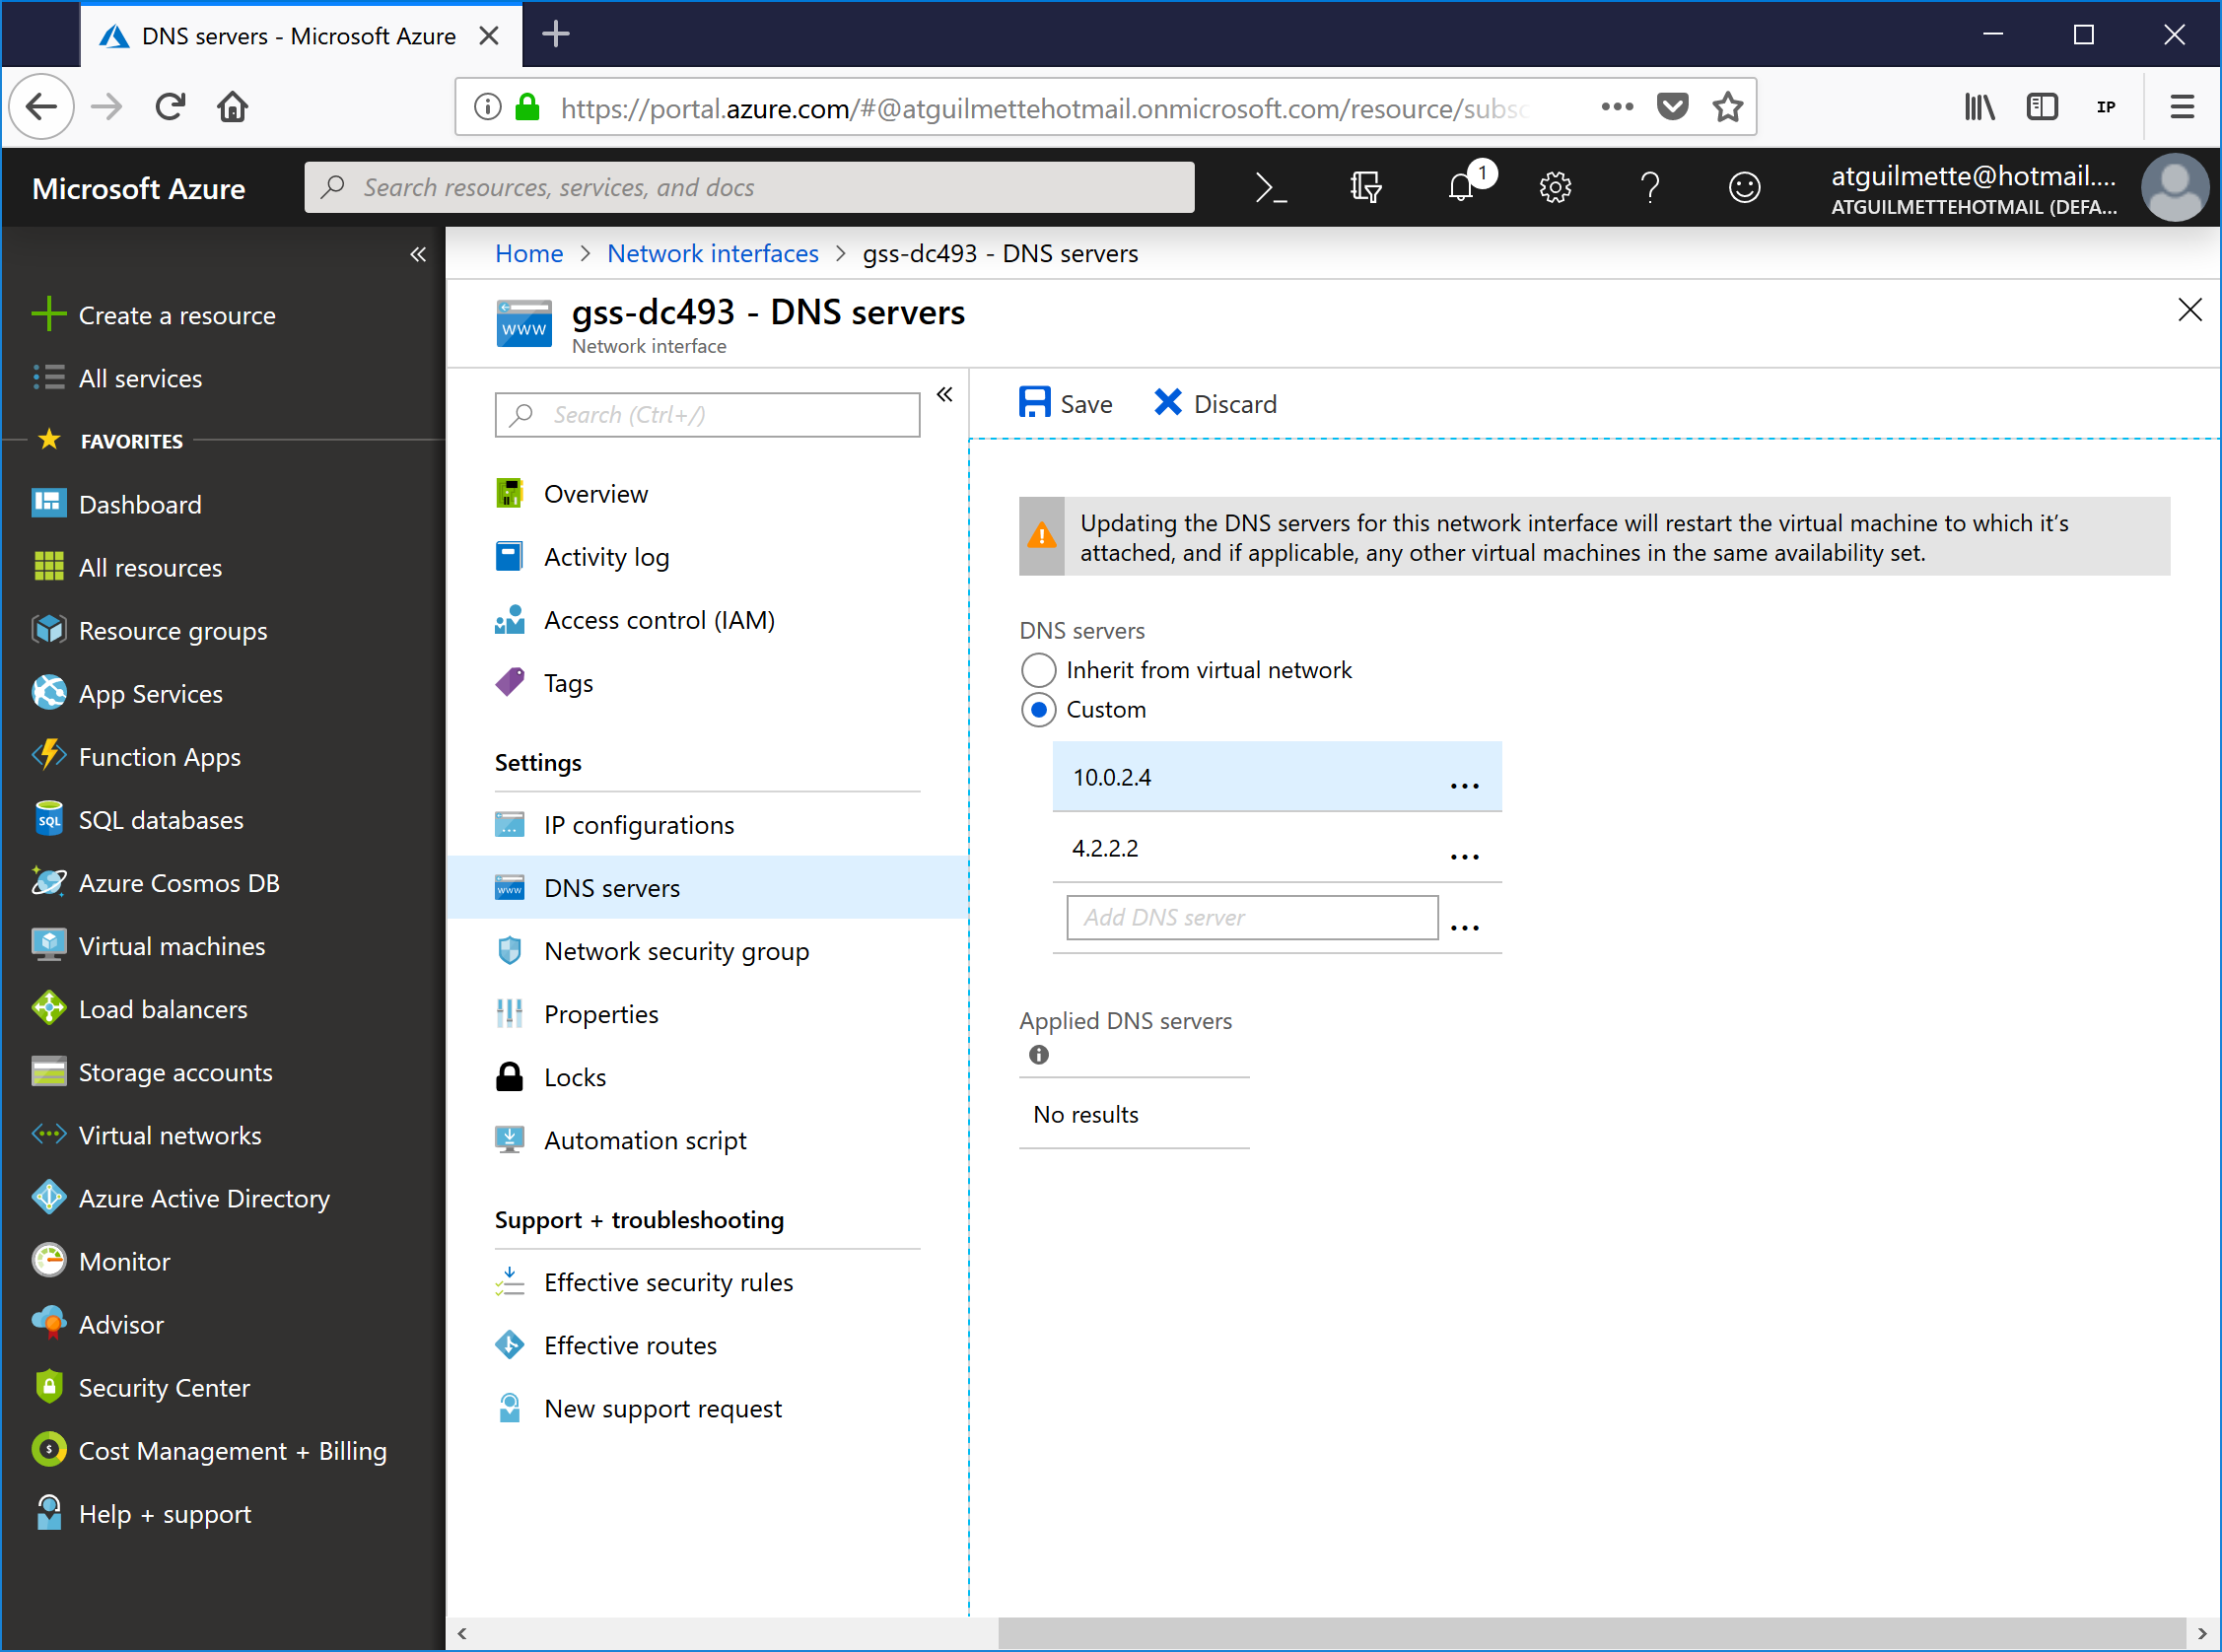
    Good?  Sweet! On to Network Security Groups!

Create Network Security Groups

As mentioned earlier, we need to ensure connectivity from each of the account forests to the resource forest.  To help achieve this, we're going to define some networking to allow us to be able to reach the endpoints. We're going to create a NSG to allow GSTA and GSTB to communicate with GSS on the following ports:

  • 53 - DNS
  • 135 - RPC PortMapper
  • 389 - LDAP
  • 445 - SMB
  • 636 - LDAP over SSL (optional, you can configure AAD Connect to connect securely)
  • 3268 - Global Catalog
  • 3389 - RDP (optional, but during the configuration, I'd like to be able to reach the DC in GSS from either of the account forests)

We're going to create a network security group for each virtual network.  When you create a new network security group, it is automatically populated with the following rules:

Default security rules

Azure creates the following default rules in each network security group that you create:

Inbound

AllowVNetInBound
Priority Source Source ports Destination Destination ports Protocol Access
65000 VirtualNetwork 0-65535 VirtualNetwork 0-65535 All Allow
AllowAzureLoadBalancerInBound
Priority Source Source ports Destination Destination ports Protocol Access
65001 AzureLoadBalancer 0-65535 0.0.0.0/0 0-65535 All Allow
DenyAllInbound
Priority Source Source ports Destination Destination ports Protocol Access
65500 0.0.0.0/0 0-65535 0.0.0.0/0 0-65535 All Deny

Outbound

AllowVnetOutBound
Priority Source Source ports Destination Destination ports Protocol Access
65000 VirtualNetwork 0-65535 VirtualNetwork 0-65535 All Allow
AllowInternetOutBound
Priority Source Source ports Destination Destination ports Protocol Access
65001 0.0.0.0/0 0-65535 Internet 0-65535 All Allow
DenyAllOutBound
Priority Source Source ports Destination Destination ports Protocol Access
65500 0.0.0.0/0 0-65535 0.0.0.0/0 0-65535 All Deny

What that basically amounts to:

  • Allow inbound traffic from all resources in the same virtual network.
  • Block all inbound traffic from anywhere outside of the virtual network.
  • Allow all outbound traffic.

Based on our network requirements, we're going to create three network security groups and then configure the network security group associated with GalSync Shared to allow inbound traffic on the necessary ports.

  1. From the Azure Portal (https://portal.azure.com), select +Create a resource, start typing Network Security Group, and then select it from the list.
  2. Ensure Resource Manager is selected as the deployment type, and click Create.
  3. Enter a name of the security group, select a resource group, and click Create.
  4. Repeat steps 2 and 3, creating network security groups for the additional virtual networks.
  5. After you've created them, click All services, type network security groups to filter the list, and select Network security groups (again, not the classic one).
  6. You should have three brand-spanking new Network Security Groups.

Configure Network Security Groups

Now that we've got NSG objects, we need to configure the rules that will govern our virtual machines when they are created and inserted into the networks.

  1. From the Network Security Groups blade, click on the NSG representing GalSync Shared (resource forest).
  2. Click Subnets, and then click the Associate button.
  3. Click Choose a virtual network and then select the GalSync Shared network.
  4. Select Choose a subnet, and then select the subnet associated with the virtual network.
  5. Click OK.
  6. Click Inbound security rules and then click Add.
  7. For my configuration, I just wanted to create a single rule to capture all of the GALSync traffic.  Using an Advanced rule, you can configure multiple sources and ports.  Ensure the Advanced input is toggled (click the wrench icon to switch between Basic and Advanced).  Select IP Addresses under source, enter the CIDR blocks for GalSyncTenantA and GalSyncTenantB VNets (in my case, 10.0.0.0/24 and 10.0.1.0/24 for the internal addresses and 137.117.58.26 and 168.62.181.187 as the public IPs), set the destination as Virtual network (if you were doing this for real, you might bind it to a specific host. We haven't created any hosts yet, and we're only putting a single host in the network, so this will work fine).  Under Destination port ranges, enter 53,135,389,445,3268,3389.  Select Any under Protocol, and give the rule a name.  Enter a description if you feel enterprising.  Click Add when finished.
  8. Click Network Security Groups in the breadcrumb trail to take you back to the screen in step 1, and then associate a virtual network and subnet with each of the remaining network security groups (steps 2-5).
  9. For all three network security groups, configure an inbound rule for port 3389 from your workstation (which will allow you to log in via an RDP client).  For example, I created an inbound rule in each network security group by selecting the following settings:

Create Virtual Network Gateways

Routing between VNets is, unfortunately, not automatic.  In order to make it work, you need to create a routing topology using Gateways.  We'll have to do this a few times.

Create the Virtual Gateways

  1. From Virtual Networks, click the Resource Forest virtual network.
  2. If you haven't already created the Gateway Subnets, click Subnets, and then click + Gateway subnet.
  3. Enter the subnet you want to use for the gateway subnet.  The Gateway Subnet must be inside the address space for the network.  In this case, I've divided my /24 virtual network into two /25 subnets and used the first half for hosts and the second half for the gateway subnet.
  4. Click Add.
  5. Click +Create a resource, and start typing Virtual Network Gateway. Select Virtual Network Gateway from the list.
  6. Click Create.
  7. Enter a name for the gateway, select VPN for the gateway type, select Route-based for the VPN type, select VpnGw1 for the SKU type, and select the resource forest virtual network.  Enter a name for the Gateway IP (I just copied the name I stuck in the top and appended -IP).  Click Create when finished.
  8. Repeat steps 5-8 for the account forest networks.  Be prepared to wait a while.  Each VPN Gateway can take up to 45 minutes to provision.

Create Virtual Network Gateway Connections

From this point, we'll be creating Vnet-to-Vnet gateways.  The connections will be created on both sides (just like traditional VPN gateways).

  1. Once the network gateways are created, click All services and navigate to Virtual Network Gateways.
  2. Select a Gateway from the list.  In this example, I'm going to start with the resource forest gateway GalSyncSharedVNG, and connect it to GalSyncTenantAVNG.
  3. Select Connections, and then click Add.
  4. Enter a connection name, and then select the virtual network gateways that will be included.  Select VNet-to-VNet as the connection type.  Enter a pre-shared key (you will need the same pre-shared key when you create the VNet on the other side.  You can use a PowerShell one-liner such as this to generate a PSK that will be quite difficult to guess:[System.Convert]::ToBase64String([System.Text.Encoding]::UTF8.GetBytes((Get-Random).ToString() + (Get-Random).ToString() + (Get-Random).ToString()))
  5. Click OK when finished.
  6. Click All services, start typing Virtual Network Gateway, and select Virtual network gateways.  Select the account forest virtual network gateway used in step 4, and then create a connection using the resource forest gateway.  Use the same pre-shared key used in step 4 (both sides of the VNet-to-VNet configuration must use the same key).
  7. Verify connections show as Connected for each virtual network gateway.

Create Domain Controllers in Azure

During this process, we're going to deploy a single virtual machine to each of the virtual networks.  Once we've deployed the VMs, we'll assign static IP addresses and then start the DC promotion process.

Provision virtual machines

  1. From the navigation blade of the Azure portal, All services, start typing virtual machines, and select Virtual machines from the filtered list.
  2. Click Add.
  3. Select a subscription, resource group, and name for your machine.  I've selected my existing GalSync resource group, specified a machine name (GSS-DC), selected a Windows Server 2016 image, and the VM size B2ms (the virtual machine sizes you have available will depend upon your subscription and region), and specified an administrator credential.

  4. Click Next : Disks > to go to the next screen.
  5. Select a disk configuration.  Since this is just a lab environment, I'm going to select standard hard drives.
  6. Click Next : Networking > to go to the networking configuration.
  7. Select the appropriate virtual network, subnet, and a new public IP.  Click Advanced radio button and select the appropriate network security group.
  8. Click Next : Management > to proceed to the next screen.
  9. Select any additional options (I didn't click any here) and click Next : Guest config to continue.
  10. Add any extensions (I also didn't select any) and click Next : Tags > to proceed to the next screen.
  11. Add a tag if you like to further group the resources.  Click Next : Review + create > to proceed to the last screen.
  12. Ensure your machine passes validation and click Create.
  13. Repeat steps 1-12 for the other two virtual machines for the other forests (GalSyncTenantA and GalSyncTenantB) and assign them to the appropriate virtual networks and network security groups.
  14. Click Virtual Machines in the navigation blade and monitor the progress.

Assign Static IPs to Domain Controllers

While it's totally possible to use dynamic IP addresses for your domain controllers, it's definitely not recommended (just like it's not recommended on-premises).  We'll convert the existing dynamic IPs to static IPs, and then we can start the actual installations!

  1. Click All services and start typing network interfaces.  Click Network interfaces to open the blade.
  2. Click the first network interface.
  3. Click IP configurations and then click the IP configuration (likely named ipconfig1).
  4. Under Assignment, select Static.  Select an IP address (it's populated with the current address, so you can just leave it).  Click the Save icon to save changes.
  5. Click the X to close this configuration blade.
  6. Select DNS servers, select Custom, and then add two DNS server entries (primary as this server's static address you assigned in step 4, and a secondary of either an Azure recursive DNS server, a DNS forwarder already configured in your network, or a public recursive DNS server).  Click the Save icon.  Note that your VM will restart.
  7. Repeat steps 1-6 for the remaining servers in the lab.

Install AD DS Role

Using the guide at docs.microsoft.com, install AD DS.  Since I want this to be done sooner rather than later, I'm just going to use PowerShell in an elevated prompt on each server.

  1. Install required Windows Features.
    Install-WindowsFeature -name AD-Domain-Services,Dns -IncludeManagementTools
  2. At the end of the installation, you should have both the AD DS and Dns Server binaries installed.  If you're installing in Azure, you'll probably see this warning, which you can safely ignore (since the virtual machine is configured with a static IP in the VM configuration).
  3. Add a credential.
    $cred = Get-Credential

  4. Configure this server as the first domain controller in a new forest.
    Install-ADDSForest -DomainName <DNS domain name> -SafeModeAdministratorPassword $cred.Password -DomainMode Win2012R2 -DomainNetbiosName <NetBIOS domain name> -ForestMode Win2012R2 -InstallDns

  5. The severs will reboot after installation.

Extend schema for Exchange 2016

In order to ensure the environment has all of the applicable attributes necessary during AAD Connect setup, we need to extend the schema using the Exchange 2016 setup.

On each of the following servers, perform each of the following actions:

  1. Download the Exchange 2016 media (https://www.microsoft.com/en-us/download/confirmation.aspx?id=49161).  You may need to disable the Internet Explorer Enhanced Security Configuration.
    Write-Host -ForegroundColor Green "Closing all Internet Explorer processes."
    If (Get-Process -Name iexplore -ErrorAction SilentlyContinue) { Get-Process -Name iexplore | % { Stop-Process $_ -Force } }
    Write-Host -ForegroundColor Green "Disabling IE Enhanced Security for Administrators."
    $AdminKey = "HKLM:SOFTWAREMicrosoftActive SetupInstalled Components{A509B1A7-37EF-4b3f-8CFC-4F3A74704073}"
    Set-ItemProperty -Path $AdminKey -Name "IsInstalled" -Value 0
  2. Extract the download to a temp folder.
  3. Launch an elevated command prompt (not a PowerShell prompt--things may not work correctly) and change to the directory containing the extracted Exchange 2016 setup files.
  4. From the command prompt, run:
    setup /PrepareSchema /IAcceptExchangeServerLicenseTerms

  5. Restart server.

Prepare Active Directory

Now that the base infrastructure is in place, we're going to create some users in both environments to work with.

On the account forest domain controllers (GSTA-DC and GSTB-DC, in my lab), I'm going to use the Create-LabUsers tool to create about 5,000 users each.

  1. On GSTA-DC, download Create-LabUsers.
  2. Unblock it if necessary (right-click | Properties | Unblock).
  3. Launch an elevated PowerShell session, change to the directory where Create-LabUsers.ps1 was downloaded and then run the following command:
    .Create-LabUsers.ps1 -Domain <verified domain in Office 365> -Company "GalSync Tenant A" -Count 5000 -Password Passw0rd123 -AddUpnSuffix -UpnSuffix <verified domain in Office 365>

    In my case, since I'm not adding any new verified domains (since it's for a lab), so I'm going to tell the script to use my tenant domain as the UPN suffix for my users (and add it as a UPN suffix to the forest).

    .Create-LabUsers.ps1 -Domain galsynctenanta.onmicrosoft.com -Company "GalSync Tenant A" -Count 5000 -Password Passw0rd123 -AddUpnSuffix -UpnSuffix galsynctenanta.onmicrosoft.com

  4. Since we didn't install Exchange, we don't have all of the mail-enabled attributes on those user.  You'll have to update and provision the mailNickname attribute (because we need it later):
    Get-ADUser -Filter * | % { $alias = $_.sAMAccountName; Set-ADUser $_ -Replace @{mailnickname = $alias } }
  5. Close the PowerShell window.
  6. Repeat on GSTB-DC.

Configure Directory Synchronization

This is the last set of steps to perform--making sure that our source tenant environments can communicate with Office 365, configure permissions for write-back, and proceed with the AAD Connect installation.

AAD Connect Prerequisite Test

On each of the account forest DCs (GSTA-DC and GSTB-DC) domain controllers, perform the following:

  1. Download the AAD Connect Network Tool.
  2. Unblock it if necessary (right-click | Properties | Unblock).
  3. Launch an elevated command and change directories to where the script has been downloaded.
  4. Run with the -InstallModules switch to install the MSOnline module and run all tests.  Enter your Azure AD Global Admin credential when prompted.
    .AADConnect-CommunicationsTest.ps1 -InstallModules

  5. Verify that the checks complete successfully.

Configure delegated account for AAD Connect

Most of my customers require a least-privilege deployment for AAD Connect, meaning that they don't want to configure a domain or enterprise admin account as a service account.  AAD Connect fully supports that installation model.  More information can be found on the support page: https://docs.microsoft.com/en-us/azure/active-directory/hybrid/reference-connect-accounts-permissions.  You can use the permissions tool I wrote at http://aka.ms/aadpermissions to configure the specific delegate permissions.

Install AAD Connect

Once that the prerequisite testing has completed successfully, it's time to install AAD Connect.  On both GTSA-DC and GTSB-DC, we're going to use the Express Setup to connect to our tenants.

  1. Download AAD Connect (http://aka.ms/aadconnect).
  2. Launch AAD Connect Setup and choose Express Setup.
  3. Select Exchange Hybrid to enable hybrid-write-back for your user objects.
  4. Follow the bouncing ball until setup is complete.

Whew! Now we're ready to start the hard stuff! On to part 2!


AAD Connect, a dedicated resource forest, a custom connector, and a bunch of transform rules: a GalSync story (Part 2)

$
0
0

In part 1 of our adventure, we built an Azure AD lab to support configuring AAD Connect to work as a GalSync engine. In this post, we'll finish up the configuration.  As a reminder, this is the what the overall solution will look like:

And, as I mentioned in part 1:

Please don't call Premier asking for support on this. They will hunt me down and give me a stern talking to.  As any custom solution is, this is also unsupported.  While it does work and only utilizes built-in connectors, AAD Connect (like Office 365) is an evergreen product, so there is potential that the steps outlined here may someday cease to work or functionality may be deprecated. This works with the build version of AAD Connect current as of this writing: 1.1.882.0 (September 8, 2018)

[toc]

Our story thus far

We definitely got a lot done in the last post:

  • Starting 2 Office 365 Enterprise Trials, each representing a separate organization
  • Setting up 3 virtual networks and network security groups
  • Deploying 3 virtual machines into the network security groups
  • Configuring each of those virtual machines as a new forest
    • Two of the forests will be account forests, representing our two separate organizations
    • One of the forests will be a resource forest, which will act as a staging location for shared global address list
  • Provisioning 5,000 unique users accounts in each of the account forests
  • Running the AAD Connect Network Testing Tool to verify that our two account forests can communicate with Office 365
  • Running the AAD Connect installation in Express mode to configure our account forests to sync to their respective Office 365 tenants

Now that we've got the foundation laid, we're going to start configuring our environments to talk to each other and hopefully end up with 5,000 new contacts in each tenant organization.

Create Dns Conditional Forwarding Zones

As I stated in the original solution description, we're going to leverage the default Active Directory connectors.  The AD connector requires AD DNS SRV record lookups to be successful, so in order to make that happen, we're going to create some conditional forwarding zones.  We need to be able to resolve the shared or resource forest from both of the account forests.  To achieve this, we will use PowerShell.  As a reminder, our network configuration:

GalSyncTenantA, IP Range 10.0.0.0/24, DC IP: 10.0.0.4, NAT IP: 137.117.58.26

C:>Get-ADForest
ApplicationPartitions : {DC=ForestDnsZones,DC=gstenanta,DC=local, DC=DomainDnsZones,DC=gstenanta,DC=local}
CrossForestReferences : {}
DomainNamingMaster : GSTA-DC.gstenanta.local
Domains : {gstenanta.local}
ForestMode : Windows2012R2Forest
GlobalCatalogs : {GSTA-DC.gstenanta.local}
Name : gstenanta.local
PartitionsContainer : CN=Partitions,CN=Configuration,DC=gstenanta,DC=local
RootDomain : gstenanta.local
SchemaMaster : GSTA-DC.gstenanta.local
Sites : {Default-First-Site-Name}
SPNSuffixes : {}
UPNSuffixes : {galsynctenanta.onmicrosoft.com

GalSyncTenantB, IP Range 10.0.1.0/24, DC IP: 10.0.1.4, NAT IP: 168.62.181.187

C:>Get-ADForest
ApplicationPartitions : {DC=ForestDnsZones,DC=gstenantb,DC=local, DC=DomainDnsZones,DC=gstenantb,DC=local}
CrossForestReferences : {}
DomainNamingMaster : GSTB-DC.gstenanta.local
Domains : {gstenantb.local}
ForestMode : Windows2012R2Forest
GlobalCatalogs : {GSTB-DC.gstenanta.local}
Name : gstenantb.local
PartitionsContainer : CN=Partitions,CN=Configuration,DC=gstenantb,DC=local
RootDomain : gstenantb.local
SchemaMaster : GSTB-DC.gstenanta.local
Sites : {Default-First-Site-Name}
SPNSuffixes : {}
UPNSuffixes : {galsynctenantb.onmicrosoft.com}

GalSyncShared, IP Range 10.0.2.0/24, DC IP: 10.0.2.4, NAT IP: 23.96.103.200

C:>Get-ADForest
ApplicationPartitions : {DC=ForestDnsZones,DC=gsshared,DC=local, DC=DomainDnsZones,DC=gsshared,DC=local}
CrossForestReferences : {}
DomainNamingMaster : GSS-DC.gsshared.local
Domains : {gsshared.local}
ForestMode : Windows2012R2Forest
GlobalCatalogs : {GSS-DC.gsshared.local}
Name : gsshared.local
PartitionsContainer : CN=Partitions,CN=Configuration,DC=gsshared,DC=local
RootDomain : gsshared.local
SchemaMaster : GSS-DC.gsshared.local
Sites : {Default-First-Site-Name}
SPNSuffixes : {}
UPNSuffixes : {}

Since the diagram shows exporting to and importing from the GalSyncShared forest, we'll need to be able to locate that forest from each of the account forests.  So, we can run this in each of the account forests:

$DnsServers = @('<IP addresses of DC in resource forest')
Add-DnsServerConditionalForwarderZone -MasterServers $DnsServers -Name <resource forest FQDN>

In my environment, it looks like this:

$DnsServers = @('10.0.2.4')
Add-DnsServerConditionalForwarderZone -MasterServers $DnsServers -Name gsshared.local

In the previous post, we configured some network security groups. Now, it's time to test them out!  As the solution requires, we need to verify that we have network connectivity to our resource forest from our account forests. Grab the AAD Network Tool and run it from each of the account forest DCs (GTSA-DC and GTSB-DC, in my lab) with the following parameters:

.AADConnect-CommunicationsTest.ps1 -DCs <FQDN of one or more DCs in remote forest> -ActiveDirectory -ForestFQDN <resource forest FQDN> -Dns -Network

So, in my lab, it looks like this:

.AADConnect-CommunicationsTest.ps1 -DCs gss-dc.gshshared.local -ActiveDirectory -ForestFQDN gsshared.local -Dns -Network

This test verifies that all of the networking and name resolution prerequisites are met in order to be able to add another AD connector to AAD Connect.  Run this in each account forest and attempt to communicate with the resource forest.

Prepare the Resource Forest

In this step, we're going to prepare the resource forest and delegated service accounts.  Similar to a standard mutli-forest configuration, we're going to need to specify an account to use to connect with in the remote resource forest.  We're also going to specify which organizational unit structure we want to scope our connector to (well, we need to create it first, technically).

  1. Log into the resource forest domain controller.  In my lab, this is gss-dc.gsshared.local.
  2. Launch Active Directory Users and Computers.
  3. Create an Organizational Unit called something easy to identify, such as Shared GAL.

  4. Then, underneath it, create an OU for each organization that will be utilizing the shared resource forest.
    and
  5. In the users container (or any other container not in the Shared GAL path), create two new users--one for each tenant.  I'm going to name my accounts pretty obvious names: admin-tenanta and admin-tenantb.
  6. Select View | Advanced Features.
  7. Right-click on OU=Tenant A,OU=Shared GAL, select Properties, and then select the Security tab.  Click Add, add admin-tenanta, and then click the Full Control check box under the Allow column.
  8. Click Advanced, and then click the entry for admin-tenanta. Click Edit. Ensure This object and all descendant objects is selected in addition to Full Control.
  9. Click OK. Repeat the procedure for OU=Tenant B,OU=Shared GAL and admin-tenantb.

Create Connector for Resource Forest

Now that we have name resolution and network connectivity established as well as an OU structure in the resource forest, we're going to start the AAD Connect configuration.  A brief overview:

  • Stop AAD Connect Sync Cycle Schedule
  • Establish a new connector
  • Create Run Profiles
  • Create metaverse attribute

These steps will establish the connectivity between AAD Connect and the resource forest and configure the run steps that will allow connector to execute later.  These steps will be performed on each of the account forest AAD Connect servers.

Disable AAD Connect Schedule

  1. Launch an elevated PowerShell window.
  2. Run the following command to disable the synchronization scheduler:
    Set-ADSyncScheduler -SyncCycleEnabled $false

Create Connector

  1. Click Start and select the Synchronization Service.
  2. Click the Operations tab, and then select Create from the Actions Pane (or right-click | Create in the empty area).
  3. Select the type of connector as Active Directory Domain Services.  Enter a name and a description and click Next.
  4. Enter the resource forest name, the admin account created previously for this account forest, password, and the  DNS domain name. Click Next.
  5. Select the domain partition shown, and then click the Containers button.
  6. Deselect all containers except the Shared GAL container created previously. Click OK when finished.
  7. Click Next.
  8. On the Configure Provisioning Hierarchy page, click Next without making any changes.
  9. On the Select Object Types page, click contact to add it to the list of selected object types.  Click Next.
  10. On the Select Attributes page, click the Show All checkbox, and then select the following attributes:
    c
    cn
    co
    company
    department
    description
    displayName
    division
    extensionAttribute1
    extensionAttribute10
    extensionAttribute11
    extensionAttribute12
    extensionAttribute13
    extensionAttribute14
    extensionAttribute15
    extensionAttribute2
    extensionAttribute3
    extensionAttribute4
    extensionAttribute5
    extensionAttribute6
    extensionAttribute7
    extensionAttribute8
    extensionAttribute9
    facsimileTelephoneNumber
    givenName
    homePhone
    info
    initials
    l
    mail
    mailNickname
    middleName
    mobile
    msExchRecipientDisplayType
    msExchRecipientTypeDetails
    objectGUID
    otherHomePhone
    otherTelephone
    pager
    physicalDeliveryOfficeName
    postalAddress
    postalCode
    postOfficeBox
    proxyAddresses
    sn
    st
    street
    streetAddress
    targetAddress
    telephoneAssistant
    telephoneNumber
    title
  11. Click OK to complete the creation of the connector.

Create Run Profiles

Run profiles are action definitions for the connector.  For example, if AAD Connect calls a profile with the Full Import action, it will import all objects in scope in the connected directory.

  1. On the Connections tab, right-click on the Shared GAL connector and click Configure Run Profiles.
  2. Click New Profile.
  3. Enter Full Import in the name field and click Next.
  4. Select the Full Import step type and click Next.
  5. Click Finish.
  6. Click New Profile.
  7. Enter Full Synchronization in the name field and click Next.
  8. Select the Full Synchronization step type and click Next.
  9. Click Finish.
  10. Click New Profile.
  11. Enter Delta Import in the name field and click Next.
  12. Select the Delta Import (Stage Only) step type and click Next.
  13. Click Finish.
  14. Click New Profile.
  15. Enter Delta Synchronization in the name field and click Next.
  16. Select the Delta Synchronization step type and click Next.
  17. Click Finish.
  18. Click New Profile.
  19. Enter Export in the name field and click Next.
  20. Select the Export step type and click Next.
  21. Click Finish.  You should now have 5 run profiles configured.
  22. Click OK.

Create metaverse attribute

For this custom configuration, we're going to create a custom metaverse attribute to hold a unique value that we can assign to objects in the remote forest. In the event that we have two objects with otherwise identical properties (for example, two users name John Smith), we can use this stored value which is unique to this installation to ensure uniqueness of objects going to the resource forest.

  1. From inside the Synchronization Service Manager, click Metaverse Designer.
  2. Click the person object type.
  3. Click Add Attribute.
  4. Click New Attribute.
  5. Enter a new attribute name.  In this example, I'm going to use customMailNicknameBe exactly sure of what you enter.  This is case-sensitive, and bad things will happen if you capitalize it differently throughout the configuration process.
  6. Click OK to close the Add Attribute to Object Type dialog box.
  7. Click the group object type.
  8. Click Add Attribute.
  9. Select customMailNickname from the list and click OK.

Create Synchronization Rules

The synchronization rules is where all of the magic happens.  You can download this script, which is all of the rules assembled here.  If you have used a different custom attribute in the Metaverse, you'll need to specify it with -CustomMetaverseAttribute. To run the script:

  1. Download it to each of the AAD connect servers participating in the synchronization.
  2. Launch an elevated PowerShell window and change to the directory where you've saved the script.
  3. The script requires a TargetOU parameter, so, you'll need to specify the OU that you created above for the forest that you're syncing from.  For example, if we're configuring this in GalSync Tenant A (GSTA), I'd use "OU=Tenant A,OU=Shared GAL,DC=gsshared,DC=local" as my OU path.
    .CustomGAL -TargetOU "OU=Tenant A,OU=Shared GAL,DC=gsshared,DC=local"

  4. Select the AD connector that represents your current Active Directory Account ForestIn this case, I'm going to choose 1.
  5. Select the AD connector that represents the Active Directory Resource Forest.  In this case, I'm going to choose 2.
  6. Confirm your choice.  The script will create the necessary connectors.

Or, if you're a glutton for punishment, you can go through the process outlined here to create the sync rules manually.

In from AD - Prevent Contact Target Address

The purpose of this rule is to prevent the flowing of an AD user’s targetAddress into their corresponding contact’s targetAddress when the object gets synchronized out to the GAL.

  1. Launch the Synchronization Rules Editor.
  2. Select Inbound under direction, and then click Add New Rule.
  3. On the Description page, enter the following values:
Name In from AD - Prevent Contact Target Address
Connected System Organization Active Directory connector
Connected System Object Type user
Metaverse Object Type person
Link Type join
Precedence 90 (or other unused value about 10 below default rules)
  1. Click Next.
  2. On the Scoping Filter page, click Next.
  3. On the Join Rules page, click Next.
  4. On the Transformations page, click Add.
  5. Enter the following values:
Flow Type Target Attribute Source Apply Once Merge Type
Expression targetAddress AuthoritativeNull Update
  1. Click Add.

In from AD - Flow CustomMailNickname - Group

The purpose of this rule is to populate the CustomMailNickname attribute on the objects that will be going to the Shared GAL.  It will be used to help construct unique names in the event that multiple source objects have the same alias value.

  1. Select Inbound under direction, and then click Add New Rule.
  2. On the Description page, enter the following values:
Name In from AD - Flow CustomMailNickname - Group
Connected System Organization Active Directory connector
Connected System Object Type group
Metaverse Object Type group
Link Type join
Precedence 98 (or other unused value higher than Prevent Contact Target Adress)
  1. Click Next.
  2. On the Scoping Filter page, click Add Group.
  3. Click Add Clause.
    Enter the following values:
Attribute Operator Value
mailNickname ISNOTNULL
  1. Click Next.
  2. On the Join Rules page, click
  3. On the Transformations page, enter the following values:
Flow Type Target Attribute Source Apply Once Merge Type
Expression customMailNickname %Forest.Netbios% & "." & [mailNickname] Update
  1. Click Add.

In from AD - Flow CustomMailNickname - User

The purpose of this rule is to populate the CustomMailNickname attribute on the objects that will be going to the Shared GAL.  It will be used to help construct unique names in the event that multiple source objects have the same alias value.

  1. Select Inbound under direction, and then click Add New Rule.
  2. On the Description page, enter the following values:
Name In from AD - Flow CustomMailNickname - User
Connected System Organization Active Directory connector
Connected System Object Type user
Metaverse Object Type person
Link Type join
Precedence 99 (or other unused value higher than Flow CustomMailNickname - Group)
  1. Click Next.
  2. On the Scoping Filter page, enter the following values:
Attribute Operator Value
mailNickname ISNOTNULL
  1. Click Next.
  2. On the Join Rules page, click
  3. On the Transformations page, enter the following values:
Flow Type Target Attribute Source Apply Once Merge Type
Expression customMailNickname %Forest.Netbios% & "." & [mailNickname] Update
  1. Click Add.

In from AD - Shared GAL Contact

The purpose of this rule is to import objects from the Shared GAL to the AAD Connect metaverse.

  1. Select Inbound under direction, and then click Add New Rule.
  2. On the Description page, enter the following values:
Name In from AD - Shared GAL Contact
Connected System Shared GAL (resource forest)
Connected System Object Type contact
Metaverse Object Type person
Link Type provision
Precedence 201 (or other unused value higher than all default values)
  1. Click Next.
  2. On the Scoping Filter page, enter the following values:
Attribute Operator Value
dn NOTCONTAINS .group.
mail NOTCONTAINS @[organization SMTP]
  1. Click Next.
  2. On the Join Rules page, click Add group.
  3. Click Add clause.
  4. Enter the following values, clicking Add clause to add a line for each join rule:
Source Attribute Target Attribute Case Sensitive
mailNickname customMailNickname
mail mail
  1. Click Next.
  2. On the Transformations page, enter the following values:
Flow Type Target Attribute Source Apply Once Merge Type
Expression c Trim([c]) Update
Direct cn cn Update
Expression co Trim([co]) Update
Expression company Trim([company]) Update
Direct countryCode countryCode Update
Expression department Trim([department]) Update
Expression description IIF(IsNullOrEmpty([description]),NULL,Left(Trim(Item([description],1)),448)) Update
Expression displayName IIF(IsNullOrEmpty([displayName]),[cn],[displayName]) Update
Expression extensionAttribute1 Trim([extensionAttribute1]) Update
Expression extensionAttribute2 Trim([extensionAttribute2]) Update
Expression extensionAttribute3 Trim([extensionAttribute3]) Update
Expression extensionAttribute4 Trim([extensionAttribute4]) Update
Expression extensionAttribute5 Trim([extensionAttribute5]) Update
Expression extensionAttribute6 Trim([extensionAttribute6]) Update
Expression extensionAttribute7 Trim([extensionAttribute7]) Update
Expression extensionAttribute8 Trim([extensionAttribute8]) Update
Expression extensionAttribute9 Trim([extensionAttribute9]) Update
Expression extensionAttribute10 Trim([extensionAttribute10]) Update
Expression extensionAttribute11 Trim([extensionAttribute11]) Update
Expression extensionAttribute12 Trim([extensionAttribute12]) Update
Expression extensionAttribute13 Trim([extensionAttribute13]) Update
Expression extensionAttribute14 Trim([extensionAttribute14]) Update
Expression extensionAttribute15 Trim([extensionAttribute15]) Update
Expression facsimileTelephoneNumber Trim([facsimileTelephoneNumber]) Update
Expression givenName Trim([givenName]) Update
Expression homePhone Trim([homePhone]) Update
Expression info Left(Trim([info]),448) Update
Expression initials Trim([initials]) Update
Expression ipPhone Trim([ipPhone]) Update
Expression l Trim([l]) Update
Expression mail Trim([mail]) Update
Expression mailNickname IIF(IsPresent([mailNickname]), [mailNickname], [cn]) Update
Expression middleName Trim([middleName]) Update
Expression mobile Trim([mobile]) Update
Direct msExchRecipientDisplayType msExchRecipientDisplayType Update
Direct msExchRecipientTypeDetails msExchRecipientTypeDetails Update
Expression otherFacsimileTelephoneNumber Trim([otherFacsimileTelephoneNumber]) Update
Expression otherHomePhone Trim([otherHomePhone]) Update
Expression otherIpPhone Trim([otherIpPhone]) Update
Expression otherMobile Trim([otherMobile]) Update
Expression otherPager Trim([otherPager]) Update
Expression otherTelephone Trim([otherTelephone]) Update
Expression pager Trim([pager]) Update
Expression physicalDeliveryOfficeName Trim([physicalDeliveryOfficeName]) Update
Expression postalCode Trim([postalCode]) Update
Expression postOfficeBox IIF(IsNullOrEmpty([postOfficeBox]),NULL,Left(Trim(Item([postOfficeBox],1)),448)) Update
Expression proxyAddresses RemoveDuplicates(Trim(ImportedValue("proxyAddresses"))) Update
Expression sn Trim([sn]) Update
Expression sourceAnchor ConvertToBase64([objectGUID]) Update
Direct sourceAnchorBinary objectGUID Update
Constant sourceObjectType Contact Update
Expression st Trim([st]) Update
Expression streetAddress Trim([streetAddress]) Update
Direct targetAddress targetAddress Update
Expression telephoneAssistant Trim([telephoneAssistant]) Update
Expression telephoeNumber Trim([telephoneNumber]) Update
Expression title Trim([title]) Update
Expression cloudFiltered IIF(IsPresent([isCriticalSystemObject]) || ( (InStr([displayName], "(MSOL)") > 0) && (CBool([msExchHideFromAddressLists]))) || (Left([mailNickname], 4) = "CAS_" && (InStr([mailNickname], "}") > 0)) || CBool(InStr(DNComponent(CRef([dn]),1),"\0ACNF:")>0), True, NULL) Update
Expression mailEnabled IIF(( (IsPresent([proxyAddresses]) = True) && (Contains([proxyAddresses], "SMTP:") > 0) && (InStr(Item([proxyAddresses], Contains([proxyAddresses], "SMTP:")), "@") > 0)) ||  (IsPresent([mail]) = True && (InStr([mail], "@") > 0)), True, False) Update
  1. Click Add.

Out to AD - Shared GAL User Contact

The purpose of this rule is to provision a new user contact object in the organization’s Office 365 GAL OU (the resource forest).

  1. Select Outbound under direction, and then click Add New Rule.
  2. On the Description page, enter the following values:
Name Out to AD – Shared GAL User Contact
Connected System Shared GAL [resource forest]
Connected System Object Type contact
Metaverse Object Type person
Link Type provision
Precedence 300 (or other unused value higher than all other rules)
  1. Click Next.
  2. On the Scoping Filter page, enter the following values for each domain for which the agency hosts mail:
Attribute Operator Value
customMailNickname ISNOTNULL
mail ISNOTNULL
  1. Click Next.
  2. On the Join Rules page, enter the following values:
Source Attribute Target Attribute Case Sensitive
mail mail
  1. Click Next.
  2. On the Transformations page, enter the following values:
Flow Type Target Attribute Source Apply Once Merge Type
Expression c Trim([c]) Update
Expression co Trim([co]) Update
Expression company Trim([company]) Update
Direct countryCode countryCode Update
Expression department Trim([department]) Update
Expression description IIF(IsNullOrEmpty([description]),NULL,Left(Trim(Item([description],1)),448)) Update
Expression displayName IIF(IsNullOrEmpty([displayName]),[cn],[displayName]) Update
Expression dn "CN=" & [customMailNickname] & ",OU=<dept>, OU=Shared GAL,DC=[resource forest],DC=[tld]" Update
Expression extensionAttribute1 Trim([extensionAttribute1]) Update
Expression extensionAttribute2 Trim([extensionAttribute2]) Update
Expression extensionAttribute3 Trim([extensionAttribute3]) Update
Expression extensionAttribute4 Trim([extensionAttribute4]) Update
Expression extensionAttribute5 Trim([extensionAttribute5]) Update
Expression extensionAttribute6 Trim([extensionAttribute6]) Update
Expression extensionAttribute7 Trim([extensionAttribute7]) Update
Expression extensionAttribute8 Trim([extensionAttribute8]) Update
Expression extensionAttribute9 Trim([extensionAttribute9]) Update
Expression extensionAttribute10 Trim([extensionAttribute10]) Update
Expression extensionAttribute11 Trim([extensionAttribute11]) Update
Expression extensionAttribute12 Trim([extensionAttribute12]) Update
Expression extensionAttribute13 Trim([extensionAttribute13]) Update
Expression extensionAttribute14 Trim([extensionAttribute14]) Update
Expression extensionAttribute15 Trim([extensionAttribute15]) Update
Expression facsimileTelephoneNumber Trim([facsimileTelephoneNumber]) Update
Expression givenName Trim([givenName]) Update
Expression homePhone Trim([homePhone]) Update
Expression info Left(Trim([info]),448) Update
Expression initials Trim([initials]) Update
Expression ipPhone Trim([ipPhone]) Update
Expression l Trim([l]) Update
Expression mail Trim([mail]) Update
Expression mailNickname IIF(IsPresent([mailNickname]), [mailNickname], [cn]) Update
Expression middleName Trim([middleName]) Update
Expression mobile Trim([mobile]) Update
Constant msExchRecipientDisplayType 6 Update
Constant msExchRecipientTypeDetails 128 Update
Expression otherFacsimileTelephoneNumber Trim([otherFacsimileTelephoneNumber]) Update
Expression otherHomePhone Trim([otherHomePhone]) Update
Expression otherIpPhone Trim([otherIpPhone]) Update
Expression otherMobile Trim([otherMobile]) Update
Expression otherPager Trim([otherPager]) Update
Expression otherTelephone Trim([otherTelephone]) Update
Expression pager Trim([pager]) Update
Expression physicalDeliveryOfficeName Trim([physicalDeliveryOfficeName]) Update
Expression postalCode Trim([postalCode]) Update
Expression postOfficeBox IIF(IsNullOrEmpty([postOfficeBox]),NULL,Left(Trim(Item([postOfficeBox],1)),448)) Update
Expression proxyAddresses RemoveDuplicates(Trim(ImportedValue("proxyAddresses"))) Update
Expression sn Trim([sn]) Update
Expression sourceAnchor ConvertToBase64([objectGUID]) Update
Direct sourceAnchorBinary objectGUID Update
Constant sourceObjectType Contact Update
Expression st Trim([st]) Update
Expression streetAddress Trim([streetAddress]) Update
Expression targetAddress "SMTP:" & [mail] Update
Expression telephoneAssistant Trim([telephoneAssistant]) Update
Expression telephoeNumber Trim([telephoneNumber]) Update
Expression title Trim([title]) Update
  1. Click Add.

Out to AD - Shared GAL Group Contact

The purpose of this rule is to provision a new group contact object in the organization’s Office 365 GAL (resource forest).

  1. Select Outbound under direction, and then click Add New Rule.
  2. On the Description page, enter the following values:
Name Out to AD - Shared GAL Group Contact
Connected System Shared GAL (resource forest)
Connected System Object Type contact
Metaverse Object Type group
Link Type provision
Precedence 301 (or other unused value higher than Out to AD – Shared GAL User Contact rule)
  1. Click Next.
  2. On the Scoping Filter page, enter the following values for each domain for which the agency hosts mail:
Attribute Operator Value
customMailNickname ISNOTNULL
mail ISNOTNULL


  1. Click Next.
  2. On the Join Rules page, enter the following values:
Source Attribute Target Attribute Case Sensitive
mail mail
  1. Click Next.
  2. On the Transformations page, enter the following values:
Flow Type Target Attribute Source Apply Once Merge Type
Expression description IIF(IsNullOrEmpty([description]),NULL,Left(Trim(Item([description],1)),448)) Update
Expression displayName IIF(IsNullOrEmpty([displayName]),[cn],[displayName]) Update
Expression dn "CN=.group." & [customMailNickname] & ",OU=<dept>, OU=Shared GAL,DC=[resourceforest],DC=[tld]" Update
Expression extensionAttribute1 Trim([extensionAttribute1]) Update
Expression extensionAttribute2 Trim([extensionAttribute2]) Update
Expression extensionAttribute3 Trim([extensionAttribute3]) Update
Expression extensionAttribute4 Trim([extensionAttribute4]) Update
Expression extensionAttribute5 Trim([extensionAttribute5]) Update
Expression extensionAttribute6 Trim([extensionAttribute6]) Update
Expression extensionAttribute7 Trim([extensionAttribute7]) Update
Expression extensionAttribute8 Trim([extensionAttribute8]) Update
Expression extensionAttribute9 Trim([extensionAttribute9]) Update
Expression extensionAttribute10 Trim([extensionAttribute10]) Update
Expression extensionAttribute11 Trim([extensionAttribute11]) Update
Expression extensionAttribute12 Trim([extensionAttribute12]) Update
Expression extensionAttribute13 Trim([extensionAttribute13]) Update
Expression extensionAttribute14 Trim([extensionAttribute14]) Update
Expression extensionAttribute15 Trim([extensionAttribute15]) Update
Expression info Left(Trim([info]),448) Update
Expression mail Trim([mail]) Update
Expression mailNickname IIF(IsPresent([mailNickname]), [mailNickname], [cn]) Update
Constant msExchRecipientDisplayType 6 Update
Constant msExchRecipientTypeDetails 128 Update
Expression proxyAddresses RemoveDuplicates(Trim(ImportedValue("proxyAddresses"))) Update
Expression targetAddress "SMTP:" & [mail] Update
  1. Click Add.

Create Custom Sync Schedule

  1. Disable the default AAD Connect synchronization schedule.
    1. Launch an elevated PowerShell prompt.
    2. Run Import-Module ADSync
    3. Run Set-ADSyncScheduler -SyncCycleEnabled $False
  2. Create new scheduled task to call each of the required run profiles for AD, AAD, and Shared GAL connectors. The scheduled task should be configured to execute every 30 minutes using an account that is a member of both the AADSync Admins group and the local Administrators group.
  3. Replace the value after -ConnectorName with the connector name as it is displayed in the AAD Connect Synchronization Service Manager. It is cAsE sENsItIvE.
  4. The values for -RunProfileName must explicitly match one of the values specified in the run profile configuration for the connector. It is cAsE sENsItIvE.

Sample Scheduled Task Script

Import-Module ADSync

Invoke-ADSyncRunProfile -ConnectorName "activedirectory.com" -RunProfileName "Delta Import"

Invoke-ADSyncRunProfile -ConnectorName "tenant.onmicrosoft.com - AAD" -RunProfileName "Delta Import"

Invoke-ADSyncRunProfile -ConnectorName "Shared GAL" -RunProfileName "Delta Import"

Invoke-ADSyncRunProfile -ConnectorName "activedirectory.com" -RunProfileName "Delta Synchronization"

Invoke-ADSyncRunProfile -ConnectorName "tenant.onmicrosoft.com - AAD" -RunProfileName "Delta Synchronization"

Invoke-ADSyncRunProfile -ConnectorName "Shared GAL" -RunProfileName "Delta Synchronization"

Invoke-ADSyncRunProfile -ConnectorName "tenant.onmicrosoft.com - AAD" -RunProfileName "Export"

Invoke-ADSyncRunProfile -ConnectorName “activedirectory.com” -RunProfile “Export”

Invoke-ADSyncRunProfile -ConnectorName "Shared GAL" -RunProfileName "Export"

Run Custom Sync Schedule

If you ran the script at the top of this post, it would have created a custom sync schedule script for you.  You can execute that, or, if you created your own custom sync schedule script, run that instead. You should be able to click on the Shared GAL connector to see the progress.

Verify

Now that we have objects running through the synchronization rules, we should be able to check a few places to make sure that objects are flowing.

First, check the the Shared GAL containers in the resource forest for contact objects.

Next, after a round of sync cycles, you should be able to check your tenants for objects from the partner organizations forest as contact objects.

That's all she wrote! Be fruitful and multiply contacts!

Thanks for Playing!

$
0
0

I was so excited to see this notification in the TechNet Gallery today when I logged in:

Thanks to everyone for making this one of the most downloaded OneDrive tools in the Gallery! As a thanks for your support, feel free to download it as many times as you like! 🙂

Viewing all 36188 articles
Browse latest View live


<script src="https://jsc.adskeeper.com/r/s/rssing.com.1596347.js" async> </script>